[Ben Krasnow] Did It All For The (Perfect) Cookie

[Ben Krasnow] is on a mission. He’s looking for the perfect chocolate chip cookie. To aid him in this noble endeavor, he’s created the cookie perfection machine. From cleaning with plasma, to a DIY CT scanner, to ruby lasers, to LED contact lenses, [Ben] has to be one of the most prolific and versatile hackers out there today. What better way to relax after a hard day of hacking than to enjoy a glass of milk and a perfect chocolate chip cookie?

This is actually an update to the machine we first saw back in 2012. [Ben] has loaded his machine up with ingredients, and has everything under computer control. The machine will now dispense the exact amount of ingredients specified by the computer, measured by a scale. Everything happens one cookie at a time. The only downside is that the machine doesn’t have a mixer yet. [Ben] has to mix a single cookie’s worth of dough for every data point. His experiments have returned some surprising results. Too little flour actually results in a crisper cookie, as the wetter dough spreads out to a thinner layer. [Ben] also found that adding extra brown sugar also doesn’t result in a more chewy cookie. Even though he’s still in the early experimentation phases, [Ben] mentions that since it’s hard to make a bad chocolate cookie, even his failures taste pretty good.

Continue reading “[Ben Krasnow] Did It All For The (Perfect) Cookie” →

R/C Rock Crawler Prepped To Become Stair Climbing Robot

rc-robot-frame

[Starlino] is working on an autonomous mobile robot. Like many before him, he looked to the radio controlled car world for a base frame. He found a good candidate in a rock crawler model called “Mad Torque”. Crawlers have been around for years, but they’ve recently been getting more popular. As always, popularity leads to lower priced entry-level models, which puts this crawler at a reasonable price for a robot frame. As the name implies, rock crawlers are all about crawling. Relatively low speeds, locked differentials, four-wheel drive, and (optional) four-wheel steering.

Of course, [Starlino] had to test drive his frame out before tearing it down to install electronics. As long time R/C modelers ourselves, we can’t blame him. Testing uncovered one major problem. The Mad Torque wasn’t quite mad enough to climb the stairs in his house. The front tires would grab and pull over the first step, but the wheelbase wasn’t quite long enough for the rear wheels to grab hold.

[Starlino’s] solution was to extend the wheelbase. For most 4WD R/C cars or trucks this would be a major problem, as the motors are mounted amidships. An extended wheelbase would mean also extending the drive shafts or belts. This isn’t a problem with rock crawlers. Crawlers need to support huge amounts of suspension articulation. Rather than create complex drive linkages, the common design is to place an electric motor on each axle. This isn’t the greatest idea in terms of unsprung mass, but it does make for easy wheelbase changes. [Starlino] found that the design was so modular he could bolt a second chassis up to the original. The new rear chassis bolted to the front at the top shock mounts. An extra set of battery brackets formed a lower brace. The new extended truck was long enough to clear the steps, though it does still struggle a bit, as can be seen in the video. We think larger diameter tires might help a bit here. [Starlino’s] next step is to ditch the R/C unit and give this ‘bot a brain!

Continue reading “R/C Rock Crawler Prepped To Become Stair Climbing Robot” →

Saving $20,000 USD With A Single LED

carrier

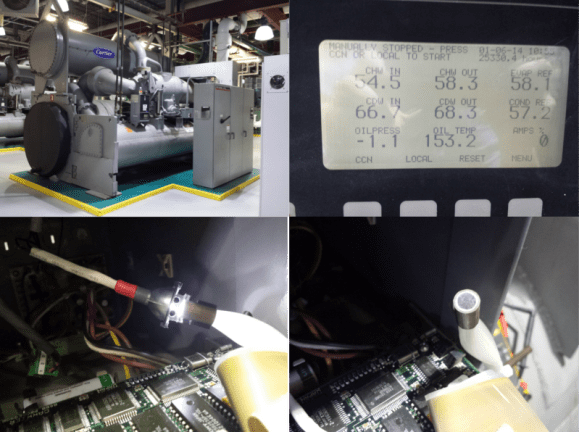
[N8Mcnasty] is a HVAC tech who works on some big machines. One of his charges is a Carrier 19EX Chiller, rated at 1350 tons of cooling. 1 ton of cooling = 12,000 BTU. This particular chiller contained an odd LCD screen. It used a fiber optic bundle and a halogen light for backlight illumination. The system worked fine for over a decade. Now though, the halogen bulb has begun melting the glue on the fiber bundle, causing a dim display. The display in question shows some very important operating parameters, such as oil temperature, current draw, and process temperatures. Since they couldn’t easily see the display, the machine’s operators weren’t running the machine, placing stress on the other chillers in the building’s physical plant. [N8Mcnasty] tried repairing the bundle, however the glue kept melting.

A replacement display was no longer available, meaning that the entire chiller control system would have to be upgraded to a newer system. The new control system uses different sensors than the old one. This is where things start getting expensive. Replacing the sensors would also require draining the 15-20 gallons of oil, 4500 lbs of R134a refrigerant, and bringing the whole system down for almost two weeks, a $20,000 job. Rather than go this route, [N8Mcnasty] found an alternative. LED’s have come a long way since 1996, when the chiller was built. He simply replaced the halogen bulb with an LED and appropriate resistor. [N8Mcnasty] was even able to reuse the halogen bulb bracket. A bit of heat shrink tube later, and the fix looks like it was a factory option. He’s documented his fix here on reddit.

Teaching Mario To Play Pong And Snake Through Innumerable Exploits

This is the coolest classic Super Nintendo Entertainment System (SNES) hack we’ve seen in quite a while. What you’re seeing is called “Super Mario World (Total Control)” by [Masterjun]. Our first recommendation is that you watch the video, then come back here for an explanation. Similar to what we saw for Pokemon Yellow on Gameboy, [Masterjun] created entire Pong and Snake clones within Super Mario World. He also created a menu and ending screen, along with his trademark smiley face graphic. Even more amazing is that this was unveiled live on a real SNES running an unmodified game cartridge. [Masterjun] actually used dual multitap cables, effectively connecting 8 controllers to a SNES. This gave him enough bandwidth to quickly download his new binary through the controller ports alone.

Welcome to the world of Tool Assisted Speedruns (TAS), where emulators and scripts are used to create high-speed runs through video games. The runners often work frame by frame, painstakingly inputting commands to create the perfect run. Game bugs and glitches are often exploited in these speed runs. In fact, in runs such as this one, the speed run takes second place to showing off the exploit. The output of speed run creation is a script file of control inputs which can be executed on an emulator to “re-run” the TAS at any time. This script can also be saved to a PC or Raspberry Pi and played back into the controller port of a real game system. A PIC based hardware translator is used to convert the data to NES or SNES controller format. As one might expect, these scripts run open loop. With no feedback from the running game, they can and do become desynchronized due to differences in console hardware, such as the tolerance of the oscillator crystal. When everything is in sync and does work , the results are awesome.

Continue reading “Teaching Mario To Play Pong And Snake Through Innumerable Exploits” →

Geek Group Fire Update

gg-gap2

The Geek Group is in the process of cleaning up after their fire. Their small capacitor/spark gap room sustained the most damage, with the interior nearly completely incinerated, along with some structural damage to the walls and roof.  The gap room was isolated from the much larger high voltage lab by red plastic welding curtain. The curtain was fire-retardant, but when it did finally burn, it was extremely sooty. With the curtain burning, soot covered the high voltage lab. The rest of the building escaped fire damage, but nearly all of it is covered in a fine layer of soot. The group has been and are attacking the soot problem head on, with shop-vacs, rags, and elbow grease. Several of their sponsors have also promised supplies to cover the remediation.

[Chris] and [Paul] have also been doing some sleuthing as to the root cause of the fire. While the cause will never be known beyond a shadow of a doubt, they have a pretty good idea of the chain of events. Gemini, the group’s 200 kVA Tesla coil had been run about 1/2 hour before smoke was detected. The fire was concentrated in Gemini’s spark gap room. Close inspection of the rotary spark gap showed that the stationary electrodes all seemed to have sustained a mechanical impact. It appears that either while the gap was running, or as it was spinning down, one of the flying electrodes moved enough to impact the stationary electrodes. These electrodes are 3/8″ and 1/2″ tungsten, and often glowed white-hot while the gap was in operation. One set screw held each electrode in to the 12″ rotor. The set screw of one flying electrode was found to be loose, and the electrode it retained probably impacted the stationary electrodes. It’s not a far leap to guess that hot metal from these impacts could have landed in the capacitor array, smoldered, and eventually caught aflame.

A single loose screw most likely caused the entire chain of events leading up to the fire. [Chris] and [Paul] had observed the spark gap throwing out hot bits of metal even during normal operation, and had planned an encapsulation box. However, disaster struck before it was built. This is not to say that The Geek Group operates an unsafe shop. The important thing here is that no one was hurt. Everyone in the building was evacuated quickly and safely.

A quick note about the comments – we know The Geek Group and [Chris] tend to be polarizing topics. However, we’d like to at try to keep the comments constructive.

Continue reading “Geek Group Fire Update” →

Retro Chaser Sign Lights Up Your Life

lighted-sign

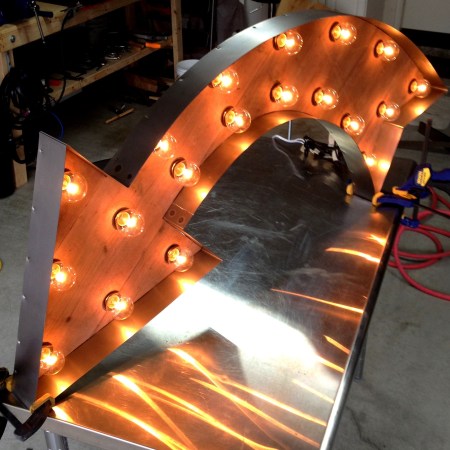
[Gnsart] builds props often used in the film industry. He’s created an amazing retro Vegas style light chaser sign. The sign was started as a job a few years ago. While [Gnsart] could handle the physical assembly, the cost of a mechanical light chaser pushed the project over budget. The sign project was cancelled back then, but he never forgot it.

Fast forward to a few weeks ago. [Gnsart] happened upon the Arduino community. He realized that with an Arduino Uno and a commonly available relay board, he could finally build the sign. He started with some leftover cedar fence pickets. The pickets were glued up and then cut into an arrow shape. The holes for the lights were then laid out and drilled with a paddle bit. [Gnsart] wanted the wood to look a bit aged, so he created an ebonizing stain. 0000 steel wool, submerged and allowed to rust in vinegar for a few days, created a liquid which was perfect for the task. The solution is brushed on and removed just like stain, resulting in an aged wood. We’ve seen this technique used before with tea, stain, and other materials to achieve the desired effect.

[Gnsart] then built his edging. 22 gauge steel sheet metal was bent to fit the outline in a bending brake. The steel sheet was stapled to the wood, then spot welded to create one continuous piece. Finally, the light sockets were installed and wired up to the Arduino. [Gnsart] first experimented with mechanical relays, and while we love the sound, we’re not sure how long they’d last. He wisely decided to go with solid state relays for the final implementation. The result speaks for itself. LEDs are great – but there is just something about the warm glow of low-wattage incandescent lights.

Continue reading “Retro Chaser Sign Lights Up Your Life” →

Build A Simple Audio Amp

[Ynze] has built an audio amplifier that looks and sounds great. His amplifier uses a National Instruments (now TI) LM3886 Overture series 68 Watt power amp. The LM3886 places [Ynze’s] amp squarely in the “Gainclone” catagory. Gainclone or Chipamp are terms long used by the DIY community to describe audio amps based upon highly integrated semiconductor amplifiers. The Gainclone name stems from the original Gaincard audio amplifier sold by 47 labs. The Gaincard used less than $100 USD of parts when it was introduced in 1999. It sounded good enough to command a $3300 USD price tag on the audiophile market. The low parts count and simple construction spawned the audio DIY community to build their own versions of the Gaincard. Hundreds of variants exist now, and wading through the different versions can be a bit of a daunting task. [Ynze] found a basic design that works, and built from there.

One of the interesting things about [Ynze’s] amp, as well as many of the Gainclones, is the fact that they use no circuit board. All wiring is done point to point. resistors are soldered directly to the pins of the amplifier chip. This can be some tricky soldering for beginners, but several PCB kits are available. [Ynze] built his amp in two cases. One case holds the power supply, and the other contains the amplifier itself. [Ynze] is using a large toroid transformer to drop his local 230V mains down to +25V and -25V. The amplifier circuit itself is simple – a few discrete components surround the LM3886 and it’s heat sink. [Ynze] also did some very nice carpentry work on his wood chassis. The resulting amp looks like it’s right out of the 1960’s – but hides 1990’s electronics inside.

Continue reading “Build A Simple Audio Amp” →