Horizontal Magnetic Levitation Experiments

Levitating chairs from the Jetsons still have a few years of becoming a commercial product though they are fun to think about. One such curious inventor, [Conor Patrick], took a deep dive into the world of maglev and came up with a plan to create a clock with levitating hands. He shares the first part of his journey to horizontal levitational control.

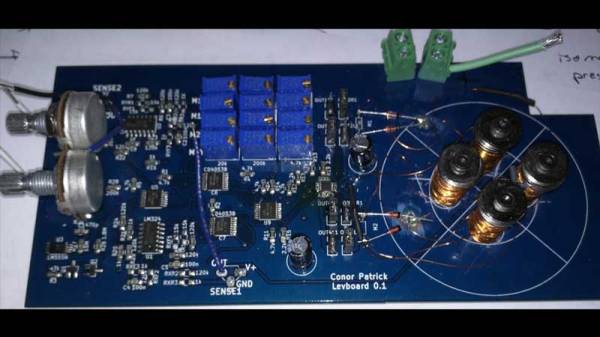
[Conor Patrick] bought an off-the-shelf levitation product that was capable of horizontal levitation. Upon dissecting it he found a large magnet, four electromagnet coils, and a hall effect sensor. These parts collectively form a closed-loop control to hold an object at a specific distance. He soon discovered that in fact, there were just two coils energized by H-bridges. His first attempt at replicating the circuit, he employed a breadboard which worked fine for a single axis model. Unfortunately, it did not work as expected with multiple coils.

After a few iteration and experiments with the PID control loop, he was able to remove unwanted sensor feedback as well as overshoot in control current. He finally moved to a Teensy with a digital PD loop. The system works, but only marginally. [Conor Patrick] is seeking help from the control loop experts out there and that is the essence of the OSHW world. The best part of this project is that it is a journey that involves solving one problem at a time. We hope to see some unique results in the future.

We have covered Acoustic Levitation in the past and the Levitating Clock on a similar beat. We’re certain a more refined approach is on the horizon since many of us are now looking at making one to experiment with on our workbench.

Analysing 3D Printer Songs For Hacks

3D printers have become indispensable in industry sectors such as biomedical and manufacturing, and are deployed as what is termed as a 3D print farm. They help reduce production costs as well as time-to-market. However, a hacker with access to these manufacturing banks can introduce defects such as microfractures and holes that are intended to compromise the quality of the printed component.

Researchers at the Rutgers University-New Brunswick and Georgia Institute of Technology have published a study on cyber physical attacks and their detection techniques. By monitoring the movement of the extruder using sensors, monitored sounds made by the printer via microphones and finally using structural imaging, they were able to audit the printing process.

A lot of studies have popped up in the last year or so including papers discussing remote data exfiltration on Makerbots that talk about the type of defects introduced. In a paper by [Belikovetsky, S. et al] titled ‘dr0wned‘, such an attack was documented which allowed a compromised 3D printed propeller to crash a UAV. In a follow-up paper, they demonstrated Digital Audio Signing to thwart Cyber-physical attacks. Check out the video below.

In this new study, the attack is identified by using not only the sound of the stepper motors but also the movement of the extruder. After the part has been manufactured, a CT scan ensures the integrity of the part thereby completing the audit.

Disconnected printers and private networks may be the way to go however automation requires connectivity and is the foundation for a lot of online 3D printing services. The universe of Skynet and Terminators may not be far-fetched either if you consider ambitious projects such as this 3D printed BLDC motor. For now, learn to listen to your 3D printer’s song. She may be telling you a story you should hear.

Thanks for the tip [Qes] Continue reading “Analysing 3D Printer Songs For Hacks”

Bringing A 50 Watt Laser Cutter To Life

This is the future and we live in a world of 3D printers and laser cutters. Have you ever pondered the question of getting yourself a laser cutter? Well [Erich Styger] just landed a 50 Watt Laser Cutter from AliExpress and has written up a detailed guide to his experience.

[Erich] had been wrestling with the idea of buying one for himself for some time but was put off by the difficulty in their operation. This changed when [Scorch] published the K40 Whisperer control software which allows for better control over these machines. With the hopes of an interesting weekend project, [Erich Styger] took a leap of faith and spent $900 on a model 4040 laser cutter.

In his blog, he goes through the steps in setting up the machine as well as calibrating the laser. With a plethora of images and a detailed look at each aspect of the leveling and testing, [Erich Styger] had a weekend well spent and a working K40 laser cutter for his workshop. But perhaps the more valuable part of the stories is the overall experience.

It was not a “what you see is what you get” order, but it did turn out to be a hacker’s “what you want is what you get” adventure. The machine didn’t look the same as the picture, it came with a burned CD-R with a box full of small parts (in addition to separate shipment of a USB thumb drive and silicone sealant), and there were some mechanical touchups plus a stuck switch requiring reassembly. He has done an excellent job of documenting from order to test-runs and the photos alone are worth taking a look.

Adding value to inexpensive laser cutters in an often-featured project around here. If you are looking for more details on these wonderful machines, be sure to check out more tales of Cheap Laser Cutters and our coverage of the K40 Whisperer software launch from last month.

Alexa In A Bunny Rabbit

The Raspberry Pi is the perfect candidate for Google’s AIY where you can talk to a cardboard box with some electronics in it. [BuddyCasino] took on the challenge of squeezing an Alexa Client in an ESP32 and to make things interesting, a bunny rabbit was chosen as the host of the virtual assistant.

A few months ago, we did a teardown of the Google AIY Kit where [BuddyCasino] commented that he managed to port the Echo Dot client into and ESP32. Sure enough, the video below shows a demonstration of the build in action. The project uses the MAX98357A which is the same I2S DAC used in the Google AIY Voice Hat. For the microphone, the device is again an I2S component however unlike the Google AIY kit which uses the SPH0645LM4H, [BuddyCasino] opted for the ICS-43434.

Two NeoPixels are employed as visual indicators for various purposes. This project is an excellent example of how simple and cheap modern-day designs have become. We are hoping to see the author add more features to the design and who knows maybe we will see a Google Assistant port on the ESP32 in the future. Check out the original teardown for more inspiration. Continue reading “Alexa In A Bunny Rabbit”

Know Thy LED

The invention of the LED is one of the most important discoveries of our times. They are everywhere, from our flashlights to household lighting and television sets. We don’t need to tell you that a project with more blinkies is better than a project with fewer blinkies. But an LED is not simply an LED; the sheer variety of LEDs is amazing, and so in this write-up, we’ll take a closer look at how to choose the right LED for your next masterpiece. Continue reading “Know Thy LED”

DIY Wind Turbine For Free Energy

With electricity cost going up and the likes of British Gas hiking up their price, everyone could use a bit of free energy. There are a number of ways to harvest renewable energy including solar and wind, however, the cost of setting up a wind farm can be quite high. [Mr Tickles] has uploaded a video where he has a cheaper DIY method of making a DIY wind turbine.

His project uses a commercial ceiling fan as a turbine for converting the wind energy into electricity. PVC pipes are used to mount the entire thing such that it becomes portable. A cardboard fin is used to make the propeller face the wind but there are plans to upgrade it in the future. [Mr Tickles] demonstrates his project by lighting up a lamp and then charging a cell phone.

For the price, this hack is pretty neat and can be extended to work with larger fans. For those who are looking at an even simpler version of this build, check out the most straightforward wind turbine.

Continue reading “DIY Wind Turbine For Free Energy”

3D Printed Curta Gets Upgrades

It is amazing how makers can accomplish so much when they put their mind to something. [Marcus Wu] has uploaded a mesmerizing video on how to build a 3D printed Curta Mechanical Calculator. After nine iterations of design, [Marcus] presents a polished design that not only works but looks like a master piece.

For the uninitiated, the Curta is a mechanical calculator designed around the time of World War II. It is still often seen used in time-speed-distance (TSD) rallies to aid in the computation of times to checkpoints, distances off-course and so on. Many of these rallies don’t allow electronic calculators, so the Curta is perfect.  The complex inner workings of the contraption were a key feature and point of interest among enthusiasts and the device itself is a highly popular collectible.

As for the 3D printed design, the attention to detail is impeccable. The current version has around 80 parts that need to 3D printed and a requires a few other screws and springs. Some parts like the reversing lever and selector knobs have been painted and digits added to complete the visual detail. The assembly took [Marcus Wu] around 40 minutes to complete and is one of the most satisfying builds we have ever seen.

What is even more amazing is that [Markus Wu], who is a software engineer by profession has shared all the files including the original design files free of cost on Thingiverse. A blog with written instructions is also available along with details of the iterations and original builds. We already did a post on a previous version so check it out for a little more background info.

Thanks for the tip [lonestar] Continue reading “3D Printed Curta Gets Upgrades”