Controlling A Rigol With Linux

The Rigol DS1052E is the de facto oscilloscope for any tinkerer’s bench. It’s cheap, it’s good enough, and it’s been around for a long time; with the new 1054 zed model out now, you might even be able to pick up a 1052E on the cheap.

[wd5gnr1] came up with a really interesting piece of software that allows a Linux system to control most of the functions on this popular scope. With just a USB cable, you can read and log all the measurement of the scope, save waveforms in CSV format, and send data to gnuplot and qtiplot.

Since the 1052E has been around for such a long time, there’s a bunch of software out there that takes advantage of the nifty USB port on the front of this scope. If you need a cheap spectrum analyzer, here ‘ya go, and tools for the .WFM files native to this scope even exist for Windows. [wd5gnr1] even says his tool can probably be ported to Windows, but ‘just use Linux.’

Automatic Print Ejector For All 3D Printers

Way back in 2010, Makerbot released the Automated Build Platform, a neat heated conveyor belt for the Cupcake or Thing-O-Matic that would spit parts out when a print was done. It’s a great invention if you need to produce 20 of something, and the perfect invention if you want to sit on a patent and not innovate anything ever.

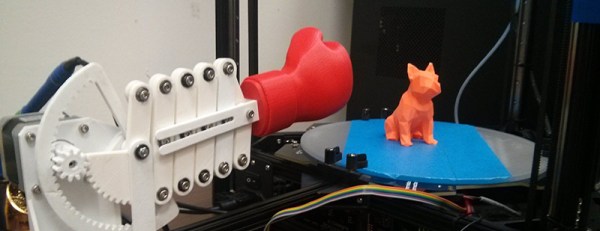
You won’t need to wait until the year 2030 to get a device that automatically removes a print from a print bed. The folks at MatterHackers came up with an Automatic Print Ejector that removes a print in the most [Rube Goldberg]-ish way possible: with a boxing glove.

The Automatic Print Ejector is pretty much taken straight out of a [Buster Keaton] movie. It’s a series of scissor mechanisms with a 3D printed boxing glove on the end, driven by a stepper motor. When the print finishes, the boxing glove simply punches a print off the bed of a printer.

Does it work? It does, brilliantly. Check out the video below.

Continue reading “Automatic Print Ejector For All 3D Printers”

Creating New Nintendo 3DS Hardware

For the last five years or so, Nintendo has been selling the 3DS, the latest in a long line of handheld consoles. Around two years ago, Nintendo announced the New Nintendo 3DS, with a faster processor and a few other refinements. The new 3DS comes in two sizes: normal and XL. You can buy the XL version anywhere in the world, but Nintendo fans in North America cannot buy the normal version.

[Stephen] didn’t want the jumbo-sized New 3DS XL, both because it’s too large for his pockets, and because there are no fancy cases for the XL. His solution? Creating a US non-XL 3DS with god-like soldering skills.

In manufacturing the XL and non-XL versions of the 3DS, Nintendo didn’t change much on the PCBs. Sure, the enclosure is different, but electronically there are really only two changes: the eMMC storage and the Nintendo processor. 3DS are region-locked, so simply swapping out the boards from a normal 3DS to an XL 3DS wouldn’t work; [Stephen] would also like to play US games on his modded console. That leaves only one option: desoldering two chips from a US XL and placing them on the board from a Japanese 3DS.

With a board preheater and heat gun, [Stephen] was able to desolder the eMMC chip off both boards. Of course this meant the BGA balls were completely destroyed in the process, which means reballing the package with solder bits only 0.3mm in diameter. With the US eMMC transplanted to the Japanese board, [Stephen] ended up with an error message that suggested the processor was reading the memory. Progress, at least.

[Stephen] then moved on to the processor. This was a nightmare of a 512 pin BGA package, with 512 pins that needed a tiny dot of solder placed on them. Here, sanity gave way and [Stephen] called up a local board and assembly house. They agreed to solder the chip onto the board and do an x-ray inspection. With the professional rework done, [Stephen] assembled his new US non-XL 3DS, and everything worked. It’s the only one in the world, and given the effort required to make these mods, we’re expecting it to remain the only one for a very long time.

Hackaday Prize Entry: Python Powered Scientific Instrumentation

A common theme in The Hackaday Prize and Hackaday.io in general is tools to make more tools. There are a lot of people out there trying to make the next Bus Pirate, and simply measuring things is the first step towards automating a house or creating the next great blinkey invention.

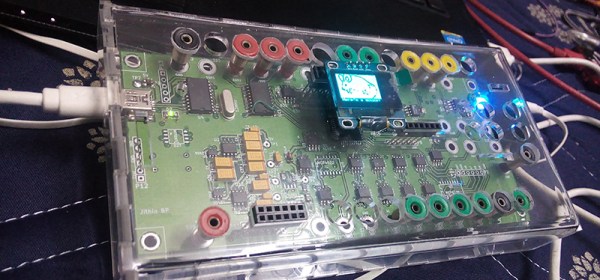
In what is probably the most capable measurement system in the running for this year’s Hackaday Prize, [jithin] is working on a Python Powered Scientific Instrumentation Tool. It’s a microcontroller-powered box containing just about every imaginable benchtop electronics tool, from constant current supplies, LCR meters, waveform generators, frequency counters, and a logic analyzer.

This project is stuffed to the gills with just about every electronic tool imaginable; there are programmable gain amplifiers, voltage references, DACs and constant current sources, opamps and comparators, all connected to a bunch of banana jacks. All of these components are tied up in a nifty Python framework, allowing a bunch of measurements to be taken by a single box.

If that’s not enough, [jithin] is also working on wireless extension nodes for this box to get data from multiple acquisition points where wires would be unfeasible. This feature uses a NRF24L01+ radio module; it’s more than enough bandwidth for a lot of sensors, and there’s enough space all the wireless sensors you would ever need.


The 2015 Hackaday Prize is sponsored by:

Astronaut Or Astronot: Random Stuff For Random People

In case you’re not aware, we’re running a contest to send one lucky hacker into space. We’re already giving out $50k in prizes to entice the most worthy hackers to submit their project to the The Hackaday Prize. Now it’s time for community voting, and that means trotting out Astronaut Or Astronot, where you decide the best project for this week’s theme. Projects voted into the top ten for each theme will receive Hackaday Prize t-shirts.

But there’s something in it for you too. Everyone who votes in the community voting rounds will be eligible to win a $1000 gift card to The Hackaday Store.

Most Likely To Be Widely Used

This week’s round of community voting will decide which project entered into the Hackaday Prize will be the most likely to be widely used. Everyone on Hackaday.io gets 50 votes to pick the project that will be the most popular, most game changing, and most useful. Head on over to the voting page and spend those votes wisely.

Submit Your Entry For Community Feedback

We’ll be doing a new round of community voting as often as every seven days. Everyone registered on Hackaday.io gets 50 votes for each round of voting, and every Friday (around 20:00 UTC), we’ll randomly select one person registered on Hackaday.io. If that person has voted, they get a $1000 gift card for The Hackaday Store. If they haven’t vote — nothing.

So what do you need to get in on this action? Vote, obviously. We’ll be tracking which projects make it to the top of the list, and next week we’ll do it all over again. Enter your project now because we’re giving away a trip to space and hundreds of other prizes.

Hackaday Prize Entry: Very, Very Small Logic

Despite the existence of FPGAs and CPLDs, there’s still a necessity for very small programmable logic devices. GALs, PALs, and other old tech just won’t cut it, though, and so we are left with a new generation of programmable devices that aren’t microcontrollers or CPUs. The GreenPAC from Silego fill this niche quite nicely, with the ability to implement counters, ADCs, logic glue, level shifting, and comparators in a single chip. For any homebrew electronics tinkerer, these devices have one very obvious problem: they’re really, really small. The smallest GreenPAC device has 12 pins stuffed into a 1.6 x 1.6mm QFN package. You’re not hand soldering this thing.

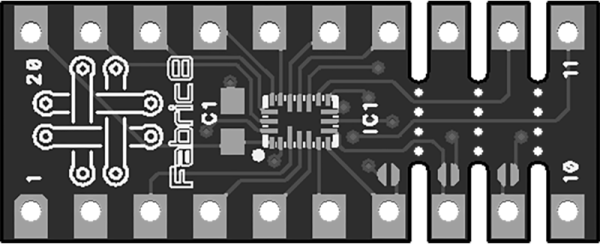
For [Nick Johnson]’s Hackaday Prize entry, he’s taking these small programmable logic chips and making it easy to create your own custom ICs. Basically, it’s a breakout board for GreenPAC devices that stuffs these tiny chips onto a much more reasonable DIP package.

Breakouts aren’t enough, and to program these small chips, [Nick] is also building a board based on an ARM microcontroller. With USB input, a way to generate the 7.5V used for programming, and a breadboard friendly format, this programmer will tell these tiny chips what to do.

Not many people are building stuff with PALs and GALs anymore, but there are still a lot of work that can be done with small programmable chips. There’s certainly a place for tiny programmable logic chips like this, and anything that gets them in to the hands of more people is okay in our book.


The 2015 Hackaday Prize is sponsored by:

Embedding PCBs In 3D Prints

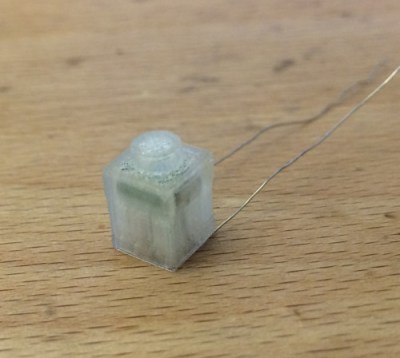
The folks over at Lunchbox Electronics are working on a very cool prototype: embedding LEDs inside standard 1×1 Lego bricks. Being a prototype, they needed a cheap way to produce Lego bricks stuffed with electronics. It turns out a normal 3D printer has okay-enough resolution, but how to put the electronics in the bricks? Gcode wizardry, of course.

3d-printed-LEGO-w-pcb-thumbThe electronics being stuffed into the bricks isn’t much – just a small PCB with an LED. It does, however, need to get inside the brick. This requires stopping the 3D printer at the right layer, moving the print head out of the way, inserting the PCB, and moving the head back to where it stopped.


Gcode to the rescue. By inserting a few lines into the Gcode of the print, the print can be paused, the print head raised and returned, and the print continued.

If you want to check out what these light up Lego look like, There’s a Kickstarter happening now. It’s exactly what the 80s space sets needed, only thirty years late.