THP Entry: Making Amateur Astronomy Easy

explrad With the advent of electronics in everything, amateur astronomy has never been easier. Telescope mounts that point in the direction of any astronomical object automatically have been around for decades, and the Telrad – a device that paints 0.5, 2, and 4 degree diameter circles in your finder scope’s field of view are available if you’re just too cool for letting a robot do your job. [Christoph]’s explorad takes the concept of a Telrad and adds a somewhat more electronic twist: it still displays the field of view circles, but adds highlighting of interesting astronomical objects from a custom telescope mount, a huge database, and a few sensors.

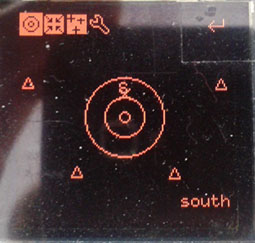
By far the biggest challenge to any homebrew finder of astronomical objects is figuring out where the observer is. Not only does [Cristoph] need to take into account the location on Earth (GPS helps with that), but also where North is (electronic compass), where the telescope is pointing (optical encoders on a two axis mount), but also the universal time and current sidereal time. Living on a rotating planet that orbits a sun makes for a lot of code.

The current progress on the star finder to beat all star finders is a bit of code that draws the ‘telrad circles’ and displays placeholders for each patch of sky with a small triangle. Tilting the device or turning the azimuth pot moves these triangles and loads new ones on the fly. Now the name of the game is a sky object database for all the astronomical objects [Cristoph] wants to view.

Rooting The Nest Thermostat

nest-300x293 
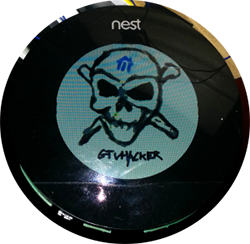
A few months ago, Google bought a $3.2 billion dollar thermostat in the hopes it would pave the way for smart devices in every home. The Nest thermostat itself is actually pretty cool – it’s running Linux with a reasonably capable CPU, and adds WiFi to the mix for some potentially cool applications. It can also be rooted in under a minute,

As [cj] explains, the CPU inside the Nest has a Device Firmware Update mode that’s normally used for testing inside the Nest factory. This DFU mode can also be used to modify the device without any restrictions at all.

With a simple shell script, [cj] plugs the Nest into his laptop’s USB port, puts the device into DFU mode, and uploads a two-stage booloader to enable complete control over the Linux-powered thermostat.

As a bonus, the shell script also installs an SSH server and enables a reverse SSH connection to get around most firewalls. This allows anyone to remotely control the Nest thermostat, a wonderful addition to the Nest that doesn’t rely on iPhone apps or a cloud service to remotely control your Internet enabled thermostat.

Video of the rooting process below.

Continue reading “Rooting The Nest Thermostat”

The State-Based Nixie Multimeter

state

Instead of numbers the IN-15A Nixie tube has symbols, specifically n, μ, P, -, +, m, M, k, Π, and %. The related IN-15B Nixie has letters: A, F, H, Hz, Ω, S, V, and W. These should look familiar to you. [kittan] decided it would be really cool to have a Nixie-equipped multimeter, and since he’s going retro fabulous anyway, he might as well make his multimeter controllerless, with discrete logic and comparator ICs. It’s a state-based Nixie multimeter, and it’s going to be freakin’ awesome.

The basic plan of the multimeter is a precision 1V voltage reference, a bunch of opamps, and a ton of resistors to form a ladder All the opamps in each decade are XOR’d together, so when one of the ten comparators for each decade stage is tripped, only one number will display on the (numeric) Nixie tube.

With a reasonable plan for measuring a voltage, it’s not too hard to expand the design for other measurements. V=IR, so with a constant current, V=R. The same equation can be used with a fixed resistance to determine current. Capacitance can be measured by comparing the change in charge of a known capacitor. Inductance, conductance, power, and frequency are all planned for this monster of a multimeter.

The initial PCB design is completed (and shown above) and it’s theoretically possible to do on a single-sided board with a minimum of jumpers. An amazing project, and even though you could probably find a similar, ancient meter in a trash heap or on a collector’s shelf, this is by far one of the best Nixie projects we’ve ever seen.


Programming Pi Games With Bare Metal Assembly

pifoxWhile the most common use for a Raspberry Pi is probably a media center PC or retro game emulator, the Pi was designed as an educational computer meant to be an easy-to-use system in the hands of millions of students. Team 28 at Imperial College London certainly living up to the Raspberry Pi Foundation’s expectations with their bare metal assembly clone of Star Fox, aptly titled PiFox.

This isn’t the first time a college course has taken up the task of developing software for the Pi without an operating system; a few years ago, Cambridge University started that off with a series of bare metal tutorials for the Pi that included drawing graphics on the screen and playing around with USB keyboards. PiFox greatly expands on what those early tutorials could do, reading an NES joystick from the GPIO pins, sound with DMA, and rendering 3D objects.

If you’d like to build PiFox for yourself, or better yet, expand on the existing build, all the code is up on Github. There’s also a Raspberry Pi emulator for Linux, just in case you have an ARM assembly bug you just can’t scratch with a Raspberry Pi.

Continue reading “Programming Pi Games With Bare Metal Assembly”

THP Entry: A Wireless Bootloaders And Linux Build Systems

radioWith The Hackaday Prize, you’re not just limited to one entry. Of course it would be better to devote your time and efforts to only one project if you’re competing for a trip to space, but if you’re [Necromant], you might be working on two highly related project that are both good enough for The Hackaday Prize

[Necromant]’s first project is rf24boot, an over-the-air bootloader using the very cheap and very popular NRF24L01 2.4GHz wireless module. There have been many, many projects that add wireless bootloading to microcontrollers using XBees and the NRF24, but [Necromant] is doing something different with this project: he’s building in support for a wide variety of microcontrollers, that include the STM32, MSP430, PIC32, 8051, and of course AVR chips for that ever so popular Arduino compatibility.

The support of multiple microcontroller platforms is a result of [Necromant]’s other entry to The Hackaday Prize, Antares, the Linux kernel-like build system for microcontrollers. The idea behind Antares is to separate the writing of code from microcontrollers away from compiling and burning. Think of it as a giant makefile on steroids that works with everything, that also includes a few libraries for common projects.

Supported platforms for Antares include the popular aforementioned targets, and allow you to use any IDE you could possibly desire. emacs? Sure. Eclipse? Right on. Arduino? You’re a masochist. For a really great overview of Antares you can check out the Readme, or the post we did a year or so ago.

It’s all very cool stuff, and very easy to see the potential of what [Necromant]’s working on. Combining the two together, it’s almost a complete system for developing that Internet of Things we’ve been hearing about – uploading code to simple AVRs for simple sensors, and deploying significantly more complex code for your ARM-powered dishwasher or microwave.

An Introduction To The BeagleBone PRU

BBB 
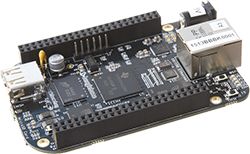
While the BeagleBone is usually compared to the Raspberry Pi, there are a few features that make the ‘Bone a vastly more capable single board computer. There is a small difference in the capabilities of the processor, but the real power of the BeagleBone comes from the PRUs available: two small cores that give the BeagleBone the hardware equivalent of bitbanging pins. [Texane] has put up two great tutorials for using the PRU in the BeagleBone that should be required reading for every BeagleBone owner.

The first tutorial goes over the capabilities of the PRUs in the BeagleBone and setting up the software environment to develop your own hardware interfaces with the PRU. While writing code for the PRU has usually involved the Beagleboard packages, TI has recently released a version of Code Composer Studio that gives the option to compile C code for the PRU.

[Texane] used this C compiler to rehash the earlier, assembly only PRU program, making development significantly easier. There’s still a bit of inline assembly, and the inline assembly support isn’t as advanced as in GCC, but it’s still much easier than the assembly only variant.

While [Texane] is using the PRU in his BeagleBone to develop something at a synchrotron facility, three are a few things where really fast hardware bitbanging comes in handy: it can be used to make a video card for a vintage mac, or any sort of VGA video card, really. Very cool stuff, especially now that you can write something in C.

Hackaday Links: June 22, 2014

hackaday-links-chain

Solar Freakin’ Roadways! There’s been a lot of talk about how solar freakin’ roadways are an ill-conceived idea, and now [Dave Jones] is weighing in on the subject. Highlights include a quarter of the solar power generated being used to light the LEDs that form the lane markers, something that could easily be accomplished with paint. Oh, the solar freakin’ roadway campaign is over. Just over $2.2 million, if you’re wondering.

The Game Boy Micro is the best way to play GBA games, but finding one for a reasonable price just isn’t going to happen. [John Sparks] is making his own Macro Micros by casemodding a DS Lite.On the subject of Game Boy mods, [koji-Kendo] is improving the common frontlight Game Boy Color mod with optically clear UV curing glue. Without glue on the left, with glue on the right.

Need to label a panel with the function of all your switches and dials? Yeah, you could drop the panel into an engraver, till the engraved letters with enamel, or do some electroetching. You can also buy a pack or rub-on letters, available in any Michaels, Hobby Lobby, or the like.

MSI Afterburner is a utility that allows you to play with settings and monitor performance on MSI graphics cards. [Stephen] made a little device for MSI Afterburner that displays the current FPS and GPU load on an external LCD. Handy, seeing as how FPS and GPU load is the one thing you’ll want to know when you’re gaming fullscreen.

Realtime cloudmaps of the Earth. Using reasonably recent images take from five geostationary satellites, you can stitch together a real-time cloud map of the entire Earth. Here’s the software to do it. Now all you need is a projector and pair of frosted acrylic hemispheres, and you have a real-time globe.

Say you have a Kickstarter in the works, and you’re trying to figure out all the ways to get some buzz from the Internet public.. Here’s how you get it to the front page of hackaday.io using a bit of Perl. “So far, this page has been updated 02578 times.”