2026 Frikkin Lasers Challenge: Super-Simple Laser Precision For Your Stargazing

Perhaps the hardest thing for amateur astronomers just starting out is finding the things you want to look at. Prolific maker [mircemk] has submitted a quick-and-easy star-hopper device that will help guide your binoculars with laser-like precision using things you likely already have on hand: a smartphone, a mounting plate, and a green laser pointer.

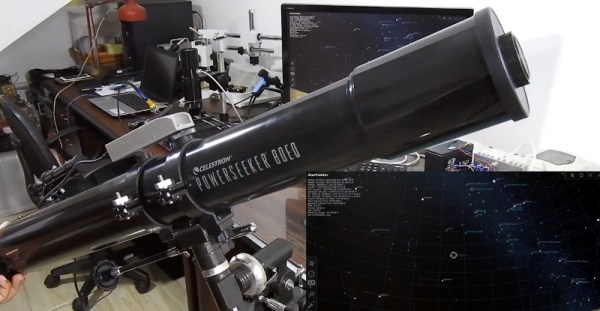
The smartphone is running AstroHopper, an astronomy app that uses GPS and inertial navigation to know exactly where your phone is pointing, and offer an image of the sky on the screen. There are many others of this ilk, and there’s no reason [mircemk]’s trick won’t work with your favorite. The trick is decidedly simple: the smartphone is mounted to a flat plate, in line with a green laser pointer. Careful placement aligns the axis of the phone and the laser, and the mounting plate is set up to fit a tripod.

Using it is simple: with a labelled view of the sky displayed on the screen, one lines up the phone/laser combo with the desired object, and activates the laser pointer. [micremk] has wired in an on-off switch for this purpose and a large external battery, rather than relying on the stock pushbutton. Since the axis of the laser pointer and the phone are aligned, a green line launches out into the heavens for you to follow with your binoculars. Once you locate that green dot, you can turn off the laser. Yes, the computer has helped you find the object, but your muscles are doing the slewing and that will make it much more likely you start to learn the sky yourself rather than relying on electronic magic.

This is probably the simplest hack we’ve yet seen in the Frikkin’ Lasers Challenge, and yet also one of the most practical. If you enjoy playing with radiation that’s spontaneously emitted, there’s still time to get your entry together — the contest runs until July 23, 2026.

Continue reading “2026 Frikkin Lasers Challenge: Super-Simple Laser Precision For Your Stargazing”

Bortle-1 Skies in the heart of darkest Texas.

“Telescope Rancher” Is The Coolest Job You Didn’t Know Existed

McCulloch County, Texas, is smack dab in the middle of a very large state. We wouldn’t exactly call it the middle of nowhere, but given there’s so little light pollution it scores a 1 on the Bortle Scale, it’s not exactly the Big Apple, either. [Bray Falls] lives there, and has a job description we have become immediately jealous of: [Bray] is a telescope rancher.

Like the song goes, the stars really are big and bright at night deep in the heart of Texas. Not only is his ranch free of the light pollution that plagues more urban locations, central Texas is pretty dry, with only a few days of rain in any given month. That’s not great for agriculture, but it’s great for astronomy since it means the skies are most often cloud-free. Combine that with access to high-speed internet, and you have the makings of a telescope ranch.

Telescopes being let out of the barns for the night.
Image: Starfront Observatory

It’s brilliant in its simplicity: along with his own ‘scopes, [Bray]’s Starscope Observatory hosts hundreds of other people’s CCD equipped goto telescopes, all set up to be remote controlled over the information superhighway. On clear nights– which again, is most of them–the roofs roll off the telescope barns and observations can begin. Pad rental comes with tech support, too, so you don’t have to fly out to heart of darkest Texas if your mount gets jammed or you lose signal for any reason. That said, you should be sure to read the fine print before signing up, because said tech support probably doesn’t apply if you 3D printed your own ‘scope, or built your own mount.

That said, having gone to the effort of doing all that, would you really send your baby away to a farm upstate? Best reserve that for the old Celestron collecting dust in the corner. If you think we should be leaving these observations to the pros, be aware [Bray] has apparently discovered a very oddly-placed supernova remnant, 40 degrees off the galactic plane in Virgo. So this isn’t just a rewarding hobby; it’s still science, too.

Telescope Rides On 3D Printed Equatorial Table

In the realm of amateur astronomy, enthusiasts find themselves navigating a cosmos in perpetual motion. Planets revolve around stars, which, in turn, orbit within galaxies. But the axial rotation of the Earth and the fact that its axis is tilted is the thing that tends to get in the way of viewing celestial bodies for any appreciable amount of time.

Amateur astronomy is filled with solutions to problems like these that don’t cost an arm and a leg, though, like this 3D printed equatorial table built by [aeropic]. An equatorial table is a device used to compensate for the Earth’s rotation, enabling telescopes to track celestial objects accurately. It aligns with the Earth’s axis, allowing the telescope to follow the apparent motion of stars and planets across the night sky.

Equatorial tables are specific to a location on the Earth, though, so [aeropic] designed this one to be usable for anyone between around 30° and 50° latitude. An OpenSCAD script generates the parts that are latitude-specific, which can then be 3D printed.

From there, the table is assembled, mounted on ball bearings, and powered by a small stepper motor controlled by an ESP32. The microcontroller allows a telescope, in this case a Newtonian SkyWatcher telescope, to track objects in the sky over long periods of time without any expensive commercially-available mounting systems.

Equatorial tables like these are indispensable for a number of reasons, such as long-exposure astrophotography, time lapse imaging, gathering a large amount of observational detail for scientific purposes, or simply as an educational tool to allow more viewing of objects in the sky and less fussing with the telescope. They’re also comparatively low-cost which is a major key in a hobby whose costs can get high quickly, but not even the telescope needs to be that expensive. A Dobsonian telescope can be put together fairly quickly sometimes using off-the-shelf parts from IKEA.

A black motion system with two stepper motors. A green circuit board is fixed in a rotating cage in the center, and the entire assembly is on a white base atop a green cutting mat. Wires wind through the assembly.

Pi-lomar Puts An Observatory In Your Hands

Humans have loved looking up at the night sky for time immemorial, and that hasn’t stopped today. [MattHh] has taken this love to the next level with the Pi-lomar Miniature Observatory.

Built with a Raspberry Pi 4, a RPi Hi Quality camera, and a Pimoroni Tiny2040, this tiny observatory does a solid job of letting you observe the night sky from the comfort of your sofa (some assembly required). The current version of Pi-lomar uses a 16mm ‘telephoto’ lens and the built-in camera libraries from Raspbian Buster. This gives a field of view of approximately 21 degrees of the sky.

While small for an observatory, there are still 4 spools of 3D printing filament in the five different assemblies: the Foundation, the Platform, the Tower, the Gearboxes and the Dome. Two NEMA 17 motors are directed by the Tiny2040 to keep the motion smoother than if the RPi 4 was running them directly. The observatory isn’t waterproof, so if you make your own, don’t leave it out in the rain.

If you’re curious how we might combat the growing spectre of light pollution to better our nighttime observations, check out how blinking can help. And if you want to build a (much) larger telescope, how about using the Sun as a gravitational lens?

Continue reading “Pi-lomar Puts An Observatory In Your Hands”

Amateur Estimates Of Venusian Day Using Arecibo Data

[Nathaniel Fairfield] aka [thandal] was curious about the actual rotation and axis tilt of Venus. He decided to spin up at GitHub Python repository to study the issue further, as one does. The scientific literature shows a wide range of estimates and variations for the planet’s rotation and axis tilt. He wondered if the real answer might be found in a publicly available set of uncalibrated delay-doppler images of Venus. These data were collected by the former Arecibo Observatory in Puerto Rico from 1988 through 2020.  [Thanda] observed that the planet’s rotation appears to be speeding up slightly, and furthermore, his estimates of the orbital axis were within 0.01 degrees of the International Astronomical Union’s (IAU) values. [Note: Venus is a bit confusing — one planetary rotation, 243 Earth days, is longer than its year, 225 Earth days].

Estimations of Venusian Orbital Period, [Thandal] Estimates in Green
Aligning and calibrating the raw data was no trivial task. You have to consider the radar’s (Earth’s) position and time, as well as Venus. Complicating the math even more, some times the radar was operated in a bistatic mode, with the Green Bank Telescope in West Virginia being the receiver.

There’s a lot of interesting signal processing going on here. The Doppler-delay data consists of images that are 8091×8092 array of complex values, has to be mapped onto the Venus geoid.  Then by using various surface features, one can compare their positions vs time and obtain an estimate of rotational speed and tilt. If these kinds of calculations interest you, be sure to check out [Thandal]’s summary report, and also take note of the poliastro Python astrodynamics library. Why is this important? One reason to better plan future missions.

StarPointer Keeps Scope On Target With Stellarium

On astronomical telescopes of even middling power, a small “finderscope” is often mounted in parallel to the main optics to assist in getting the larger instrument on target. The low magnification of the finderscope offers a far wider field of view than the primary telescope, which makes it much easier to find small objects in the sky. Even if your target is too small or faint to see in the finderscope, just being able to get your primary telescope pointed at the right celestial neighborhood is a huge help.

But [Dilshan Jayakody] still thought he could improve on things a bit. Instead of a small optical scope, his StarPointer is an electronic device that can determine the orientation of the telescope it’s mounted to. As the ADXL345 accelerometer and HMC5883L magnetometer inside the STM32F103C8 powered gadget detect motion, the angle data is sent to Stellarium — an open source planetarium program. Combined with a known latitude and longitude, this allows the software to show where the telescope is currently pointed in the night sky.

As demonstrated in the video after the break, this provides real-time feedback which is easy to understand even for the absolute beginner: all you need to do is slew the scope around until the object you want to look at it under the crosshairs. While we wouldn’t recommend looking at a bright computer screen right before trying to pick out dim objects in your telescope’s eyepiece, we can certainly see the appeal of this “virtual” finderscope.

Then again…who said this technique had to be limited to optical observations? As the StarPointer is an open hardware project, you could always integrate the tech into that DIY radio telescope you’ve always dreamed of building in the backyard.

Continue reading “StarPointer Keeps Scope On Target With Stellarium

A Milky Way Photo Twelve Years In The Making

Starting projects is easy. It’s the finishing part that many of us have trouble with. We can hardly imagine completing a project after more than a decade, but seeing the breathtaking results of [J-P Metsavainio]’s gigapixel composite image of our galaxy might just make us reconsider. The photograph, which we highly suggest you go check out in its full glory, has been in progress since 2009, features 1250 total hours of exposure time, and spans across 125 degrees of sky. It is simply spectacular.

Of course, it wasn’t an absolutely continuous effort to make this one image over those twelve years. Part of the reason for the extended time span is many frames of the mosaic were shot, processed, and released as their own individual pieces; each of the many astronomical features impressive in its own right. But, over the years, he’s filled in the gaps between and has been able to release a more and more complete picture of our galactic home.

A project this long, somewhat predictably, eventually outlives the technology used to create it. Up until 2014, [Metsavainio]’s setup included a Meade 12-inch telescope and some modified Canon optics. Since then, he’s used a dedicated equatorial mount, astrocamera, and a Tokina lens (again, modified) with an 11-inch Celestron for longer focal lengths. He processes the frames in Photoshop, accounting for small exposure and color differences and aligning the images based on background stars. He’s had plenty of time to get his process down, though, so the necessary tweaking is relatively minor.

Amateur astronomy is an awesome hobby, and the barrier to entry is lower than it might seem. You can get started on a budget with the ubiquitous Raspberry Pi or with the slightly less practical Game Boy Camera. And if you’re just interested in viewing the cosmos, there are options for building your own telescope as well.

[via PetaPixel]