Electric Chainsaw Teardown

An electric chainsaw with its case removed

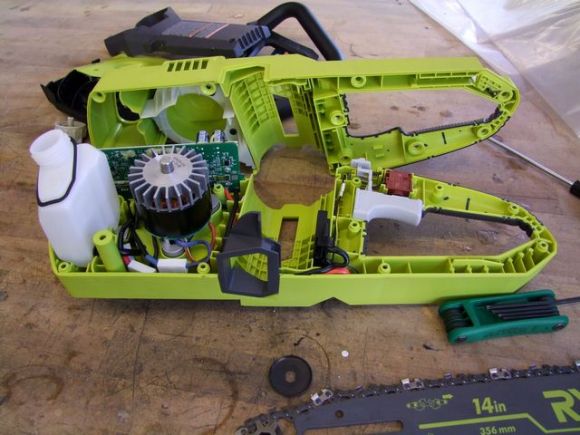
For his Beyond Unboxing series, [Charles] tore apart a Ryobi cordless chainsaw to get a better look at how this battery powered tool works.

Inside he found a three-phase motor and controller. This motor looks like it could be useful in other projects since it has a standard shaft. The battery pack was popped open to reveal a set of LG Chem 21865 cells, and some management hardware.

With all the parts liberated from the original enclosure, [Charles] set up the motor, controller, and battery on the bench. With a scope connected, some characterization of the motor could be done. A load was applied by grabbing the spinning shaft with welding gloves. [Charles] admits that this isn’t the safest way to test a motor.

While it is a very fast motor, the cut-in speed was found to be rather low. That means it can’t start a vehicle from a stop, but could be useful on e-bikes or scooters which are push started.

This chainsaw a $200 motor, controller, and battery set that could be the basis of a DIY scooter. It sounds great too, as the video after the break demonstrates.

[Thanks to Dane for the tip!]

Continue reading “Electric Chainsaw Teardown”

Rooting The Nest Thermostat

nest-300x293 A few months ago, Google bought a $3.2 billion dollar thermostat in the hopes it would pave the way for smart devices in every home. The Nest thermostat itself is actually pretty cool – it’s running Linux with a reasonably capable CPU, and adds WiFi to the mix for some potentially cool applications. It can also be rooted in under a minute,

As [cj] explains, the CPU inside the Nest has a Device Firmware Update mode that’s normally used for testing inside the Nest factory. This DFU mode can also be used to modify the device without any restrictions at all.

With a simple shell script, [cj] plugs the Nest into his laptop’s USB port, puts the device into DFU mode, and uploads a two-stage booloader to enable complete control over the Linux-powered thermostat.

As a bonus, the shell script also installs an SSH server and enables a reverse SSH connection to get around most firewalls. This allows anyone to remotely control the Nest thermostat, a wonderful addition to the Nest that doesn’t rely on iPhone apps or a cloud service to remotely control your Internet enabled thermostat.

Video of the rooting process below.

Continue reading “Rooting The Nest Thermostat”

Drones And Robots Come Out To Play At Sparkfun’s 6th Annual Autonomous Vehicle Competition

Sparkfun AVC 2014

Sparkfun Electronics held their 6th annual Autonomous Vehicle Competition last weekend, and this year was bigger than ever before. The action was at Boulder Reservoir in Colorado, but anyone could follow along (with a few technical difficulties) on the YouTube LiveStream. (Part 1), and (Part 2).

The story of the day was Team SHARC’s Troubled Child, which won the ground vehicle doping class. Rather than mess around with miniature cars, Team SHARC built their ‘bot out of a freaking Jeep, a 1986 Jeep Grand Wagoneer to be exact. Troubled Child had no problem getting around the course. One could say it carried the entire team. Literally – the rest of Team SHARC’s robots are riding along on top of Troubled Child in the picture up there.

There was also plenty of action in the aerial competition. Sir Crash-a-Lot was the first drone to find a watery doom at Boulder Reservoir. The last we saw of it on the stream, the team was looking for some divers.

Aircraft can not be hand launched at the AVC. Not a problem for rotary-winged vehicles, but this rule has led to some interesting solutions for fixed wing aircraft. The disguised “Team Falcon” showed up with an incredible compressed air launcher, which used a gallon water jug to fire their delta-winged plane to a clean run.  Team Karma550 wasn’t quite as lucky, with their helicopter crashing hard, and throwing up quite a bit of smoke.

We’re still waiting for more detailed results, but if you want the full scores, they are available on Sparkfun’s AVC scoreboard page.

Programmable Logic I – PLA/PAL


C64-B

Yeah I am still a little pissed that the competition is still around and we aren’t, and by “we” I mean Commodore Business Machines (CBM). It was Commodore that had the most popular home computer ever in the C64 (27 Million) and it was a team of MOS engineers after all, that had the idea to make a “micro” processor out of a 12 square inch PCB.

MOS Technologies logo and address
MOS Technology in King of Prussia/Norristown

Of course they did work at Motorola at the time and “Mot” did not want anything to do with a reduction of the profit margin on the pie-plate size processor. Of course MOS got sued by Motorola but that was an average Tuesday at MOS/CBM. I absolutely credit CBM with buying the MOS Technologies chip foundry, as together we could make our own processors, graphics chips, sound chips, memory controllers, and programmable logic.

With this arsenal at our call we didn’t have to make compromises the way other companies did such as conforming to the bus spec of an industrial standard 6845 or having to add extra logic when a custom extra pin would work. We could also make sprites.

6502 Design Team
6502 Design Team (EE Times 1975, archive.archaeology.org)

The compromise we did have to make when designing was cost, and I mean the kind of cost reduction where finding a way to save a dollar ($1USD) saved millions in the production run. I knocked $.90USD out of a transformer one day and I couldn’t focus the rest of the day due to elation.

Cost reduction is a harsh mistress however as you can’t just do it a little some of the time or only when you want to. The mental exercise of multiplying anything times a million was always there, it made it hard to buy lunch — I’d be blocking the lunch line while figuring the cost of a million tuna sandwiches FOB Tokyo Continue reading “Programmable Logic I – PLA/PAL”

OLED display, blue LED and Smartcard

Developed On Hackaday: Current Status And Selected Beta Testers

Mooltipass final prototype

The Hackaday community is currently working on an offline password keeper, aka Mooltipass. The concept behind this product is to minimize the number of ways your passwords can be compromised, while generating and storing long and complex random passwords for the different websites you use daily. The Mooltipass is a standalone device connected through USB and is compatible with all major operating systems on PCs, Macs and Smartphones. More details on the encryption and technical details can be found on our github repository readme or by having look at all the articles we previously published on Hackaday.

As you can see from our commit activity these last weeks have been extremely busy for us. We finally have a firmware that uses all the different libraries that our contributors made but also a chrome plugin and extension that can communicate with our Mooltipass. We’re very happy to say that our system is completely driverless. A video will be published on Hackaday next week showing our current prototype in action as some of the contributors are already using it to store their credentials.

We selected 20 beta testers that will be in charge of providing us with valuable feedback during the final stages of firmware / plugin development. Selection was made based on how many passwords they currently have, which OS they were using but also if they were willing to contribute to the prototype production cost. We expect them to receive their prototypes in less than 2 months as the production funds were wired today.

We think we’ve come a long way since the project was announced last december on Hackaday, thanks to you dear readers. You provided us with valuable feedback and in some cases important github push requests. You’ve been there to make sure that we were designing something that could please most of the (non) tech-savy people out there and we thank you for it. So stay tuned as in a week we will be publishing a video of our first prototype in action!

Want to chat with us? You can join the official Mooltipass Google Group or follow us on Hackaday Projects.

Judge Spotlight: Limor “Ladyada” Fried

judge-spotlight-ladyada

We sent off a list of questions, just like every week, and [Ladyada] offered to do a video response. How awesome is that? Not only did she answer our questions, but she talked at length for several of them. We’re biased, but her explanation about Adafruit’s manufacturing processes and options for home hackers to get boards spun was a real treat.

Perhaps we should step back for a minute though. In case you don’t know [Limor Fried], aka [Ladyada], is a judge for The Hackaday Prize which will award a trip into space and hundreds of other prizes for hackers who build connected devices that use Open Design (Open Hardware and Open Source Software). She’s the founder of Adafruit Industries, an MIT double-grad, and all around an awesome engineer!

Check out the video after the break. We’ve included a list of the questions and the timestamps at which they are answered.

Continue reading “Judge Spotlight: Limor “Ladyada” Fried”

The 200 LED Ring Clock

There are LED clocks, and then there are LED clocks that can blind you from 30 paces. [Stiggalicious’s] LED ring clock is of the latter variety. 200 WS2812B/Neopixel RGB LEDs drive the ring clock to pupil searing levels. The clock runs on ATMega1284P, with timekeeping handled by an NXP PCF8563 real-time clock chip. Code is written in Arduino’s wiring language using Adafruit’s Neopixel library.

Building the clock with a single Printed Circuit Board (PCB) would be both expensive and wasteful. [Stiggalicious] cleverly designed his clock to be built with 8 copies of the same PCB. Each board makes up a 45° pie slice of the ring. All 8 PCBs have footprints for the CPU, clock chip, and other various discrete parts, but only the “master” section has these parts populated. 7 “slave” sections simply pass clock, data, power and ground through each LED. He used Seeedstudio’s board service to get 10 copies of his PCB made, just in case there were any mistakes.

[Stiggalicious] rolled the dice by buying exactly the 200 LEDs he needed. Either he got really lucky, or the WS2812 quality testing has improved, because only one LED had a dead blue LED.

If you’d like to find out more, [Stiggalicious] gives plenty of details in his Reddit thread. He doesn’t have a webpage setup for the clock but he’s uploaded his source code (pastebin link) and Altium schematic/PCB files (mega.nz link). We may be a bit biased, but hackaday.io would be a perfect spot for this or any other project!