THP Entry: The Improved Open Source Tricorder

Since [Gene Roddenberry] traveled back in time from the 23rd century, the idea of a small, portable device has wound its way through the social consciousness, eventually turning into things like smartphones, PDAs, and all the other technological gadgetry of modern life. A few years ago, [Peter Jansen] started The Tricorder Project, the start of the ultimate expression of [Mr. Roddneberry]’s electronic swiss army knife. Now [Peter] is building a better, smaller version for The Hackaday Prize.

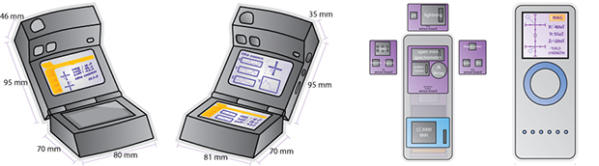
[Peter]’s first tricorders borrowed their design heavily from The Next Generation props with a fold-out section, two displays, and a bulky front packed to the gills with sensors and detectors. Accurate if you’re cosplaying, but not the most practical in terms of interface and human factors consideration. These constraints led [Peter] to completely redesign his tricorder, disregarding the painted wooden blocks found on Enterprise and putting all the electronics in a more usable form factor.

A muse of sorts was found in the Radiation Watch, a tiny, handheld Geiger counter meant as an add-on to smartphones. [Peter] envisions a small ~1.5″ OLED display on top, a capacitive sensing wheel in the middle, and a swipe bar at the bottom. Basically, it looks like a 1st gen iPod nano, but much, much more useful.

Plans for what to put in this improved tricorder include temperature, humidity, pressure, and gas sensors, a 3-axis magnetometer, x-ray and gamma ray detectors, a polarimeter, colorimeter, spectrometer, 9-axis IMU, a microphone, a lightning sensor, and WiFi courtesy of TI’s CC3000 module. Also included is something akin to a nuclear event detector; if it still exists, there has been no nuclear event.

It’s an astonishing array of technology packed into an extremely small enclosure – impressive for something that is essentially a homebrew device.Even if it doesn’t win the Hackaday Prize, it’s still an ambitious attempt at putting data collection and science in everyone’s pocket – just like in Star Trek.


SpaceWrencherThe project featured in this post is an entry in The Hackaday Prize. Build something awesome and win a trip to space or hundreds of other prizes.

Digital Pinball With Force Feedback

pinball 
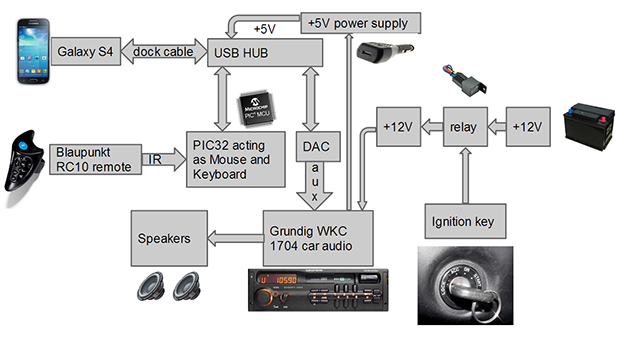
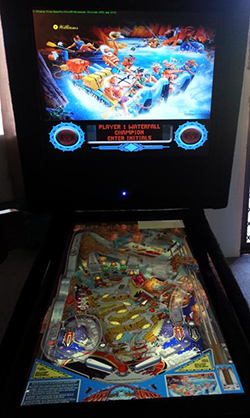
Hang around Hackaday long enough and you’ll hear about MAME, and all the other ways to emulate vintage arcade machines on a computer. The builds are usually fantastic, with real arcade buttons, MDF cabinets, and side graphics with just the right retro flair to make any connoisseur of ancient video games happy. MAME is only emulating old video games, though, and not physical systems like the digital pinball system [ronnied] put up on the Projects site.

[ronnied] was inspired by a real life, full-size White Water pinball machine at his previous job, and decided it was high time for him to acquire – somehow – a pinball machine of his own. He had a spare computer sitting around, an old 16:9 monitor for the main playfield, and was donated a smaller 4:3 monitor for the backglass. With an MDF cabinet, PinMAME, and a little bit of work, [ronnied] had his own machine capable of recreating hundreds of classic machines.

The build didn’t stop at just a few arcade buttons and a screen; [ronnied] added a 3-axis accelerometer for a tilt mechanism, solenoids and a plunger torn from a real pinball machine for a more realistic interface, and a Williams knocker for a very loud bit of haptic feedback. We’ve seen solenoids, buzzers, and knockers in pinball emulators before, and the vibrations and buzzing that comes with these electromechanical add ons make all the difference; without them, it’s pretty much the same as playing a pinball emulator on a computer. With them, it’s pretty easy to convince yourself you’re playing a real machine.

Videos of the mechanisms below.

Continue reading “Digital Pinball With Force Feedback”

640×480 VGA On An Arduino

There are dozens, if not hundreds of examples around the Intertubes of an Arduino generating a VGA video output. The Arduino isn’t the fastest chip by far, and so far, all of these VGA generation techniques have peaked out at lower resolutions if you want to control individual pixels.[PK] has an interesting technique to generate 640×480 VGA at 60 frames per second without overclocking. It’s hacky, it’s ugly, but surprisingly, it actually works.

The VGA standard of 640×480 @ 60 fps requires pixels to be clocked out at 25.175 MHz, and the ATMega chips found in Arduinos top out at 20 MHz. [PK] wanted to generate VGA signals without overclocking, He did this by doubling the clock frequency with digital logic. The ATMega generates a clock, an inverter delays that clock so it is 90 degrees out of phase, and the two clocks are XORed, doubling clock output of the micro. It produces a very ugly square wave at 32 MHz – an error of 27% compared to the VGA spec. Somehow it still works.

With a hilariously out of spec clock, the rest of the project was pulled together from [Nick Gammon]’s VGA library, a 16×16 font set, and a project from [lft]. Video below.

Continue reading “640×480 VGA On An Arduino”

A Head Unit Docking Station

dock

[Ivan] had a simple idea: being able to control his Android device from the small keypad on his car’s steering column. This would allow him to cycle through apps, navigation, and audio tracks while never taking his hands off the wheel. Feature creep then set in and [Ivan] asked himself how he could charge his phone through the same interface. What he ended up with is a head unit that’s also a dock.

While [Ivan]’s steering wheel doesn’t have the nice integrated remote control buttons found in newer cars, he does have a Blaupunkt remote, a small, clip-on controller that has a an IR transmitter on it. The IR receiver was connected to a PIC microcontroller, sending commands to the phone for up, down, left, right, menu, and home. Audio output from the phone is handled by a small USB sound card connected to a USB hub, sending the audio signals directly into the head unit’s amplifier.

Having the phone charge while it’s still in USB host mode is the crucial part of this build; not being able to charge on a long car ride would quickly drain the battery and make a car dock kind of pointless. To accomplish this, [Ivan] simulated a Galaxy S4 dock with a few resistors in the USB port, allowing the phone to control the USB sound card, listen to the emulated keyboard and mouse, and charge at the same time.

It’s not a pretty build, but it is extraordinarily useful. In the videos you can see that [Ivan] pretty much pulled this build together from stuff he had sitting around – a great reuse of junk, and a great addition to his car at the same time.

Continue reading “A Head Unit Docking Station”

THP Entry: An Affordable Metal 3D Printer

metal
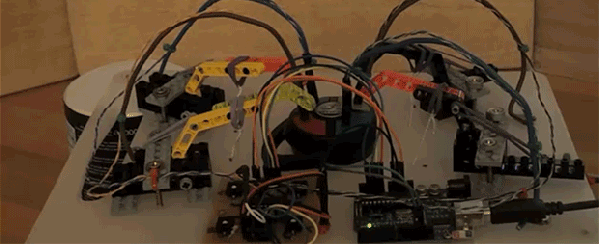
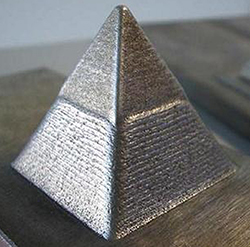
For years now, people have been trying to develop an affordable, RepRap-derived 3D printer that will create objects in metal. There has been a lot of work with crazy devices like high-powered lasers, and electron beams, but so far no one has yet developed a machine that can print metal objects easily, cheaply and safely. For The Hackaday Prize, [Sagar] is taking a different tack for his metal 3D printer: he’s extruding low temperature alloys just like a normal 3D printer would extrude plastic.

[Sagar]’s printer is pretty much a carbon copy of one of the many ‘plastic-only’ 3D printers out there, the only change being in the extruder and hot end. As a material, he’s using an alloy of 95.8% tin, 4% copper, and 0.2% silver in a 3mm diameter spool. This alloy melts at 235° C, about the same temperature as the ABS plastic these printers normally use.

The only real problems with this build are the extruder and nozzle. [Sagar] is milling his own nozzle and hot end out of stainless steel; a challenging bit of machining, but still within the realm of a hobbyist. He has some doubts about the RepRap derived plastic geared extruder being able to handle metal, so he’s also looking at designing a new version and milling that out of stainless as well.

It’s an awesome project, and we hope we’ll be seeing some updates to the project shortly. While a 3D printer that produces objects out of a low temperature alloy won’t be building rocket engines any time soon, it could be a great way to fabricate some reasonably high-strength parts at home.


SpaceWrencherThe project featured in this post is an entry in The Hackaday Prize. Build something awesome and win a trip to space or hundreds of other prizes.

Beating Simon

Virtually everyone has played Simon, that electronic memory game from the 70s, but who among us has actually beaten it? That was the goal of [Ben] and his 7-year-old daughter, and after a year of work, an Arduino, some servos, and a few Lego bricks, they’ve finally done it.

Instead of the large original Simon, [Ben] is using a key chain version of the game: much smaller, and much easier to build a device to sense the lights and push the buttons. The arms are made from Lego bricks, held up with rubber bands and actuated with two servos mounted on a cutting board.

To detect Simon’s lights, [Ben] connected four phototransistors to an Arduino. The Arduino records the pattern of lights on the Simon, and activates the Lego arms in response to that pattern. [Ben]’s version of Simon has only a maximum of 32 steps in the final sequence, but that still means each game takes 528 button presses – and a lot of annoying beeps – to complete.

Videos below.

Continue reading “Beating Simon”

[Afrotech]’s Guide To Class D Amplifiers

classd

Hang around in any of the many guitar or audiophile forums or discussion boards for long enough, and eventually you’ll come across the arguments over amplifier topologies. One of the more interesting and useful of these classes of amplifier is class d – they’re extremely efficient and when well designed can sound pretty good. [Afrotech] is here to show you how they work, and how to build a 15 Watt amp using a $3 class d amplifier chip.

The very definition of an amplifier is taking a low power signal and transforming it into a high power signal. A great way to modulate a high power signal very quickly is by modulating a square wave with pulse width modulation. A class d amplifier takes a low power input signal, uses it to modulate the duty cycle of a high power square wave, and with a little filtering, amplifies the low power input.

To demo this, [Afrotech] used TI’s TPA3122 class d amplifier chip. It’s a pretty cheap chip for being a 15 Watt stereo amplifier, and the circuit is simple enough to build on a breadboard. With a few caps, resistors, and a pair of inductors, [Afrotech] built this one-chip amplifier that’s capable of powering some pretty big speakers. It’s also very efficient – no heat sink required.

Although class d amps are extremely efficient. there are a few people out there that say because the amplifier is basically a filtered square wave, you’ll be able to hear a difference in the audio over class a or class ab amplifiers. This led to the development of class t amplifiers, basically a class d amp with a higher switching speed (Megahertz for class t, a few hundred kilohertz for class d). Still, if you need a cheap amplifier for a DIY boombox or any other high power application, you could do a lot worse than a simple class d amp.

Continue reading “[Afrotech]’s Guide To Class D Amplifiers”