Expanded Memory For The Teensy++ 2.0

RAM

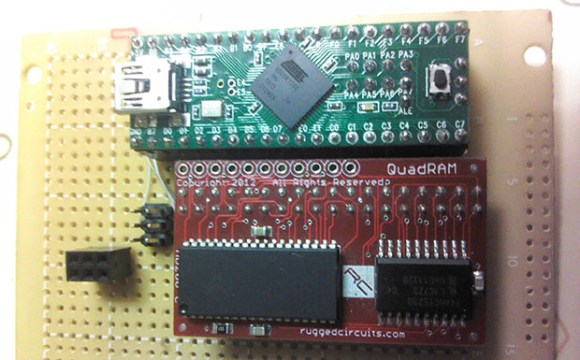
Sometimes with a microcontroller project you need to do some very RAM-hungry operations, like image and audio processing. The largish AVR chips are certainly fast enough to do these tasks, but the RAM on these chips is limited. [xxxajk] has come up with a library that allows the use of huge RAM expansions with the Teensy++ 2.0 microcontroller, making these RAM-dependant tasks easy on one of our favorite microcontroller board.

[xxajk]’s work is actually a port of XMEM2, an earlier project of his that added RAM expansion and multitasking to the Arduino Mega. Up to 255 banks of memory are available and with the supported hardware, the Teensy can address up to 512kB of RAM.

XMEM2 also features a preemptive multitasking with up to 16 tasks, the ability to pipe messages between tasks, and all the fun of malloc().

The build is fairly hardware independent, able to work with Rugged Circuits QuadRAM and MegaRAM expansions for the Arduino Mega as well as [Andy Brown]’s 512 SRAM expansion. With the right SRAM chip, etching a board at home for XMEM2 is also a possibility.

A Pick-And-Mix FPGA Retrocomputer

Logo

Cheap FPGA boards are readily available, as are VHDL implementations of classic CPUs like the 6502, 6809, and Z80. Up until now, we haven’t seen anyone take these two parts and combine them into a complete system that turns an FPGA board into a complete 8-bit retrocomputer. Thanks to [Grant]’s work, it’s now possible to do just that (server on fire, here’s a google cache) with a $30 FPGA board and a handful of parts.

In its full configuration, the Multicomp, as [Grant] calls his project, includes either a 6502, 6809, Z80, or (in the future) a 6800 CPU. Video options include either monochrome RCA, RGB VGA, or RGB via SCART. This, along an SD card interface, a PS2 keyboard, and the ability to connect an external 128kB RAM chip (64k available) means it’s a piece of cake to build a proper and complete portable retrocomputer.

What’s extremely interesting about [Grant]’s project is the fact the data and address lines are fully exposed on the FPGA board. This means it’s possible to add whatever circuit you’d like to whatever retrocomputer you can imagine; if you want a few NES gamepads, an IDE interface, or you’d like to design your own primitive video card, it’s just a matter of designing a circuit and writing some assembly.

If you’d like to build your own, search “EP2C5T144C8N” on the usual sites, grab a few resistors and connectors, and take a look at [Grant]’s documentation and upcoming examples.

Via 6502.org forums

Building A Better Sewing Machine

sewing

After making a few fabric RFID tags, [Micah] had a sewing machine sitting in her workshop completely unused. This was due at least in part to how crappy this entry-level sewing machine was; it stalled easily, unusable at low speeds, and noises like a robot with bronchitis. The solution, of course, was to replace the motor and add electronic control, turning a terrible sewing machine into one that should cost several hundred dollars more.

After some experimentations with an AC motor, [Micah] came upon a small DC motor. This, combined with an LMD18200 H-bridge, Propeller microcontroller, and a beefy power supply gave [Micah] enough torque to run the sewing machine without mechanical wheezing and grinding.

The new update to the motor allowed [Micah] several control modes for the machine, all controlled by the foot pedal: an open-loop mode is pretty much the same as the stock machine, a closed-loop mode keeps a constant RPM on the motor regardless of resistance. There are a few more interesting modes that moves the needle down when the pedal is released, perfect for detailed work.

A small addition to this project was an LCD attached to the front of the machine, allowing [Micah] to toggle modes without the microcontroller being connected to the computer.

Continue reading “Building A Better Sewing Machine”

3D Printering: Making A Thing In FreeCAD, Part II

printering

It’s time once again for another installment of a Making A Thing tutorial, where I design the same part, over and over again, in multiple 3D design software packages.

Last week we took a look at FreeCAD, a free, open source parametric modeller. It’s an amazingly powerful tool, and not it’s finally time to complete our model of a strange object ripped from the pages of an 80-year-old drafting textbook.

Here’s some links to previous Making A Thing tutorials, doe:

Read on for the second part of our FreeCAD tutorial

Continue reading “3D Printering: Making A Thing In FreeCAD, Part II”

The 128 Button, 6 Axis, 17 Slider, 4 POV Hat Switch Joystick Controller

stick

[Paul Stoffregen], creator of the Teensy series of dev boards, previously implemented a six-axis joystick for Teensyduino, the Arduino library for the Teensy. He had originally tried 8 axes, but a few problems cropped up, deadlines approached, and he left it as is. A few recent projects gave him some insight into how to implement a joystick with more than six axes as a USB HID device, so he started looking at how to read an improbable amount of pots and buttons for a USB joystick.

So far, the biggest problem is figuring out what software can actually use an HID joystick with this many controls. The answer to that question is none. The Linux-based jstest-gtk is able to read 6+17 pots, the four hat switches, but only 64 of the 128 buttons. A user on the Teensy forums, [Pointy], has been working on his own joystick test app that works on Linux Windows, but testing the joystick on Windows is an exercise in futility for reasons no one can figure out.

As for why anyone would want a six-axis, 17-slider, 128-button joystick, think about this: with this much control, it would be relatively simple to build the MIDI controller to end all MIDI controllers, or a cockpit simulator for everything from a C172, 737, to a Kerbal interplanetary cruiser. That’s an impressive amount of control, and all from a $20 Teensy dev board.

Further testing of this Teensy joystick is desperately needed, so if you’re able to help out drop a note in the forum thread.

The Three Chip Retrocomputer

Where homebrew computers are usually complex bundles of wires and chips, [Mike]’s own single board computer is not. It’s a three-chip computer with only a CPU, RAM, and a microcontroller that is able to emulate the retrocomputers of yore.

Normally, a homebrew computer project requires some amount of ‘glue’ logic – a few NAND, OR, or inverters to combine signals and send them where they’re needed for address decoding. This tiny pocket computer doesn’t need any of that; all the address decoding is done on a 40-pin PIC microcontroller.

With 64kB on the PIC 18F46K22, there’s enough space for all the address decoding logic, space for a pseudo ACIA mapped onto the $DF page, and a ROM image that provides a monitor program and a copy of BASIC. Basically, with the addition of a USB to serial adapter, this is a three chip 6502 single board computer, and with the right ROM monitor can emulate an Apple I, Woz monitor included.

Yes, 6502 projects are a dime a dozen, but [Mike]’s work with the address decoding logic on the microcontroller is top-notch. There are a few remaining chip select lines in his schematic, and with another microcontroller it would be easy to add VGA out, a compact flash adapter, or some other really cool peripherals. Good thing there’s an expansion port on this thing.

A Reel To Reel Clock

And this is how the clock will tell time!

Word clocks – time pieces that spell out the current time with words – are awesome. They’re usually entirely electronic, illuminating LEDs to display the time. Not this one. It’s a mechanical masterpiece that shows the current time in words using motors and 35mm film leader.

The mechanics of this clock are fairly simple: text is transferred onto 35mm film leaders with water slide decals, which are then rolled onto film reels. These film reels are mounted on stepper motors attached to a frame with Meccano. There are four film strips, making this a surprisingly similar a word clock but using motors instead of LEDs.

Because this clock was originally built in 2008, the electronics are a bit… strange through the lens of a post-Arduino skill set. [David] is using a homebrew BASIC Stamp with eight Step Genie ICs and MOSFETs for each motor. Calibration of the clock is handled by an IR detector and a mark on each piece of film leader.

It’s an impressive example of mashing up spare and surplus parts to make something cool, but unfortunately we can’t find a video of this clock in action. If you manage to find one, put a link in the comments and we’ll add it below.