Overclocking Your Bitcoin Miner

The name of the game in mining Bitcoins isn’t CPUs, GPUs, or even FPGAs. Now, hardcore miners are moving on to custom ASIC chips like the Block Erupter, For around $100 USD, you too can mine Bitcoins at 300 MH/s with 2.5 Watts of power and a single USB port. This speed isn’t enough for some people, like [Jeremy] who overclocked his Block Erupter to nearly twice the speed.

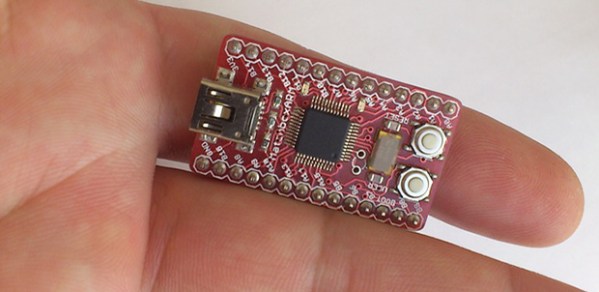
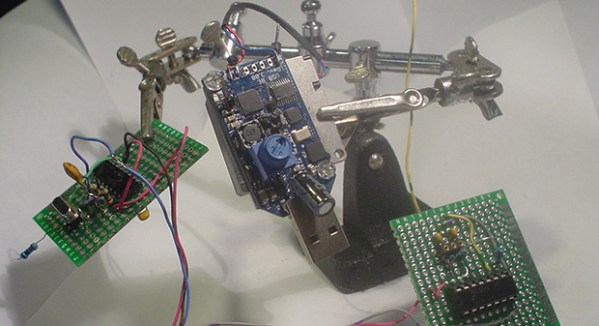
[Jeremy] begins his tutorial with a teardown of the Block Erupter hardware. Inside, he found a custom ASIC chip, an ATTIny2313, a USB UART converter, and a voltage regulator for the ASIC. By changing out the 12 MHz crystal connected to the ASIC and fiddling with the voltage with a trim pot, [Jeremy] was able to overclock the ASIC core from 336 MHz to 560 MHz. Effectively, he’s running two Block Eruptors for the price of one with the potential to actually make back the purchase price of his hardware.

It must be noted the 560 MHz figure comes from replacing the 12 MHz crystal with a 20 MHz one, and this mod only lasted about 20 minutes on [Jeremy]’s bench until the magic blue smoke was released. He recommends a 14 or 16 MHz crystal, netting a new speed of either 392 MHz or 448 MHz for a stable mod.

Drilling PCBs With Cameras And Math

PCB

After making your first PCB, you’re immediately faced with your next challenge – drilling the holes. It’s a doable task with a small drill press, but a lot of makers already have a small CNC mill or router, but how to make that work the first time? [Alessio] has you covered with a technique that uses a CNC-mounted webcam and some linear algebra for perfect through-holes the first time and every time.

A few months ago we saw [Alessio]’s work with transform matrices and PCB drills. The reasoning behind this technique is if a PCB isn’t exactly aligned to a CNC mill’s axes, or if the scaling for a toner transfer board is a bit off, automating the drilling process will only end in pain, with holes going through traces and a whole host of other nasty things. The application of linear algebra gets around this problem – taking a measurement off of two or three known locations, it’s easy to program a CNC machine to drill exactly where it’s supposed to.

[Alessio]’s new project takes the same mathematical techniques and applies them to a very sleek application that uses a drill-mounted webcam. After taping his homebrew PCB down to the mill, [Alessio] simply marks off a few known points, imports the drill file, and lets a computer calculate where to drill the holes. The results are remarkable – with a soldermask and silkscreen equipment, these handmade boards can be just as good as professionally manufactured boards,

There are Windows and OS X binaries for [Alessio]’s tool available on his page, with a video demo available below.

Continue reading “Drilling PCBs With Cameras And Math”

The Mill CPU Architecture

There are basically two ways to compute data. The first is with a DSP, a chip that performs very specialized functions on a limited set of data. These are very cheap, have amazing performance per watt, but can’t do general computation at all. If you’d like to build a general-purpose computer, you’ll have to go with a superscalar processor – an x86, PowerPC, or any one of the other really beefy CPU architectures out there. Superscalars are great for general purpose computing, but their performance per watt dollar is abysmal in comparison to a DSP.

A lot of people have looked into this problem and have come up with nothing. This may change, though, if [Ivan Godard] of Out-of-the-Box computing is able to produce The Mill – a ground-up rethink of current CPU architectures.

Unlike DSPs, superscalar processors you’d find in your desktop have an enormous amount of registers, and most of these are rename registers, or places where the CPU stores a value temporarily. Combine this with the fact that connecting hundreds of these temporary registers to places where they’ll eventually be used eats up about half the power budget in a CPU, and you’ll see why DSPs are so much more efficient than the x86 sitting in your laptop.

[Ivan]’s solution to this problem is replacing the registers in a CPU with something called a ‘belt’ – basically a weird combination of a stack and a shift register. The CPU can take data from any position on the belt, perform an operation, and places the result at the front of the belt. Any data that isn’t used simply falls off the belt; this isn’t a problem, as most data used in a CPU is used only once.

On paper, it’s a vastly more efficient means of general purpose computation. Unfortunately, [Ivan] doesn’t quite have all the patents in for The Mill, so his talks (two available below) are a little compartmentalized. Still, it’s one of the coolest advances in computer architecture in recent memory and something we’d love to see become a real product.

Continue reading “The Mill CPU Architecture”

Printing An Aston Martin DB4

CAR

With 3D printers finding their way into the workshops of makers the world over, it was bound to happen sooner or later. [Ivan Sentch] is making an Aston Martin DB4 with a 3D printer.

Before we board the hype train, let’s go over what this is project is not: [Ivan] isn’t making any metal parts with his 3D printer, and the chassis and engine will be taken from a donor car. Also, the printed plastic parts won’t actually make their way into the final build; the 3D printed body panels will be used to pull the final panels in fiberglass. That being said, it’s still an impressive undertaking that’s going to cost [Ivan] $2250 NZD in plastic alone.

[Ivan]’s body panels are made by taking a DB4 model in Solidworks, slicing it up into 105mm squares, giving each square extruded sides, and finally securing them to the wooden form after the parts are printed. There’s still an awful lot of work to be done once the 3D printed parts are all glued together, but it’s still an amazingly impressive – and cheap – way to create a replica of a very famous automobile.

Making A Real Instrument Out Of A Kaoss Pad And Ribbon Controllers

swinger

MIDI guitars have been around since the 80s, and nearly without exception they are designed as direct, one-to-one copies of their acoustic and electric brethren. [Michael] has been working on turning this convention on its head with the Misa Tri-Bass, a MIDI guitar designed to be the perfect guitar-shaped synthesizer interface.

The tri-bass doesn’t produce any sound itself; instead, it’s a polyphonic MIDI controller with three channels controlled by three ribbon controllers on the neck. The body contains a huge touch screen divided into four MIDI channels, essentially turning this guitar into an instrument designed for electronic music first, and not an acoustic instrument kludged into filling an electronic role.

Unlike a whole lot of other digital guitar-shaped MIDI controllers, the tri-bass is actually made out of wood. Yes, the neck is made out of maple (inlaid with the three ribbon controllers, of course), and the body comes directly from a tree, with the styling inspired by a forgotten retro-modern design. It’s an impressive piece of kit, and we can’t wait to see [Michael]’s handiwork in the hands of digital guitarists the world over.

You can check out a video of [Michael] rockin out below.

Continue reading “Making A Real Instrument Out Of A Kaoss Pad And Ribbon Controllers”

HackRF, Or Playing From 30 MHz To 6 GHz

Up on Kickstarter, [Michael Ossmann] is launching the HackRF, an inordinately cheap, exceedingly capable software defined radio tool that’s small enough to lose in your laptop bag.

The HackRF was the subject of a lot of interest last time it was on Hackaday – the ability to receive up to 6GHz allows the HackRF to do a lot of very interesting things, including listening in on Bluetooth, WiFi, and 4G networks. Also, the ability to transmit on these frequencies means a lot of very interesting, and quite possibly slightly evil applications are open to anyone with a HackRF. Like the RTL-SDR dongles, the HackRF works with GNU Radio out of the box, meaning all those cool SDR hacks we’ve seen so far will work with this new, more powerful board.

Compared to the USB TV tuner cards that were so popular a year ago, the HackRF has 10 times the bandwidth, is able to receive up to 6GHz, and is also able to transmit. It’s only half-duplex, so to receive and transmit simultaneously you’ll need two HackRFs, or maybe wait for a hardware revision that will hopefully come sooner rather than later.

Below you can check out [Michael]’s presentation at Toorcon where the HackRF was unleashed to the world.

Continue reading “HackRF, Or Playing From 30 MHz To 6 GHz”

ARM Dev Board With USB Uploading

[George and Bogdan] wrote in to tell us about a cool Kickstarter they’ve been working on. It’s called the MatchboxARM, and like other tiny-yet-powerful ARM dev boards floating around, this one features a very fast and capable processor and more than enough pins for just about any project. One interesting feature of this board, however, makes it stand out from the pack: it has a USB mass storage-based bootloader, meaning uploading new code is as easy as a drag and drop.

This isn’t the first dev board we’ve seen to sport this feature: the Stellaris Launchpad has had this for a while and even the lowly ATtiny85, in the form of a Digispark has a mass storage-based bootloader. The MatchboxARM, though, brings this together with a very powerful ARM microcontroller with enough I/Os, ADCs, PWM pins, and I2C and SPI ports for the most complicated projects.