Adding Wireless Charging To Any Phone

The wireless charging options available on flagship phones is a great feature, but most of us aren’t rocking the latest and greatest cellphone. [Daniel] came up with a great mod that adds wireless charging to just about every cellphone ever, at a very low price and a few bits and bobs ordered off eBay.

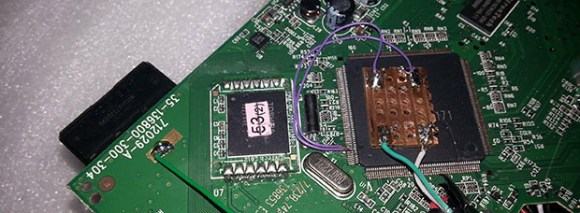
[Daniel] used a Palm Touchstone inductive charger – available for a few bucks on eBay – along with an inductive charging circuit from a Palm Pixi. This charging circuit was designed to complement the Touchstone charger, and is simple enough to wire up; all [Dan] needed to do was put the coil and charging circuit near the charge, and it output 5 Volts to charge any phone.

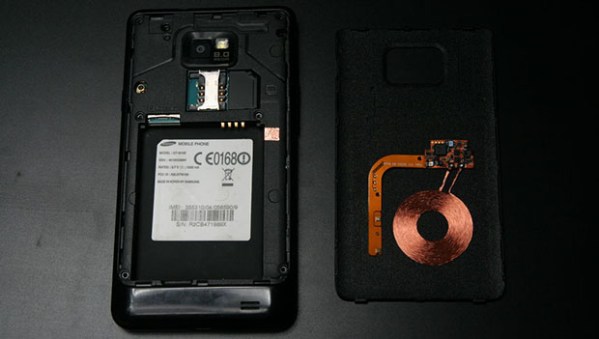
To get the power from the charging circuit into his phone’s battery, [Daniel] simply wired the output of the coil’s circuit to the USB in on the phone. The space inside his S2 was pretty tight but he was able to come up with two ways to install the charging circuit, for use with either the stock back cover or a third-party case.

For anyone with a soldering iron, it’s a quick bit of work to add wireless charging to any phone. We’re loving [Dan]’s solution, as the Palm gear he used is so readily available on eBay and junk drawers the world over.

R2D2 Cake Plays Leia’s Distress Message

As all 6-year-olds should, [Marc]’s son is a huge fan of Star Wars. For his birthday party, he wanted a Star Wars themed cake, and making one in the shape of R2D2 seemed to be right up [Marc]’s alley. Of course any clone of everyone’s favorite R2 unit should also display Leia’s distress message to Ben Kenobi, and [Marc] figured out a way to do just that.

Because of R2’s strange and decidedly non-cake shape, [Marc] first constructed a stand out of wood, cardboard, and a PVC pipe to hold the cake into place. The cylindrical droid body is of course made of cake and frosting, with R2’s dome made out of fondant.

The PVC pipe running up the center of the droid provided [Marc] with the ability to run a power and video connector up R2’s spine. These are connected to a small projector receiving video from a netbook placed out of the way.

You can check out a video of the R2 cake playing Leia’s holographic distress message below. At the end of the video, there’s a 6-year-old birthday party guest saying, “what is that?” It might be time to dig out the VHS player and the non-remastered trilogy, [Marc].

[Frank] Builds A Chair From A Sequoia

chair[Frank Howarth] is a very competent woodworker known on the YouTubes for his wonderful stop-motion videos of turned wood bowls. Lately, though, he’s put some effort into building furniture, this time a beautiful lawn chair made from a gigantic sequoia log.

A few years ago, [Frank] and a friend acquired a gigantic sequoia log and milled it themselves with a chainsaw. After two summers, the huge boards were finally dry enough to be used and [Frank] decided a lawn chair would be a fine project.

The sides of the chair are a single monolithic piece of wood. Of course [Frank] needed to cut the sides in half and join them together again for the decorative holes, but it’s still an impressively solid piece of woodworking. The back and seat of the chair are also made out of the same sequoia board, cut into slats held together with three very large dowel rods.

This project probably wouldn’t be possible if it weren’t for the awesome equipment and tools [Frank] has in his shop. He has a great tour of his shop available for your viewing. We should all be so lucky.

Adding WiFi To A Kid’s Tablet

tab

[Mick] has been playing around with the VTech Innotab – a $70 tablet computer aimed at kids – for a while now. He’s successfully turned this tablet soon to be found at yard sales the world over into a Linux tablet and can play everything from those magical LucasArts SCUMM adventure games to Angry Birds. What his tablet is missing, though, is any sort of Internet connection. He recently fixed this by soldering a USB WiFi adapter directly to the CPU of his InnoTab.

In all fairness, there’s not a terrible amount of software hackery going on here. VTech’s InnoTab 2s uses the same chipset as the cheaper InnoTab 2 but has an additional board soldered directly to the mainboard. This additional board provides a WiFi connection with an RT5370 chipset; soldering a WiFi dongle onto the InnoTab 2’s CPU D+ and D- USB lines effectively turns it into the WiFi enabled InnoTab 2s.

It’s an impressive piece of work for a low-power tablet that one can safely assume is both bullet and childproof. [Mick] was also able to mount a USB thumb drive on his upgraded kid’s tablet, so if you’re looking for a cheap tablet that doesn’t need much horsepower, you might want to check out your local Toys ‘R Us.

Giving The VirtualBoy A VGA Out

Nintendo’s VirtualBoy – the odd console-inside-a-pair-of-goggles  and arguable ancestor of Nintendo’s 3DS – was a marvelous piece of technology for its time. In a small tabletop unit, you were able to play true 3D video games at an impressive 384 x 224 pixel resolution. Of course the VirtualBoy was a complete failure, but that doesn’t mean hardware tinkerers are leaving this wonderful system to video game collectors. [furrtek] has been playing around with his VirtualBoy and managed to add VGA out.

As a 3D system with two displays, any sort of video out was rightfully ignored by the VirtualBoy system designers. Still, [furrtek] wanted some sort of video out on his system, so he began poking around with a small FPGA board to generate some VGA signals.

The two displays inside the VirtualBoy aren’t your normal LCD display – as seen in this iFixit teardown. they’re really two linear LED arrays that generate a single line of 244 pixels, with mirrors scanning the line in the in the Y axis. These LED arrays are controlled by the VirtualBoy CPU through a series of shift registers, and by carefully tapping the lines of each LED array, [furrtek] was able to copy all the image data into the RAM of an FPGA.

After stuffing an XESS XULA-200 FPGA board inside the case of his VirtualBoy, [furrtek] wired up a few resistors for a DAC and installed a VGA out port on the underside of his console. Everything worked the first time he powered it up, and he began playing his VirtualBoy on his big screen TV.

Because [furrtek] is only reading one of the VirtualBoy’s displays, all the 3D data – and the main feature of the VirtualBoy – is lost when it’s displayed on a TV. 3D TVs do exist, though, and we’d love to see an improved version of this that captures data from both of the VirtualBoy displays.

You can see [furrtek]’s video of his mod in action below.

Continue reading “Giving The VirtualBoy A VGA Out”

Wherein Books Are Judged By Their Cover

Yes, Kindles are wonderful, a computer full of PDFs are awesome, and [Tim Berners-Lee] will probably go down in history as more important than [Gutenberg]. That doesn’t mean there’s not something intangible about books that brings out the affections of so many bibliophiles. Even a book filled with blank pages can be a work of art unto itself, and most of the time these volumes are handmade.

 This video of a hardbound volume made by Smith Settle bookbinders covers the entire process from words on a page to a finished book. No, they’re not using movable type; the folios are created using lithography, but sorting, gluing, sewing and binding the folios is done in much the same way as it was done in the middle ages.

Next up is a wonderful film from 1968 by Iowa state university on creating the gold tooling on fine leather-bound volumes. You’ll be hard pressed to find a book with gold tooling nowadays, but it’s still a technique accessible to the industrious amateur bookbinder.

First, gold leaf is applied to the leather spine of a book. Then, custom-made tools are heated to a few hundred degrees  and pressed into the leaf. The heat bonds the gold with the leather, and with custom-designed tools designs are burnt into the leather. After that, the excess leaf is simply wiped off, and a fine tooled leather book is born.

What’s really cool about bookbinding is the fact that just about anyone can do it. Go to a craft store, pick up some hardboard and paper, and bind yourself a book. You could make a blank journal, or for the nerds out there (myself included), make a hard bound volume of the NASA wiring standards.

Continue reading “Wherein Books Are Judged By Their Cover”

The Making Of A Katana Hand Guard

tiger

Even though the handmade portion of Hackaday is still in its infancy, we expected to put up a post on traditional japanese sword making by now. What [Kelvin] sent in to the tip line far surpases the artistry of forging a katana by hand. It’s a tsuba, the hand guard for a katana, and over the course of two videos (one and two), you can see this masterpiece of traditional metalworking techniques take shape.

Tsubas usually come in a matched set, one for the katana, or long sword, and another for the wakizashi, a slightly shorter sword. [Ford Hallam] was asked to construct the tsuba for a katana that had been lost to the sands of time. Fortunately, a black and white photograph of the original as well as the matching wakizashi tsuba were available for reference, making the design of this tsuba an exercise in replication.

The piece of metal this tsuba was constructed from is made out of a slightly modified traditional alloy of 75% copper and 25% silver. After the blank was cast, many, many hours of scraping, filing and hammering began before the design was laid out.

The craftsmanship in this tsuba is, quite simply, insane. There are about 100 different pieces of metal inlaid into the tsuba to emulate the tiger’s stripes, and hundreds of hours of work in hand carving every leaf and every bit of fur.

Even more, no power tools were used in the creation of this hand guard; everything was crafted using the same methods, tools, and materials as the original tsuba. A masterful piece of craftsmanship, indeed.

Continue reading “The Making Of A Katana Hand Guard”