Retrotechtacular: The Mother Of All Tech Demos

Most bits of a computer we take for granted today – the mouse, hypertext, video conferencing, and word processing – were all invented by one team of researchers at Stanford in the late 60s. When the brains behind the operation, [Douglas Engelbart], showed this to 1000 computer researchers, the demo became known as The Mother of all Demos. Luckily, you can check out this demo in its entirety on YouTube.

Even though [Englebart]’s demo looks incredibly dated today, it was revolutionary at the time. This was the first demonstration of the computer mouse (side note: they call the cursor a ‘bug’), a chorded keyboard, and so many other technologies we take for granted today. During the presentation, [Englebart] was connected to the SDS 940 computer via the on-line system 30 miles away from Stanford. Yes, this pre-ARPANET, what is normally cited as the precursor to the Internet.

Sadly, most of [Englebart]’s researchers became disillusioned with the time sharing /mainframe paradigm shown in this demo. Those researchers wanted a more decentralized means of computing, so they went off to Xerox PARC where they helped create the first personal computers. Still, most of the ideas from 1968, such as the mouse, hypertext, and word processing, were in those little Xerox boxes.

On a more philosophical note, [Englebart] began his demo with the question, “If, in your office, you as an intellectual worker were supplied with a computer display, backed up by a computer that was alive for you all day and was instantly responsive to every action you had, how much value could you derive from that?” In the 44 years since this Mother of all Demos, we’ve gotten to the point where we already have a computer on our desks all day that is able to do any task imaginable, and it certainty improved our quality of life.

There are a few great resources covering the Mother of all Demos, including the Douglas Engelbart Institute’s history page and the Stanford Mousesite. Looking back, it’s not only amazing how far we’ve come, but also how little has actually changed.

Open Source Graphics Card

Even though NVidia and ATI have been open-source friendly for a while now, there still isn’t a true open-source graphics card. [Anton] and [Per] are trying to fix that by building his own graphics card around an FPGA. The project is called ORSoC, and it’s available on opencores.com.

The guys are building the ORSoC graphics card around a Digilent Atlys FPGA dev board. So far, he can draw lines, textured triangles, bitmap or vector fonts, and throw a few 3D meshes up on the screen. This project isn’t intended to run advanced OpenGL or Steam on Linux, but for all the work that into this graphics accelerator, it’s an amazing piece of work.

There are a few demos after the break; a cube rotating in 3D and a demo drawing and translating polygons and a few textures. The ORSoC is a bit slow, but that’s an artifact of the build not being optimized for the FPGA the team is using. If you’d like to test this graphics card, there’s a Git available. As a bonus you don’t even need an FPGA to play around with this project. There’s also a software emulation of all the functions. Very neat.

Continue reading “Open Source Graphics Card”

Tearing Apart A Hot Glue Gun For A 3D Printer

If you’re building a 3D printer, the most complicated part is the extruder. This part uses a series of gears to pull plastic filament off of a spool, heats it up, and squirts it out in a manner precise enough to build objects one layer at a time. [Chris] made his own extruder out of a hot glue gun and made it so simple we’re surprised we haven’t seen this build before.

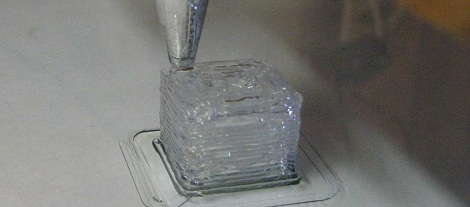
The basic operations of a plastic extruder – pushing a rod of plastic through a heated nozzle – already exists in a hot glue gun available for $3 at WalMart. To build his printer, [Chris] tor apart the hot glue gun and mounted the nozzle on a piece of plywood. The hot glue sticks are fed into the nozzle with the help of a 3D printed gear and a stepper motor driver.

After the break, you can see [Chris]’s hot glue gun RepRap printing a 10cm cube. It’s not fast, but the quality is exceptional, especially considering he made it out of a hot glue gun.

Continue reading “Tearing Apart A Hot Glue Gun For A 3D Printer”

Color Multiplexing Through Fiber Optics

If you want to go high bandwidth, fiber optics is the way to go. From trans-oceanic cables to the yet-unseen ‘fiber to every home,’ fiber optics allows a lot more bandwidth than a copper cable. In low-bandwidth applications, fiber optic cable transmits data using one color of light. There’s a way to get more bandwidth out of a fiber optic cable, as [Shahriar] found out while experimenting with an RGB LED.

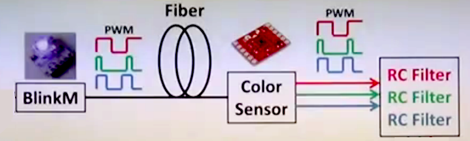
For his experiment, [Shahriar] used a BlinkM programmable RGB LED and a Sparkfun color sensor. In fiber optic lines with one light, it is possible to send many simultaneously using PWM, but noise becomes a problem at high data rates. Using an RGB LED, [Shahriar] sends three levels of Red, Green, and Blue to transmit 9 bits at a time – perfect for sending a byte with a parity check in one quick light burst.

[Shahriar]’s technique is exactly how the pros pump massive amounts of data through a single fiber optic cable. All the tools, code, and MATLAB functions are available on [Shahriar]’s site, ready to be used by anyone wanting to experiment for themselves.

In the video after the break, [Shahriar] breaks everything down, including the tools, theory, and actual circuits. It’s an amazing video demo, so thorough we’re wondering if [Shahriar] has any teaching ambitions.

Continue reading “Color Multiplexing Through Fiber Optics”

Tracking Small Changes In Video To See Someone’s Pulse

[Gil] sent in an awesome paper from this year’s SIGGRAPH. It’s a way to detect subtle changes in a video feed from [Hao-Yu Wu, et al.] at the MIT CS and AI lab and Quanta Research. To get a feel for what this paper is about, check out the video and come back when you pick your jaw off the floor.

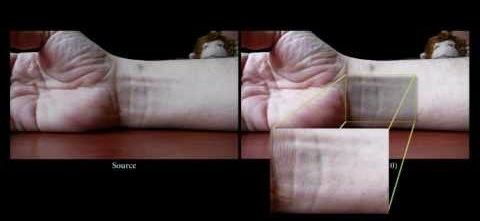
The project works by detecting and amplifying very small changes in color occurring in several frames of video. From the demo, the researchers were able to detect someone’s pulse by noting the very minute changes in the color of their skin whenever their face is pumped full of blood.

A neat side effect of detecting small changes in color is the ability to also detect motion. In the video, there’s an example of detecting someone’s pulse by exaggerating the expanding artery in someone’s wrist, and the change in a shadow produced by the sun over the course of 15 seconds. This is Batman-level tech here, and we can’t wait to see an OpenCV library for this.

Even though the researchers have shown an extremely limited use case – just pulses and breathing – we’re seeing a whole lot of potential applications. We’d love to see an open source version of this tech turned into a lie detector for the upcoming US presidential debates, and the motion exaggeration is  perfect for showing why every sports referee is blind as a bat.

If you want to read the actual paper, here’s the PDF. As always, video after the break.

Continue reading “Tracking Small Changes In Video To See Someone’s Pulse”

Making Flex Sensors On The Cheap

When [Michelle] was making a sign language translation glove, she needed a bunch of flex sensors. These flex sensors cost about $10 a pop, meaning her budget for the project was eaten up by these bendy potentiometers. Since then, [Michelle] figured out a great way to make extremely inexpensive bend sensors using anti-static bags and masking tape, allowing her to start her project once again.

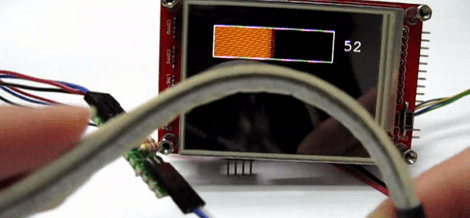
The build works by sandwiching Velostat plastic bags – the same electrically conductive bags all your components arrive in – between layers of masking tape. A jumper wires is attached to a strip of Velostat attached to a piece of masking tape. Between two of these anti-static/masking tape assemblies, another piece of Velostat is placed. After laminating all these pieces together, [Michelle] had a primitive yet very functional flexible potentiometer.

After attaching one of these flex sensors to an analog input of her dev board of choice, she had a wonderful and inexpensive flexible sensor. You can check out this sensor in action after the break.

Continue reading “Making Flex Sensors On The Cheap”

Potting Electronics With Silicone

If you want to improve the reliability of your electronics, just cover them in silicone or epoxy. Potting, as this technique is called, protects your project from impact and loose wires, but most of the time ends up as a gloppy mess. [Charles] figured out an awesome way to make pro-looking potted electronics using silicone and a few supplies from the emergency room.

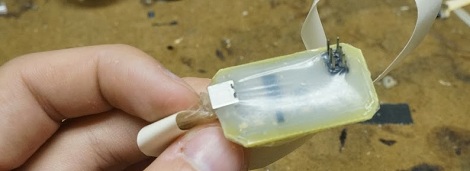
On one of [Charles]’s trips to the ER, a nurse put Tegaderm on a wound and he noticed his skin could breathe. Figuring Tegaderm would also allow silicone to breathe, he asked for a sample and went back to the lab. After putting a few globs of silicone on a PCB, [Charles] wrapped the whole thing in Tegaderm. Much to his surprise, the silicone cured and made a smooth, glossy protective covering on his board.

[Charles] put up a Picassa album of his Tegaderm/silicone potted electronics, and we’ve got to say they’re looking very professional. This technique could also be applied to [Charles]’ glass PCB touch sensor, allowing for the creation of clear (or at least tranlucent) PCBs.

After the break, you can check out [Charles] potting his ATtinyISP board in silicone with Tegaderm. One word of warning, though: don’t use a silicone that uses acetic acid to cure – that’s a death sentence to electronics. Luckily, there’s an easy test to see if your particular brand of silicone produces acetic acid while curing. Just squeeze a bit of silicone on a piece of scrap, and if it smells like vinegar after a while, don’t use it.

Continue reading “Potting Electronics With Silicone”