Putting Every Chiptune Ever In An FPGA

Finally one device combines the power of the Commodore 64 SID, Atari ST YM2149, and Amiga MOD audio into one awesome box. It’s called the RetroCade Synth, and there’s a Kickstarter that is perfect for starting your chiptune composing journey.

[Jack]’s RetroCade synth is connects directly to the Papilio One 500k FPGA. All the classic chiptune ICs can be emulated in this FPGA including the Commodore 64 SID chip, and an Amiga MOD player. Being a follow-up to [Jack]’s previous FPGA YM2149 project, he also threw that chip into the project for good measure. While the RetroCade doesn’t ship with every old chiptune IC – there isn’t support for NES, Atari, GameBoy, or SN76489-based chiptunes yet – that is something [Jack] will add once the Kickstarter is completed.

After the break you can see [Jack] jamming out on his RetroCade project playing a YM2149, SID, and Amiga MOD sounds simultaneously. For $100, it’s comparable to the venerable MIDIbox SID, but also allows anyone to play whatever genre of chiptunes they desire.


Continue reading “Putting Every Chiptune Ever In An FPGA”

Laser Cutting In 3D

Everyone in the world suffers from some degree of functional fixedness, a proclivity to use tools only how they were meant to be use. A laser cutter, for example, is usually used to make flat, two-dimensional parts. [Seeker] broke out of this cognitive lock when he decided to create an illuminated 3D object with a laser cutter and a dozen acrylic sheets.

[Seeker]’s project is inspired by acrylic edge-lit LED signs. In these signs, a pattern is engraved on an acrylic sheet and a LED illuminates the panel from the side. When the light from the LED hits the engraving, it’s refracted and produces a wonderful colorful pattern.

To make a 3D version of an edge lit display, [Seeker] subtracted a 3D model of a virus from a cube in Sketchup. This resulted in a hollow cavity that would refract light. After slicing up the model of the 3D cube, [Seeker] sent the files over to the laser cutter to produce a few dozen custom panels. [Seeker] glued them together, put the entire assemblage in front of a LED light, and admired the beauty of his new laser cut 3D virus.

Controlling A Mouse With Your Voice

It’s entirely possible to use a computer without the aid of a mouse or trackpad. Shift and arrow keys will get you very far, but that is entirely too taxing. [Stephen] came up with a really neat way to control a mouse with your voice, a project that is sure to find its way onto the desktops of those with mobility issues very quickly

The voice controlled mouse works in conjunction with the voice recognition built into OS X, a little AppleScript, and a touch of Python. When the user says, ‘show grid’ a 10 by 10 grid numbered 1 to 100 is displayed on the screen. By saying ‘thirty five,’ the cursor moves to the 35th cell in the grid. From there, the mouse can be controlled by speaking cardinal directions such as South and Northwest.

[Stephen] put up a very clever demo of his Voice Mouse project available after the break. Even though he did have a little difficulty with his mac recognizing a few of his spoken commands its light years ahead of trying to navigate the web with just shift and arrow keys.

Continue reading “Controlling A Mouse With Your Voice”

Make Your Next Enclosure Out Of Stone

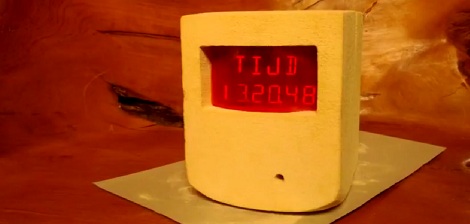
Sure, a laser-cut plywood enclosure adds a lot of maker cred, and custom plastic or cast aluminum enclosure belies an engineering and design prowess. [ardiyno] didn’t want one of these run-of-the-mill enclosures, so he made one from scratch out of limestone.

The stone [ardiyno] used comes from the southern bit of his native Netherlands. It’s a very nice limestone, easily carvable and capable of very fine detail as seen in [ardiyno]’s scary/creepy carved limestone bookends.

Inside the enclosure, [ardiyno] has a calendar/clock/environmental sensor displaying the current date, time, relative humidity, and light level on twelve 14-segment displays. [ardiyno] admits the enclosure is a bit oversized for how much space his project takes up, but the extra space is meant for future internal expansions.

After the break, you can check out [ardiyno]’s method of using a screw driver to carve the limestone. Normally, we’d call foul over someone abusing tools, but the limestone is so soft (the pyramids were made out of limestone using soft copper tools), there’s most likely very little damage to the screwdriver.

via reddit

Continue reading “Make Your Next Enclosure Out Of Stone”

Automatic Wakeboarding In A Pond

[Rick] sent in an awesome project he and his uncle [Charlie] have been working on for this summer. It’s a completely automatic wakeboarding system that tows [Charlie] and company from one end of his backyard pond and back again.

The entire system is supported by two towers at either end of the pond. Strung between these towers is a 420 foot cable that pulls the rider from one end to the other before stopping, and automatically continuing in the opposite direction. Apart from stopping and starting the motor attached to the cable, no user input is required. This means anyone lucky enough to make it to [Charlie]’s farm can wakeboard all afternoon without a break.

[Rick] posted a few short videos covering the internals of the system. From what we can see, the guys are using a LabJack U3-LV data acquisition unit to grab the speed, direction, and position of the rider. This data is sent to a laptop that controls the motor suspended on one of the towers.

There are a few more videos of this incredibly fun toy available after the break.

Continue reading “Automatic Wakeboarding In A Pond”

Building A DIY GPS Cube

Originally, [Karman] wanted to build a speedometer for his bike. Feature creep makes fools of us all, so after a month of work [Karman] had a  GPS-enabled cube that tells him his current latitude and longitude, current time, course, direction and speed.

[Karman]’s GPS cube uses a cheap GPS module, Arduino Mini Pro, a magnificent OLED display, and a LiPo battery salvaged from a first gen iPod nano. Surprisingly, the build is very clean – there are no wires, headers, or random epoxy globs sticking out everywhere. The entire build is just a bit larger than one cubic inch, allowing [Karman] to carry around the power of a GPS device in his pocket.

The code for [Karman]’s GPS cube uses the TinyGPS library for Arduino, that has a few great functions that track the number of satellites visible and report the current time. Now all that’s left to do is fabricate a case for this awesome little project. As always, video demo after the break.

Continue reading “Building A DIY GPS Cube”

Electronic Bike Derailleur

[Nabil] sent in an awesome electronic bicycle derailleur. Now, instead of pulling a steel cable with a shifting mechanism, [Nabil] can change gears electronically. As a bonus, the derailleur can be controlled by a small bicycle computer, so he’s always in the right gear.

The new electronic derailleur is controlled by a pair of servos with push buttons in the handle bar. This allows [Nabil] to automatically trim his chain, completely eliminating chain rub.

This electronic shifter is part of [Nabil]’s much large bike computer project. In addition to electronic control of what gear the bike is in, [Nabil] will be adding a GPS, accelerometer, an altimeter and a heart rate monitor and pulse ox meter. That’s an impressive bit of kit, and we cant wait to see the entire project finished. You can pick up the current version of the design over on GitHub and follow all the updates on [Nabil]’s blog.