Presence-Detecting Cushion Keeps You From Sitting Your Life Away

They say that sitting is the new smoking. They’re wrong — smoking is much, much worse, for you than sitting, and smoking only while standing or while jogging around the block in no way to justify the habit. But they’re also not wrong that humans weren’t made for extended periods parked on their posteriors, but we do it anyway, to the detriment of our heart health, posture, and general well-being. So something like this butt-detecting stand-up reminder could make a big difference to your health.

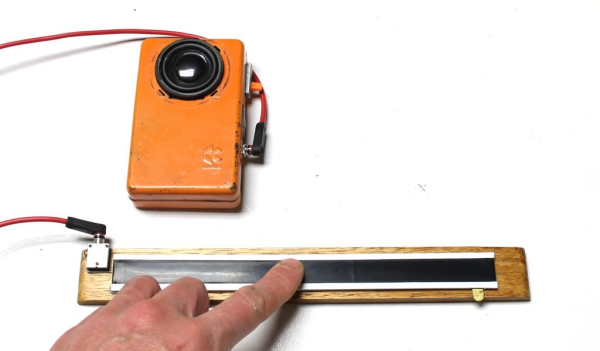
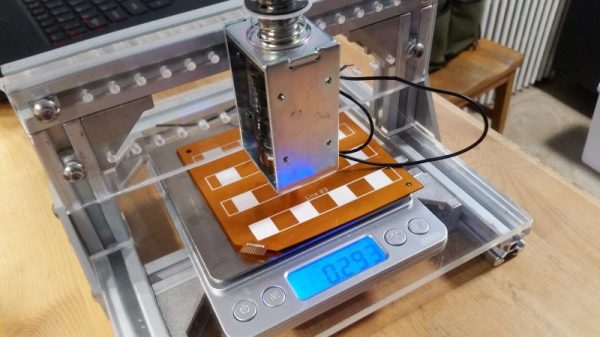
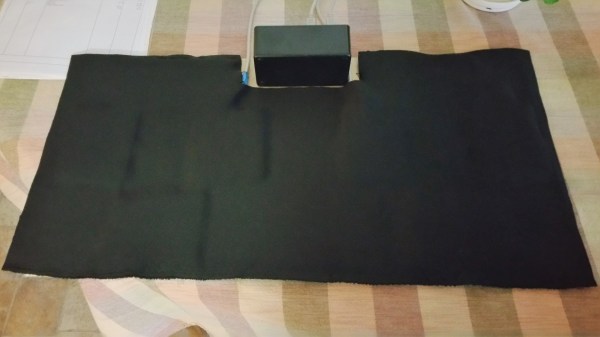
While like many of us, [Dave Bennett] has a wearable that prompts him to get up and move around after detecting 30 minutes of sitting, he found that it’s too easy to dismiss the alarm and just go right on sitting. Feeling like he needed a little more encouragement to get up and go, he built a presence detector completely from scratch. His sensor is a sheet of static-protective Velostat foam wrapped in conductive tape; when compressed, the resistance across the pad drops, making it easy to detect with a simple comparator circuit.

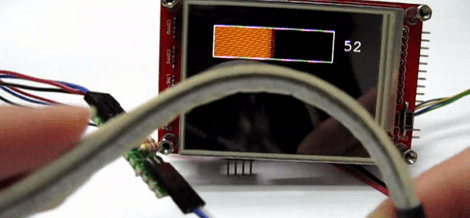
We admit to getting excited when we first saw the alarm circuit; a quick glance at the schematic seemed like it was based on a 555, which it totally could be. But no, [Dave]’s design goals include protection against spoofing the alarm with a quick “cheek sneak,” which was most easily implemented in code. So that 8-pin device in the circuit is an ATtiny85, which sounds the alarm after 30 minutes and requires him to stay off his butt for a full minute before resetting. The video below hits the high points of design and shows it in use.

Annoying? Yes, but that’s the point. Of course a standing desk would do the same thing, but that’s not going to work for everyone, so this is a nice alternative.

Continue reading “Presence-Detecting Cushion Keeps You From Sitting Your Life Away”

DIY Ribbon Controller For A DIY Synth

There’s kind of a special joy in making instruments, no matter how simple or complex they are. Even if it’s a straight-up noisemaker, that’s noise you can be proud of. And besides, noise plus rhythm equals music.

Whenever you’re ready to have some next-level fun, try making controllers for your DIY instruments. Synthesizers of all stripes are often controlled with various types of potentiometers. While it would definitely be an interesting exercise to make your own standard twist-style potentiometer, [lonesoulsurfer] shows that making a ribbon controller is relatively easy.

A ribbon controller is essentially a deconstructed potentiometer that uses your finger to actuate the wiper. Here the wiper is made from Velostat, a fun, low-cost conductive material that’s also pressure-sensitive. The rest of the ribbon controller is a sandwich of thin copper plates and non-conductive plastic mounted on a wood base.

But what’s a fun controller without a fun instrument to control? As a special bonus, [lonesoulsurfer] made a little square wave-squirting synth based on the 4046 hex inverter and included the schematic for it. Slide your finger past the break to check ’em both out.

Depending on what you have lying around, it may be easier to make analog instruments like this rubber band boinger or its country cousin, the wheelbarrow bass.

Continue reading “DIY Ribbon Controller For A DIY Synth”

Flex PCBs Make Force-Mapping Pressure Sensor For Amputee

What prosthetic limbs can do these days is nothing short of miraculous, and can change the life of an amputee in so many ways. But no matter what advanced sensors and actuators are added to the prosthetic, it has to interface with the wearer’s body, and that can lead to problems.

Measuring and mapping the pressure on the residual limb is the business of this flexible force-sensing matrix. The idea for a two-dimensional force map came from one of [chris.coulson]’s classmates, an amputee who developed a single-channel pressure sensor to help him solve a painful fitting problem. [chris.coulson] was reminded of a piezoresistive yoga mat build from [Marco Reps], which we featured a while back, and figured a scaled-down version might be just the thing to map pressure points across the prosthetic interface. Rather than the expensive and tediously-applied web of copper tape [Marco] used, [chris] chose flexible PCBs to sandwich the Velostat piezoresistive material. An interface board multiplexes the 16 elements of the sensor array to a PIC which gathers and records testing data. [chris] even built a test stand with a solenoid to apply pressure to the sensor and test its frequency response to determine what sorts of measurements are possible.

We think the project is a great application for flex PCBs, and a perfect entry into our Flexible PCB Contest. You should enter too. Even though [chris] has a prototype, you don’t need one to enter: just an idea would do. Do something up on Fritzing, make a full EAGLE schematic, or just jot a block diagram down on a napkin. We want to see your ideas, and if it’s good enough you can win a flex PCB to get you started. What are you waiting for?

Large hi-res pressure sensor mat

Hi-Res, Body-Sized Pressure Sensor Mat

Hackers often find uses for pressure sensitive materials, detecting footfalls during walking or keypresses in a synthesizer being two examples. [Marco Reps] decided he’d make a hi-res, body-sized pressure sensitive mat mainly for computer-guided physiotherapy, though he wouldn’t rule out using it for gaming (twister anyone?). That meant making the equivalent of a body-sized matrix circuit of around 7000 sensors, as well as a circuit board with a multitude of shift registers. The result has a surprisingly good resolution, capable of making clearly distinguishable the heel, arch and front part of a foot.

His choice of pressure sensitive material was Velostat, a polymeric foam available as large sheets. The foam is impregnated with carbon black to make it electrically conductive, but being a foam, its resistance changes when pressure is applied. The first layer of the mat is made up of one centimeter wide strips of copper tape laid out lengthwise and spaced one centimeter apart. That’s followed by the Velostat and then another layer of copper tape oriented horizontally this time. The pressure sensors are the sandwiches formed by where the tapes overlap. In the first video below he shows how he measured and graphed the Velostat’s dynamic range to help decide to use one centimeter squares. He also puts together a smaller prototype, with good results.

Testing the mat
Testing the mat

For the body-sized mat, we count around 50 by 140 overlapping areas for a total of around 7000 one square centimeter sensors. And of course to measure each sensor in that large matrix, as you can imagine, he made up a custom circuit board with shift registers. The board works by applying positive voltage to the columns one-by-one, while each time going through all the rows and reading their voltages. Making the board was in itself was an adventure, taking a chance on a Chinese manufacturer asking only $2. But watch the second video below where he evaluates the result, including trying unsuccessfully to delaminate a board. Sadly he forgot to include places on the board for diodes, one for each column, and fixing that is another adventure he walks us through. Patience was definitely a prerequisite here, not only for making the mat, and fixing the diode problem, but also for connecting up 96-pin ribbon cables. We applaud his efforts, and his results. Check out the second video below for the making of the large mat and the circuit board.

Continue reading “Hi-Res, Body-Sized Pressure Sensor Mat”

Hackaday Prize Entry: $50 Foot Controlled Mouse

ALS robbed one of [C. Niggel]’s relative’s of the use of their upper body. This effectively imprisoned them in their house; ALS is bad stuff. Unfortunately too, the loss of upper body mobility meant that they couldn’t even use the computer to interact with people and the outside world. However, one day [C. Niggel] noted that the relative’s new electric wheelchair was foot controlled. Could this be adapted to a computer mouse?

He looked up commercial solutions and found them not only prohibitively expensive, but also fraught with proprietary drivers and all sorts of bad design nonsense. With all of the tools out there today there was no reason this couldn’t be quickly prototyped and sent to the relative in need.

He used a combination of conductive thread, neoprene, and velostat to build the pads themselves. The pads were balanced with some adjusting resistors in series. The signals are sent to an Adafruit Feather board which interprets them and converts it to a PS/2 standard.

The first version of the mouse used separate pads glued to a MDF board with contact cement. However this, along with some other initial design flaws, resulted in premature failure of the mouse. [C. Niggel] quickly returned to the lab and produced a new version with more robust construction and mailed it off. So far so good!

Hackaday Links Column Banner

Hackaday Links: November 23, 2014

The 2015 Midwest RepRap Festival, a.k.a. the MRRF (pronounced murf) was just announced a few hours ago. It will be held in beautiful Goshen, Indiana. Yes, that’s in the middle of nowhere and you’ll learn to dodge Amish buggies when driving around Goshen, but surprisingly there were 1000 people when we attended last year. We’ll be there again.

A few activists in St. Petersburg flushed GPS trackers down the toilet. These trackers were equipped with radios that would send out their position, and surprise, surprise, they ended up in the ocean.

[Stacy] has been tinkering around with Unity2D and decided to make a DDR-style game. She needed a DDR mat, and force sensitive resistors are expensive. What did she end up using? Velostat, conductive thread, and alligator clips.

You know the Espruino, the little microcontroller board that’s basically JavaScript on a USB stick? Yeah, that’s cool. Now you can do remote access through a telnet server letting you write and debug code over the net.

The Open Source RC is a beautiful RC transmitter with buttons and switches everywhere, a real display, and force feedback sticks. It was a Hackaday Prize entry, and has had a few crowdfunding campaigns. Now its hit Indiegogo again.

Speaking of crowdfunding campaigns, The Mooltipass, the designed-on-Hackaday offline password keeper, only has a little less than two weeks until its crowdfunding campaign ends. [Mathieu] and the rest of the team are about two-thirds there, with a little more than half of the campaign already over.

Making Flex Sensors On The Cheap

When [Michelle] was making a sign language translation glove, she needed a bunch of flex sensors. These flex sensors cost about $10 a pop, meaning her budget for the project was eaten up by these bendy potentiometers. Since then, [Michelle] figured out a great way to make extremely inexpensive bend sensors using anti-static bags and masking tape, allowing her to start her project once again.

The build works by sandwiching Velostat plastic bags – the same electrically conductive bags all your components arrive in – between layers of masking tape. A jumper wires is attached to a strip of Velostat attached to a piece of masking tape. Between two of these anti-static/masking tape assemblies, another piece of Velostat is placed. After laminating all these pieces together, [Michelle] had a primitive yet very functional flexible potentiometer.

After attaching one of these flex sensors to an analog input of her dev board of choice, she had a wonderful and inexpensive flexible sensor. You can check out this sensor in action after the break.

Continue reading “Making Flex Sensors On The Cheap”