When You Get Serious About Selling A Project, Consider An Accelerator

I was visiting San Francisco, scratching my head for something cool to cover for Hackaday. When it hit me: this is one of the leading cities in the world for starting new companies. It’s known for its software, but with Tesla, Type A Machines, Intel, Apple, and more within an hour’s drive of the city, there’s got to be a hardware scene as well. Silicon isn’t a software product after-all. But where do you find it, and how do you get a hardware start-up going in one of the most expensive cities in the world?

That’s where hardware accelerators or incubators, whichever name they prefer, come in. One-third hackerspace, two-thirds business crash course, they help you skip a lot of the growing pains associated with starting a capital intensive thing like a hardware business. I dropped in, and they kindly gave me a few minutes of their time. I wanted to find out what a hacker could do if they felt it was time to turn those skulls into dollars. What are the requirements. What is the cost? What help does the incubator offer to the burgeoning capitalist in a hacker?

Continue reading “When You Get Serious About Selling A Project, Consider An Accelerator”

Fingerprint Garage Door Won’t Open Every Time A Neighbor Microwaves A Burrito

With three kids, including himself, [Dave] faced the very real likelihood of someone absent-mindedly leaving the garage door open and being robbed blind. Rather than installing some plebeian solution, he compiled a feature list. And what a feature list it is!

The garage door needed to notify him of its status with strategically placed LEDs around the house, and give him full control on his devices. He wanted to open and close it using his existing key-code entry system. Lastly, it would be extra-cool if he could add some biometrics to it; in this case, a fingerprint sensor.

The core hardware is the staple Arduino augmented with a fingerprint module, a touch screen, some vitamins, and a WiFi break-out. He also worked up some casings in tinkercad: one for the indoor hardware, another with a flip cover for the outdoor fingerprint scanner.

We think [Dave] has accomplished what he set out to. We can just picture the would-be-thief staring at the finger print scanner and moving their operation one house over where the world is simpler. Video after the break.

Continue reading “Fingerprint Garage Door Won’t Open Every Time A Neighbor Microwaves A Burrito”

Upgrade The Graphics On A Sega Game Gear To Mental

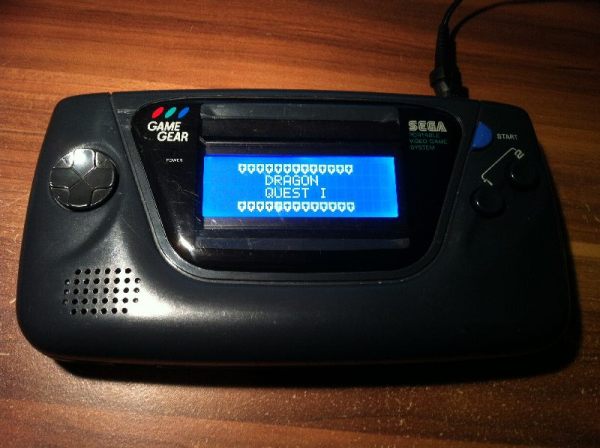
[Nino K] built a portable game player for text adventures. He decided he had spent enough time with the ATmega328 kit from NerdKits to build a more advanced project.

To start with, he built a prototype PCB and tested out the concept. It worked so he began on the real thing. He tore out the guts from a broken Game Gear, saving some parts like those responsible for supplying power. Impressively, he etched his own replacement boards for the Game Gear’s control pads; surprising himself at how simple it ended up being. He fit a 16×4 LCD into the space previously occupied by the Game Gear’s screen.

The program itself is a simple text adventure of his own creation. He even added little 8-bit sprites. The story is classic, a princess has gotten herself in some trouble and a brave hero has been coerced into saving her. Last, he added some music and sound effects from Zelda with a piezo buzzer.

This project is guaranteed to disappoint a visiting younger cousin or relative, but we like to think of that as a feature and not a bug. Great work!

Pick Locks Like In The Movies: Using A Bobby Pin

Sure, many of us don’t hold our hair in place with bobby pins, but just in case we need to break into a secure location, like the broom closet we locked ourselves out of, it wouldn’t hurt to know how to use them to pick a lock.

There are worse things you can make a lockpick set out of. After you’ve secured two bobby pins, one for the tension wrench and one for a small hook pick. To make the small hook simply flatten the pick and remove the rubber cap from the side without waves; this is the small hook. To make the tension wrench, bend the second pin in half. Simple.

The guide also functions as a very good beginner tutorial on lock-picking, covering the types of simple locks one is likely to encounter, and the various shortcomings of their construction that could impede efforts to open them. The whole site is a good resource for those who enjoy the art.

After that it is standard lock picking. Put torsion on the barrel and prod those pins into place with your reconfigured fashion accessories.

Laser PCB Exposer Built From CD-ROM Drives

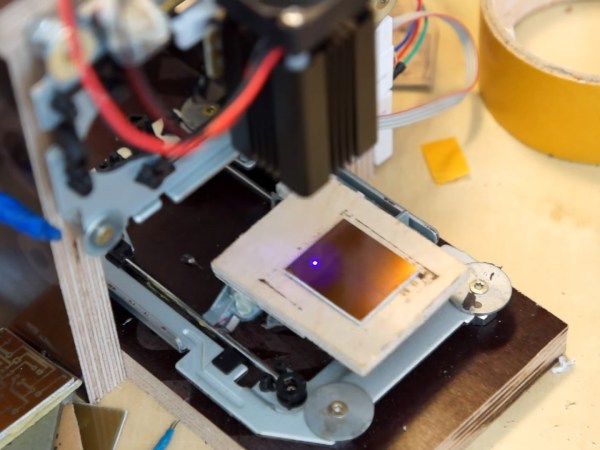
[Neumi] has built a CNC Laser using CD-ROM drives as the X and Y motion platforms. The small 405nm laser can engrave light materials like wood and foam. The coolest use demonstrated in the video is exposing pre-coated photo-resist PCBs.

With $61 US Dollars (55 Euro) for the Arduino, stepper drivers, and a laser in the project, [Nuemi] got a pretty capable machine after adding a few parts from the junk bin. He wanted to avoid using existing software in order to learn the concepts behind a laser engraver. In the end, he has a working software package which can send raster scans to an Arduino mega. The mega then controls the sync between the stepper and laser firings. The code is available on GitHub.

The machine can do a 30x30mm PCB in 10 minutes. It’s not about to set a record, but it’s cool and not at all bad for the price. You can see the failed PCBs lined up in the video from the initial tuning, but the final one produced a board very equivalent to the toner transfer method. Video after the break.

Continue reading “Laser PCB Exposer Built From CD-ROM Drives”

Upcycle Old Speakers With C.H.I.P.

Sometimes you get a piece of hardware that’s so cool you can’t help but fix it back up. There are a lot of companies after that sweet, sweet Raspberry Pi money, and the $9 US Dollar C.H.I.P. is a very interesting contender for the space. We have been especially enjoying the stream of neat hacks and example projects they’ve been putting out.

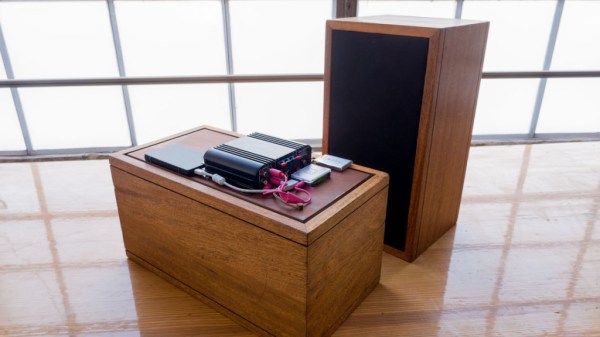
In this case, [Peter] wanted to get a pair of walnut speakers up to modern standards. Already suffering from a glut of audio equipment in his personal space, he decided to sweeten the deal by adding support for his library of music.

The first step was ordering a new set of drivers to replace the aged 40-year-old ones occupying the set. After he got them installed, he added C.H.I.P., a power supply, an amplifier, and a 500GB hard-drive. The controlling software behind the installation is the venerable mpd. This way he can control the speakers from any device in his house as long as he had an interface installed for the daemon.

We’re glad these speakers didn’t end up in the garbage behind a goodwill somewhere, and they do look good.

Wifi Enabled Center Speaker

[Ronald] has been improving his audio set-up for a while now, his latest revision culminating in this WiFi enabled center channel speaker. It all started with feature creep as you can see in this direct quote, “Being an engineer, I couldn’t stop here, not now that I had a way of adding more features…”

He had purchased a new amplifier for his system, but was irritated that the loudness setting would re-enable itself every time he switched inputs. First he thought he might just have a little board that intercepted the signals from his remote and tacked on the loudness off signal. It occurred to him that it would be even cooler if he could control it from his computer or phone. So he opened the case on his new amp and discovered an i2c break-out. We can guess how it went after that.

In version 2.0 he kept most of his work from 1.0, but wanted to simplify the set-up and build it all into a center speaker unit since an amplifier and two speaker cabinets takes up too much room. He fit a similar set-up as before in the center speaker casing, but added a touch screen and a few other improvements.  Though, strangely, he ran into some problems upgrading to the Raspberry Pi 2.0 and had to revert.

The final result is very nice, though obviously not done. As the engineer’s mantra goes, “If it ain’t broke, it doesn’t have enough features yet.”