Vintage 8mm Camera Now Powered By Raspberry Pi

If you are a lover of the aesthetic of vintage photography and Instagram’s filters don’t quite cut it for you, then there are plenty of opportunities even in this post-film age to sample the real thing. Plastic lens cameras from the former Soviet Bloc countries or the Pacific rim are still in production, and you can still buy 35mm and 120 roll film to put in them.

You can even still buy 8mm film for your vintage movie camera, but it’s rather pricey. [Claire Wright] is a young film maker who had an old 8mm camera and really wanted that analog film feel to her work, and she and her father solved this problem by using the 8mm camera’s lens in front of a Raspberry Pi camera sensor. Since an 8mm film frame is 4.5mm x 3.3mm and the Pi camera sensor size is 3.76mm x 2.74mm, it’s quite a good fit.

Their first prototype had a custom case which concealed the Pi camera behind the lens on rails taken from an old CD-ROM drive, and had an HDMI screen on top and a pistol grip to make it portable. An external thumb screw allowed the camera to be positioned in the focal plane.

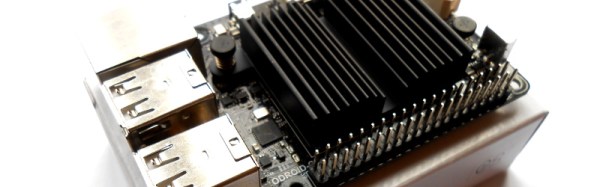
A further refinement has stepper motor driven focus driven from an Adafruit motor drive HAT. The software is simply the standard Pi camera utilities. To demonstrate the system, she made a short video about how it came to be, and took the camera on a road trip to Austin, Texas. She tells us a local 3D print shop is working on a 3D model to replicate the camera, but sadly as yet there are no resources for the Hackaday crowd to examine.

Her video is below. She has certainly captured the feel of an 8mm film very well. If the SUVs were replaced by cars with more chrome in her Mainstreet America, you might almost be there in the 1950s.

Continue reading “Vintage 8mm Camera Now Powered By Raspberry Pi”

Could Metal Particles Provide Clean Fuel For The Future?

The oil age is ending. Electricity and battery power are great, but are we really going to be able to replace the entire oil industry before it’s too late? Researchers at the McGill University have come up with a possible clean fuel replacement — metal particles.

Tiny metal particles, as fine in grain size as icing sugar, have long been used for fireworks and even for rocket propellants, like the space shuttle’s solid-fuel booster rockets. But very little research has been used on applying this technology for use as a recyclable fuel — until now.  Continue reading “Could Metal Particles Provide Clean Fuel For The Future?”

Tiny Raspberry Pi Shield For High-Quality RF Signals

Among its many tricks, the Raspberry Pi is capable of putting clock signals signal out on its GPIO pins, and that turns out to be just the thing for synthesizing RF signals in the amateur radio bands. What [Zoltan] realized, though, is that the resulting signals are pretty dirty, so he came up with a clever Pi shield for RF signal conditioning that turns a Pi into a quality low-power transmitter.

[Zoltan] stuffed a bandpass filter for broadband noise, a low-pass filter for harmonics, and a power amplifier to beef up the signal a bit into a tiny shield that is cleverly engineered to fit any version of the Pi. Even with the power amplifier, the resulting transmitter is still squarely in the realm of QRP, and the shield is optimized for use as a WSPR beacon on the 20-meter band. But there’s plenty of Pi software available to let hams try other modes, including CW, FM, SSB, and even SSTV, and other signal conditioning hardware for different bands.

Yes, these are commercially available products, but even if you’re not in the market for a shield like this, or if you want to roll your own, there’s a lot to learn from [Zoltan]’s presentation at the 2015 TAPR Digital Communications Conference (long video below). He discusses the difficulties encountered getting a low-profile shield to be compatible with every version of the Pi, and the design constraints that led to the decision to use SMT components.

Continue reading “Tiny Raspberry Pi Shield For High-Quality RF Signals”

Fingerprint Garage Door Won’t Open Every Time A Neighbor Microwaves A Burrito

With three kids, including himself, [Dave] faced the very real likelihood of someone absent-mindedly leaving the garage door open and being robbed blind. Rather than installing some plebeian solution, he compiled a feature list. And what a feature list it is!

The garage door needed to notify him of its status with strategically placed LEDs around the house, and give him full control on his devices. He wanted to open and close it using his existing key-code entry system. Lastly, it would be extra-cool if he could add some biometrics to it; in this case, a fingerprint sensor.

The core hardware is the staple Arduino augmented with a fingerprint module, a touch screen, some vitamins, and a WiFi break-out. He also worked up some casings in tinkercad: one for the indoor hardware, another with a flip cover for the outdoor fingerprint scanner.

We think [Dave] has accomplished what he set out to. We can just picture the would-be-thief staring at the finger print scanner and moving their operation one house over where the world is simpler. Video after the break.

Continue reading “Fingerprint Garage Door Won’t Open Every Time A Neighbor Microwaves A Burrito”

Crawl, Walk, Run: Planning Your First CPU Design

I’ve worked with a lot of students who want to program computers. In particular, a lot of them want to program games. However, when they find out that after a few weeks of work they won’t be able to create the next version of Skyrim or Halo, they often get disillusioned and move on to other things. When I was a kid, if you could get a text-based Hi-Lo game running, you were a wizard, but clearly the bar is a lot higher than it used to be. Think of the “Karate Kid”–he had to do “wax on, wax off” before he could get to the cool stuff. Same goes for a lot of technical projects, programming or otherwise.

I talk to a lot of people who are interested in CPU design, and I think there’s quite a bit of the same problem here, as well. Today’s commercial CPUs are huge beasts, with sophisticated memory subsystems, instruction interpreters, and superscalar execution. That’s the Skyrim of CPU design. Maybe you should start with something simpler. Sure, you probably want to start learning Verilog or VHDL with even simpler projects. But the gulf between an FPGA PWM generator and a full-blown CPU is pretty daunting.

Continue reading “Crawl, Walk, Run: Planning Your First CPU Design”

KiCAD BOM Management

KiCAD remains a popular tool for designing PCBs and other circuits, and with good reason: it’s versatile and it’s got pretty much everything needed to build any type of circuit board you’d want. It also comes with a pretty steep learning curve, though, and [Jeff] was especially frustrated with the bill of materials (BOM) features in KiCAD. After applying some Python and Kivy, [Jeff] now has a BOM manager that makes up for some of KiCAD’s shortcomings.

Currently, the tool handles schematic import, like-component consolidation, and a user-managed parts database that can be used to store and retrieve commonly used parts for the future. All of the changes can be saved back to the original schematic. [Jeff] hopes that his tool will save some time for anyone who makes more than one PCB a year and has to deal with the lack of BOM features native to KiCAD.

[Jeff] still has some features he’d like to add such as unit tests, a user guide, and a cleaner user interface. What other features are you anxious to see added to KiCAD?

This script is a great tool for anyone who has had similar frustrations. KiCAD is popular to modify and expand, too: there have been tools for mechanical CAD export, a parts-generator and cost-tracker, and an Eagle to KiCAD converter if you’re thinking of making the switch.

Hands On With The Odroid C2; The Raspberry Pi 3 Challenger

A couple of weeks ago we covered the launch of the Odroid C2, a single board computer from the Korean company Hardkernel in the same form factor and price segment as the Raspberry Pi 3. With four ARM Cortex A53 cores at 2GHz and 2Gb of DDR3 on board it has a paper spec that comfortably exceeds that of the Pi 3’s 1.2GHz take on the same cores and 1Gb of DDR2. This could be a board of great interest to our readers, so we ordered one for review.

The parcel from Korea arrived in due course, the C2 in its box inside it well protected by a sturdy cardboard outer packaging. We had ordered a couple of extras: a micro-SD card preloaded with Ubuntu and a USB power lead (more on that later), both were present and correct.

When unpacking the board it is immediately obvious how closely they’ve followed the Raspberry Pi form factor. There are a few differences, no camera or DSI connectors, the SD card in a different place, a power jack where the Pi has its audio jack, and oddly the network port is the other way up. Otherwise it looks as though it should fit most Pi cases. Of course the only case we had to hand was a PiBow which are cut for specific Pi models, so sadly we couldn’t test that assertion.

Continue reading “Hands On With The Odroid C2; The Raspberry Pi 3 Challenger”