Mini Camera Crane For Your Workbench

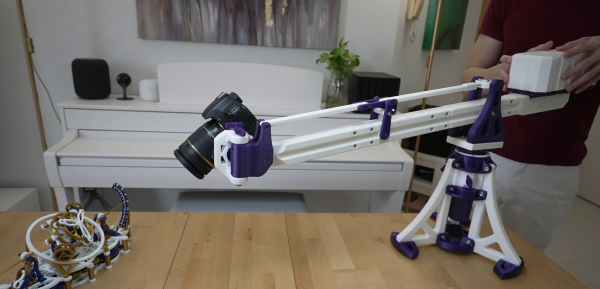
If you’ve ever tried to document a project on your workbench with photos or videos, you know the challenge of constantly moving tripods to get the right shot. [Mechanistic] is familiar with this frustration, so he built a small desktop camera crane.

Heavily inspired by [Ivan Miranda]’s large camera crane, this build scales it down and mainly uses 3D printed parts. The arm of the crane can pivot along two axes around the base, uses a parallel bar mechanism to keep the camera orientation constant through its vertical range of motion. The camera mount itself allows an additional 3 degrees of freedom to capture any angle and can mount a DSLR or smartphone. To offset the weight of the camera, an adjustable counterweight is added to the rear of the arm. Every axis of rotation can be locked using thumbscrews.

We can certainly see a crane like this being useful on our workbench for more than just camera work. You could create attachments for holding lights, displays, multimeters, or some helping hands. For some tips on creating an engaging project video check out [Lewin Day]’s excellent video on the subject.

Continue reading “Mini Camera Crane For Your Workbench”

Telepresence Robot For “Doing The Rounds”

When you are responsible for maintaining devices at a client’s location, software tools like remote desktop and SSH are great, but sometimes they are not enough. For some problems, you need to get eyes and hands on the device to figure out what’s going on and fix the problem. This is a challenge [Will Donaldson] from EDM Studio is all too familiar with. They develop and maintain interactive museum exhibits all over the world, so they created Omni, a modular telepresence robot for inspection, maintenance, and a variety of other tasks.

The Omni uses a set of three omni-wheels under its base, powered by DC geared motors with encoders, each controlled by a separate motor driver and Arduino Nano. A similar arrangement was used by Mark Rober for his domino art robot. The main controller is a Raspberry Pi 4 running ROS2 (Robot Operating System), which takes inputs from a 360 LIDAR sensor, high-quality camera module, and IMU.

All the components are mounted on a series of plates separated using threaded rods. This arrangement allows for maximum flexibility and space, especially the open-top plate, which has a grid of holes machined in to allow almost anything to be mounted. In this case, a robotic arm is mounted for manipulating the environment. Another neat feature is the charging station connector, consisting of two parallel metal strips on the outside of the robot.

Omni’s mission is very similar to that of Spot, the robotic dog from Boston Dynamics intended, among other things, for Industrial Inspection. What practical purposes would you use Omni for? Let us know in the comments below.

Supercapacitor E-Bike With DIY Motor

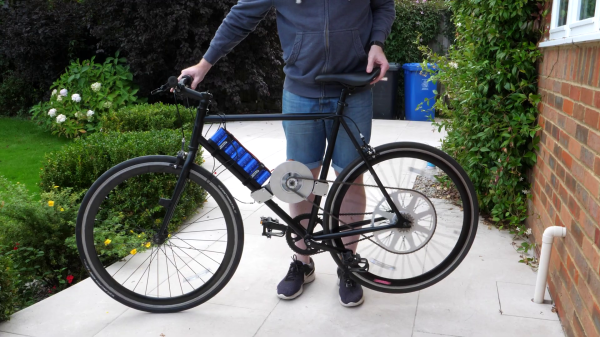
Supercapacitor technology often looks like a revolutionary energy storage technology on the surface, but the actual performance numbers can be rather uninspiring. However, for rapid and repeated charge and discharge cycles, supercaps are hard to beat. [Tom Stanton] wanted to see if supercaps have any practical use on e-bikes, and built a DIY electric motor in the process.

One of the problems with supercaps is the rapid voltage drop during discharge compared to batteries, which can limit the amount of usable energy. In an attempt to get around the voltage limitation, [Tom] built his own axial flux motor for the bike, using 3D printed formers for the coils and an aluminum rotor with embedded magnets. He expected torque to be severely limited, so he also machined a large sprocket for the rear wheel. He built a capacitor bank using six 2.7V 400F supercaps, only equivalent to the capacity of a single AA cell. Although it worked, the total range was only around 100 m at low speed. When he hooked the motor up to a conventional battery, he did find that it was quite usable, if a bit underpowered.

The controller for the DIY motor was not capable of doing regenerative braking, so he fitted the capacitors to another e-bike that does have regenerative braking. Using this feature, he was able to reclaim some power while slowing down or going downhill. Since this type of charging cycling is what supercaps are suited for, it worked, but not nearly to the level of being practical.

[Tom]’s projects are a popular feature here on Hackaday, and he has also experimented with supercaps in RC “rockets” and a flywheel for energy storage on the same bike.

Continue reading “Supercapacitor E-Bike With DIY Motor”

3D Printed VTOL Craft Can Land And Recharge Itself, And Team Up With Other Drones

For a long time fixed wing VTOL drones were tricky to work with, but with the availability of open source flight control and autopilot software this has changed. To make experimentation even easier, [Stephen Carlson] and other researchers from the RoboWork Lab at the University of Nevada created the MiniHawk, a 3D printed VTOL aircraft for use a test bed for various research projects.

Some of these project include creating a longer wingspan aircraft by combining multiple MiniHawks in mid-flight with magnetic wing-tip mounts, or “migratory behaviors“. The latter is a rather interesting idea, which involves letting the craft land in any suitable location, and recharging using wing mounted solar panels before continuing with the next leg of the mission. With this technique, the MiniHawk could operate on mission almost indefinitely without human intervention. This is a departure from some other solar planes we’ve seen, which attempt to recharge while flying, or even ditch batteries completely, which limits operation to sunny weather conditions.

The design is open source, with all the relevant information and files available on GitHub. This looks like a fun craft even if you don’t plan on doing research with it, and [Stephen] also created an FPV specific canopy cover.

Continue reading “3D Printed VTOL Craft Can Land And Recharge Itself, And Team Up With Other Drones”

The Ultimate BRRRT Simulator: Fully Featured A-10 Warthog Cockpit

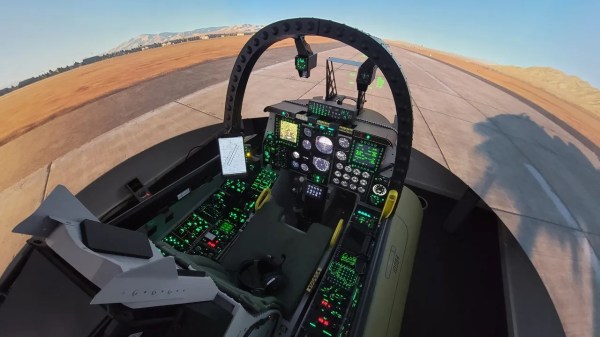
The Fairchild Republic A-10 “Warthog” with its 30 mm rotary cannon has captured the imagination of friendly soldiers and military aviation enthusiasts on the ground for as long as it’s been flying. One such enthusiast created the Warthog Project, a fully functional A-10 cockpit for Digital Combat Simulator, that’s almost an exact copy of the real thing.

It started as a four monitor gaming cockpit, with a Thrustmaster Warthog H.O.T.A.S. The first physical instrument panels were fuel and electrical panels bought through eBay, and over time more and more panels were added and eventually moved to dedicated left and right side units. All the panels communicate with the main PC over USB, either using Arduinos or purpose-made gaming interface boards. The Arduinos take input from switches and control knobs, but also run 7-segment displays and analog dials driven by servos. The panels were all laser-cut using MDF or perspex and backlit using LEDs.

The main instrument panel is a normal monitor masked with laser-cut MDF and Thrustmaster multi-function display bezels. The cockpit is run by the open source Helios Cockpit Simulator for DCS. The main monitors were replaced by a large custom-built curved projection panel lit up by a pair of projectors. It seems this is one of those projects that is never quite finished, and small details like a compass get added from time to time. Everything is documented in detail, and all the design files are available for free if you want to build your own.

We’ve seen a few impressive simulator cockpit builds from hardcore enthusiasts over the years, including a Boeing 737, P-51 Mustang, and even a Mech cockpit for Steel Battalion. Continue reading “The Ultimate BRRRT Simulator: Fully Featured A-10 Warthog Cockpit”

Open Source Autopilot For Cheap Trolling Motors

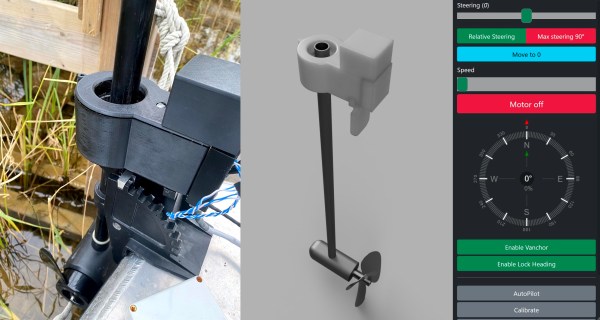
Quiet electric trolling motors are great for gliding into your favorite fishing spot but require constant correction if wind and water currents are at play. As an alternative to expensive commercial GPS-guided trolling motors, [AlexAsplund] created Vanchor, an open source system for adding autopilot to a cheap trolling motor.

To autonomously control an off-the-shelf trolling motor, [Alex] designed a 3D printed steering unit powered by a stepper motor to attach to the original transom mount over the motor’s vertical shaft. A collar screwed to the shaft locks the motor into the steering unit when the motor is lowered. The main controller is a Raspberry Pi, which hosts a WiFi hotspot and web server for control and configuration using a smartphone. Using navigation data from an e-compass sensor and a marine GPS chart plotter, it can hold position, travel in a specified direction, or follow a defined route. [Alex] is also planning to add the option of using a GPS module instead of a commercial plotter.

For an estimated total of $300, including the motor, this seems like a viable alternative to commercial systems. Of course, it might be possible to add even more features by integrating the open source ArduRover autopilot, as we’ve seen [rctestflight] do on multiple autonomous vessels. You can also build your own open source chart plotter using OpenCPN, which rivals commercial offerings.

Download From NFC Datalogger, No App Required

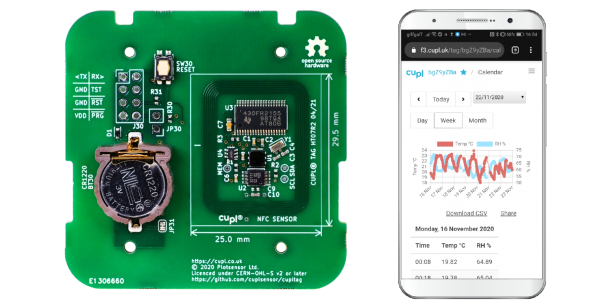
The plethora of wireless technologies has made internet-connected devices the norm, but it’s not always necessary if you don’t need real-time updates. Whether it’s due to battery life, or location and range constraints, downloading data directly from the device whenever possible might be a viable solution. [Malcolm Mackay] demonstrates an elegant solution on the open source cuplTag temperature/humidity logger, using any NFC-enabled smartphone, without requiring a custom app.

The cuplTag utilizes the feature on NFC-enabled smartphones to automatically open a URL provided by the cuplTag. It encodes the sensor data from the sensor unit as a circular buffer in a ~1 kB URL, which automatically uploads to a web frontend that plots the data. (You can use their server or run your own.)

This means that data can be collected by anyone with the appropriate phone with zero setup. The data is displayed on the web app and can be downloaded as a CSV. To deter spoofing, each tag ships with a secret key which is used to generate a unique HMAC every time the circular buffer changes.

Battery life is a priority on the cuplTag, and it’s theoretically capable of running seven years on a single CR1220 coin cell using the current-sipping Texas Instruments MSP430 microcontroller. The hardware, firmware, and server-side frontend and backend code are all open source and available on GitHub.

Earlier this year, we held a data logging contest, and featured submissions that monitored everything from your garden’s moisture levels to your caffeine intake.