A breadboard full of chips

BreadBin Is An 8-bit TTL CPU On A Breadboard, In A Bread Bin

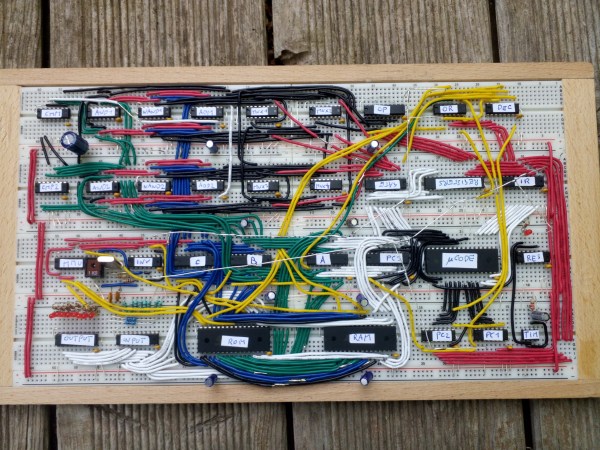
Building a CPU out of logic gates is a great way to learn about the inner workings of microprocessors, and we’ve seen several impressive projects in this area. [c0pperdragon] set himself the task of designing a very capable 8-bit CPU using just 74HC type logic chips on a large plug-in breadboard. To emphasize the “bread” theme, he put the whole thing inside an actual bread bin and named the accompanying software BERND after an anthropomorphic loaf from a German TV channel.

Getting a reliable breadboard big enough for the task at hand required some engineering by itself: cheap breadboards often have trouble making a reliable contact at each and every pin, while the length of the ground path and lack of shielding cause trouble for high-speed circuits. [c0pperdragon] therefore bought high-quality breadboards and soldered the ground wires together to get a proper low-resistance path. A ground plane made of aluminium foil should also help to prevent signal integrity issues.

A breadboard computer inside a wooden bread binThe total circuit is incredibly compact for a complete CPU, using just 33 chips. This includes 64 KB of flash to store programs as well as a 555 timer to generate a clock signal. I/Os are limited to simple eight-bit input and output buses, but a sixteen-bit address bus gives it plenty of space to add ROM, RAM or fancier interfaces.

The aforementioned BERND program is an emulator that allows the BreadBin to run code written for the 65C816 processor, the 16-bit CPU used in the Super Nintendo and the Apple IIGS. This makes it easy to re-use programs developed for [c0pperdragon]’s earlier OS816 system, which uses an actual 65C816 chip.

This has to be one of the cleanest breadboard CPU designs we’ve seen so far, certainly a lot cleaner than this one. If you’d like to watch a detailed guide to building an 8-bit CPU on a breadboard, we recommend this project.

Repairing Underground Power Cables

When we were kids, overhead power cables were a constant fixture in the neighborhood. Not only were they the bane of our kites, but they also had a tendency to fail during storms leaving us in the dark. These days lots of cables go underground — safer for kites and harder to storm damage. On the other hand, if they do need repair, it is a major operation, as [Practical Engineering] discusses in a recent post you can watch below.

In the story, a large underground distribution cable — the Scattergood-Olympic transmission line — had a failure in the late 1980s. The 10 mile line has three high-voltage phases and when the line was created, running high voltage lines underground was a bit exotic.

Continue reading “Repairing Underground Power Cables”

Mini Camera Crane For Your Workbench

If you’ve ever tried to document a project on your workbench with photos or videos, you know the challenge of constantly moving tripods to get the right shot. [Mechanistic] is familiar with this frustration, so he built a small desktop camera crane.

Heavily inspired by [Ivan Miranda]’s large camera crane, this build scales it down and mainly uses 3D printed parts. The arm of the crane can pivot along two axes around the base, uses a parallel bar mechanism to keep the camera orientation constant through its vertical range of motion. The camera mount itself allows an additional 3 degrees of freedom to capture any angle and can mount a DSLR or smartphone. To offset the weight of the camera, an adjustable counterweight is added to the rear of the arm. Every axis of rotation can be locked using thumbscrews.

We can certainly see a crane like this being useful on our workbench for more than just camera work. You could create attachments for holding lights, displays, multimeters, or some helping hands. For some tips on creating an engaging project video check out [Lewin Day]’s excellent video on the subject.

Continue reading “Mini Camera Crane For Your Workbench”

Investigating A Defective USB Power Bank Module

Call us old fashioned, but we feel like when you buy a piece of hardware, the thing should actually function. Now don’t get us wrong, like most of you, we’re willing to put up with the occasional dud so long as the price is right. But when something you just bought is so screwed up internally that there’s no chance it ever could have ever worked in the first place, that’s a very different story.

Unfortunately, that’s exactly what [Majenko] discovered when he tried out one of the USB-C power bank modules he recently ordered. The seemed to charge the battery well enough, but when he plugged a device into the USB output, he got nothing. We don’t mean just a low voltage either, probing with his meter, he became increasingly convinced that the 5 V pin on the module’s IP5306 chip literally wasn’t connected to anything.

So close, yet so far away.

Curious to know what had gone wrong, he removed all the components from the board and started sanding off the solder mask. With the copper exposed, his suspicions were confirmed. While they did route a trace from the chip to the via that would take the 5 V output the other side of the board, it wasn’t actually connected.

This is a pretty blatant bug to get left in the board, but to be fair, something similar has happened at least once or twice to pretty much everyone who’s ever designed their own PCB. Then again, those people didn’t leave said flaw in a commercially released module…

Continue reading “Investigating A Defective USB Power Bank Module”

Demonstrating ThermoAcoustics With The Rijke Tube

The Rijke tube is a very simple device that demonstrates the principle of thermoacoustics quite clearly. Construction is quite straightforward, simply place a metal gauze at the bottom end of a tube, approximately one quarter of the way up, apply a source of heat to the gauze, and instant sound. The heat produces convection, setting up a longitudinal standing wave. This is due to air passing over the hot gauze, suddenly expanding and causing a pressure change, which rushes out the tube. Next, the airflow cools and slows, and air starts to head back into the tube, and the cycle repeats. Adjusting the tube length by slipping a sleeve over it, adjusts the pitch of the note, simply because the air has a different distance to travel. If there is a flame aimed at the gauze from below, the sound will stop since the air is already hot when it hits the hot gauze, no pressure change occurs, and no oscillation.

As [Keith], the reader who sent in the tip, suggests it would be fun to attach a servo to a sleeve on the tube, build multiple units and hang the whole thing off a MIDI controller. This could make for some fun times, and we have to agree. The problem of keeping the gauze hot could be solved in a number of ways, direct resistive heating could work, but maybe inductive heating would be cleaner?

Now, we can’t find an instrument which works in this manner, which sounds like a hack in the making for someone out there so inclined.

There have been a few fire-orientated musical devices over the years, such as this Rijke Tube Organ, various variants on the pyrophone, including this neat one performing with a tesla coil, and while we’re talking about music fire, howsabout a two dimensional rubens’ tube variant?

Continue reading “Demonstrating ThermoAcoustics With The Rijke Tube”

Yes, You Can Put Out A Burning Gas Well With A Nuclear Bomb

Nuclear explosives were first developed as weapons of war in the pitched environment of World War II. However, after the war had passed, thoughts turned to alternative uses for this new powerful technology. Scientists and engineers alike dreamed up wild schemes to dig new canals or blast humans into space with the mighty power of the atom.

Few of these ever came to pass, with radiological concerns being the most common reason why. However, the Soviet Union did in fact manage to put nuclear explosions to good use for civilian ends. One of the first examples was using a nuke to plug an out-of-control gas well in the mid 1960s.

Continue reading “Yes, You Can Put Out A Burning Gas Well With A Nuclear Bomb”

Raspberry Pi Plots World Wide Earthquakes

What do you do when you stumble across a website posting real-time earthquake data? Well, if you’re [Craig Lindley] you write some code to format it nicely onto a display, put it in a box, and watch it whilst making dinner.

[Craig] started off with coding in Forth on the ESP32, using ESP32Forth, but admits it didn’t go so well, ditching the ESP32 for a Raspberry Pi 3 he had lying around, and after a brief detour via C++, he settled on a Python implementation using Pygame.

A case was 3D printed, which he says worked OK, but needs a little tuning to be perfect. There is no shortage of casing options for the Pi with the official 7″ display, [Craig] suggests that it probably wasn’t worth the effort to 3D print the case and if he was building it again would likely use a commercially available option which had a better fit.

When developing the code, and watching it work, he noted clusters of earthquakes around Hawaii, then he found out Kilauea had just gone up. Wow.

For a similar take, check out this other recent build using an ESP32 and the same data source.