A High Power Wood Rocket In 5 Days

Getting started with model rocketry is relatively cheap and easy, but as you move up in high power rocketry, there are a few hoops to jump through. To be able to buy rocket motors larger than H (160 N·s / 36 lbf·s impulse) in the US, you need to get certified by the National Association of Rocketry. The main requirement of this certification involves building, flying, and recovering a rocket with the specific motor class required for the certification level. [Xyla Foxlin] had committed to doing her Level 2 certification with a couple of friends, thanks to the old procrastination monster, was forced to build a rocket with only 5 days remaining to launch data.

For Level 2 certification, the rocket needs to fly with a J motor, which is capable of producing more than 640 N·s of impulse. Fortunately [Xyla] had already designed the rocket in OpenRocket, and ordered the motor and major body, nosecone, and parachute components. The body was built around 2 sections of 3″ cardboard tubes, which are covered in a few layers of fiberglass. The stabilizing fins were laser cut from cheap plywood and were epoxied to the inner tube which holds the motor and passes through the sides of the outer tube. The fins are also fibreglassed to increased strength. For a unique touch, she covered the rocket with a real wood veneer, with the rocket’s name, [Fifi], inlaid with darker wood. The recovery system is a basic parachute, connected to the rocket body with Kevlar rope.

[Xyla] finished her rocket just in time for the trek out to the rocket range. She successfully did the certification flight and recovered [Fifi] in reusable condition, which is a requirement. There was nothing groundbreaking about [Fifi], but then again, reliability the main requirement. You don’t want to do a certification with a fancy experimental rocket that could easily fail. Continue reading “A High Power Wood Rocket In 5 Days”

Actively Balancing A Robot With A Gyroscope

Self-balancing robots are a common hacker project, but we don’t often see them using spinning gyroscopes to achieve that balance. Robot master [James Bruton] decided to build a robotic platform with active gyroscopic stabilization, starting from a simple proof of concept.

A gyroscope can balance, but cannot actively counteract external forces directly. However, if the gyroscope is tilted around an axis it will exert a force perpendicular to that axis of tilt, known as gyroscopic precession. By tilting the gyroscope with an actuator, and orienting the gyroscope correctly, gyroscopic precession can be used for stabilization. This is known as a control moment gyroscope. [James] demonstrated this with a 3D printed proof of concept, which is used as an IMU to measure the angle of tilt, and use a PID loop to correct the imbalance with a servo actuating the gyroscope.

His second platform used a pair of gyroscopes spinning in opposite directions to compensate for any unintended gyroscopic precession along another axis. A pair of roller skate wheels allow the entire platform to roll along. Due to a slight imbalance in the platform, [James] noticed that the gyroscopes will continue to creep in one direction, until reaching the end-stops and falling over. By adding a second software controller to keep track of how much the gyroscopes have to move to maintain balance, it can continuously calculate and update the balancing point. This prevents the gyroscopes from hitting the end stops.

Control moment gyroscopes are commonly used for attitude control on spacecraft, and to reduce the rolling motion of boats in waves. [James] has plans to combine a control moment gyroscope with the more conventional balancing method, to balance a robot on a single wheel.

We’ve seen a two wheeled RC cars use gyroscopes before, but without the active control part.
Continue reading “Actively Balancing A Robot With A Gyroscope”

Homemade Metal Band Saw

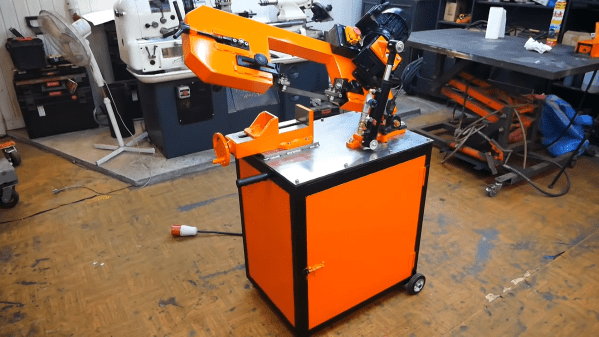
As the channel name implies, [Workshop From Scratch] is building a growing list of tools and machines from scratch. His latest edition is a heavy-duty metal band saw.

As with all his tools, the frame consists of thick welded steel components. The blade runs on a pair of modified belt pulleys and is driven by a motor with a worm gearbox. The blade tension is adjustable, and so are the pair of blade guides. To slowly lower the blade while cutting, [Workshop From Scratch] added a hydraulic piston with an adjustable valve to limit the lowering speed. When it reaches the bottom, a limit switch turns off the motor. The saw is mounted on a heavy steel table and can rotate at the base to cut at different angles. A heavy-duty vise, also built from scratch holds the workpieces securely in place.

Judging by the amount of steel he cuts for his projects, we imagine this saw will be a welcome addition to the shop. It’s impressive what he is able to build with just a drill, angle grinder, and welder. Many of the other tools used in the video, like the magnetic drill press and hydraulic vise are also his handiwork. Continue reading “Homemade Metal Band Saw”

Adding MQTT To A Solar Powered PIR Light

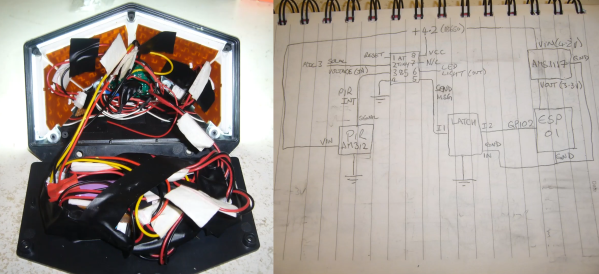
The size and price of the ESP wifi modules have quickly made them into one of the preferred building blocks for IoT devices. Unfortunately they are not particularly well suited for very low power applications.  [LittlePetieWheat] wanted to add MQTT to a cheap PIR solar light, so he paired an ESP with an Attiny85 to hold it to a strict power budget.

Most of these lights contain some sort of no-name microcontroller that monitors the analog PIR sensor, and turns on the LEDs as required. [LittlePetieWheat] replaced the PIR sensor with one that gives a digital output for simpler interfacing. The Attiny serves as the low power brains of the project. Its tasks include reading the solar panel and battery voltages, and PIR output. When movement is detected by the sensor, it activates a clever little latching power circuit to power on the ESP01 just long enough to send a MQTT message. The LEDs are only turned on if there is no power coming from the solar panel. The solar power is stored in a 18650 battery.

The Attiny85 might not be a powerhouse, but it is perfect for simple, low power applications like this. We’ve also seen it pushed to its limits by running tiny machine learning models, or receiving software updates over I2C. Continue reading “Adding MQTT To A Solar Powered PIR Light”

Building A Robotic Band To Make Up For Lack Of Practice

Learning to play a musical instrument well requires a significant time investment. [Ivan Miranda] had dreamt of doing this but made peace with the fact that his talents and motivation lay in building machines. However, he has decided to play to his strengths and is building a robotic band. See the videos after the break.

So far he has mechanized a hi-hat, snare drum, and a very basic guitar. The guitar is nothing more than a single string stretched across an aluminum frame, with an electronic pickup. Most of the work has gone into the solenoid-driven picking mechanism. He wanted to avoid picking the string when the solenoid is turned of, so he created a simple little mechanism that only comes in contact with the string when it’s moving in one direction. A bistable solenoid might be a simpler option here.

For the high hat, [Ivan] built a custom stand with two bistable solenoids to lift and drop the top cymbal. A solenoid-driven drumstick was also added. The snare drum uses a similar mechanism, but with a larger solenoid. So far he hasn’t really worked on a control system, focusing mainly on electronics.

[Ivan] points out several times that he has knows very little about making music, but we do enjoy watching him explore and experiment with this new world. Usually, his projects involve a lot more 3D printing, like when he built a giant nerf bazooka or a massive 3D printed tank. Continue reading “Building A Robotic Band To Make Up For Lack Of Practice”

Learn Engineering Concepts With Some Cool Animations

All feats of engineering build on a proper understanding of the basic engineering concepts. Learning these concepts from a book or class tends to be a rather uninspiring exercise, unfortunately. To make this task a lot more enjoyable, [The Efficient Engineer] has produced a series of high-quality, easy-to-watch videos on the concepts.

The videos focus mainly on mechanical and structural engineering and contain excellent animations and just enough math to give you a basic understanding. There are 22 videos so far and cover a wide variety of topics, including FEA analysis, stress and strain, aerodynamics, and Young’s modulus. Each video starts with the basics, then digs down into the topic, all the while visualizing the subject being discussed. For example, for FEA he starts with the applications, then covers discretization (meshing) and how to solve the calculations.

For more excellent educational videos, check out [Real Engineering] and [Practical Engineering]. Continue reading “Learn Engineering Concepts With Some Cool Animations”

A Wireless Speaker Pair From Dead Earbuds

Building a Bluetooth speaker is easy with the availability of cheap Bluetooth receivers, but surprisingly there isn’t a simple way to build a pair of truly wireless stereo speakers. [Matt] from DIY Perks realized that modern Bluetooth earbuds contain all the electronics to do just that.

Due to the popularity of these earbuds, a broken pair can be picked up very cheaply on eBay. Usually, it’s only the battery or speaker unit that give out, neither of which are required for this build. [Matt] goes through the process of taking a pair of earbuds apart, and then soldering on battery and speaker wires. The speaker wires are connected to an audio amp, which drives a mid-range and treble speaker driver, and a subwoofer. The outputs to the amp are also filtered to match the speakers. Power is provided by a set of four 18650 cells.

[Matt] housed the driver and electronics in some attractive CNC machined wood enclosures. In the video, he places a lot of emphasis on properly sealing all the gaps to get the best possible audio quality. As with all of his projects, the end result looks and performs like a high-end commercial product. We’re almost surprised that he didn’t add any brass to the speakers, as he did on his USB-C monitor or PS5 enclosure build. Continue reading “A Wireless Speaker Pair From Dead Earbuds”