Learn Sailing Mechanics Without Leaving Dry Land

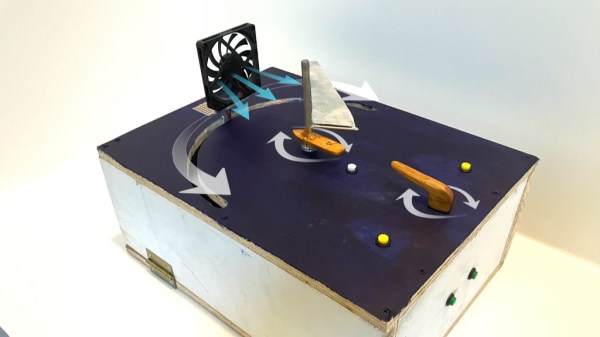
The ancient art of sailing can be very intimidating for the uninitiated given the shifty nature of wind. To help understand the interaction of wind direction and board orientation, [KifS] designed a hands-on sailing demonstrator that lets students grasp the basics before setting foot on a real sailboat.

The demonstrator uses a potentiometer as a tiller to control a model sailboat’s angle, while another stepper motor adjusts the position of a fan to simulate changing wind directions. With an Arduino Uno controlling everything, this setup affords students the opportunity to learn about sail positioning and adjusting to shifting winds in an interactive way, without the pressures and variables of being on the water.

[KifS]’s creation isn’t just about static demonstrations. It features four modes that progressively challenge learners—from simply getting a feel for the tiller, to adjusting sails with dynamic wind changes, even adding a game element that introduces random wind movements demanding quick adjustments. [KifS] mentions there are potentials aspects that can be refined, like more realistic sail response and usability, but it already achieved the main project goals.

There are a myriad of potential ways to add new tech to the ancient art of sailing. We’ve seen a DIY autopilot system, full sensor arrays, and an open source chart plotter. It’s even been proven you can have a wind powered land vehicle that travels faster than the wind.

The Simple Tech Behind Hidden Camera Detectors

If you’ve ever been concerned about privacy in a rental space or hotel room, you might have considered trying one of the many “spy camera detectors” sold online. In the video after break [Big Clive], tears one down and gives us  an in-depth look at how these gadgets actually work, and their limitations.

Most detector follow the same basic design: a ring of LEDs through which the user inspects a room, looking for reflections indicating a potential hidden camera. Although this device can help spot a camera, it’s not entirely foolproof. The work best when you’re close to the center of a camera’s field of view, and some other objects, like large LEDs can produce similar reflections

The model examined in this video takes things one step further by adding a disc of dichroic glass. Coated with a metallization layer close to the wavelength of the LEDs, it effectively acts a bandpass filter, reducing reflections from other light sources. [Big Clive] also does his customary reverse-engineering of the circuit, which is just a simple flasher powered by USB-C.

[Big Clive]’s teardowns are always an educational experience, like we’ve seen in his videos on LED bulb circuits and a fake CO2 sensor.

Continue reading “The Simple Tech Behind Hidden Camera Detectors”

Framework Motherboard Turned Cyberdeck

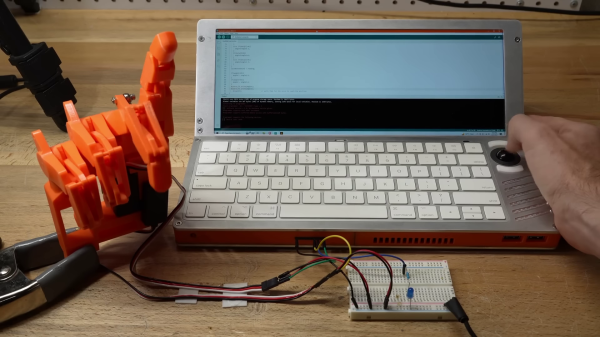
The beauty of a modular ecosystem lies in how it allows individuals to repurpose components in unconventional ways. This is precisely what [Ben Makes Everything] has achieved by using a Framework laptop’s motherboard and battery to create a slab-style cyberdeck. (Video, embedded below.)

The Framework motherboard presents an excellent choice for custom portable computer projects due to its relatively compact size and built-in modular I/O port options, all based on USB-C. Framework even released additional documentation to support this use-case. It’s significantly more powerful than the standard Raspberry PI, which is typically employed in similar projects. Ben chose a 2400 x 900 IPS display that can draw power and video through a single USB-C cable. For user input, he opted for an Apple keyboard and an optical trackball with a PS2 interface. He utilized a Arduino Pro Micro as a PS2-to-USB adaptor, using the remaining pins on the Arduino as a versatile interface for electronic projects.

The enclosure is crafted from machined aluminum plates with 3D printed spacers to secure all components. The screen can be tilted up to 45 degrees for more ergonomic desktop use. The Framework motherboard is equipped with four USB-C ports for peripheral devices; [Ben] allocated one for the display and another for a USB hub which connects the keyboard, Arduino, and external USB and HDMI connectors. The remaining USB-C ports are still available for original Framework expansion cards.

The completed project not only looks fantastic but may also be highly functional. It would have been a great entry in our recent Cyberdeck Challenge.

3D Printing On A Spinning Rod

FDM 3D printing traditionally operates on a layer-by-layer basis, using a flat bed to construct parts. However, [Humphrey Wittingtonsworth IV] demonstrates in his video how this process can be significantly enhanced in terms of mechanical strength and print speed by experimenting with printing on a rotating rod instead of the standard flat bed.

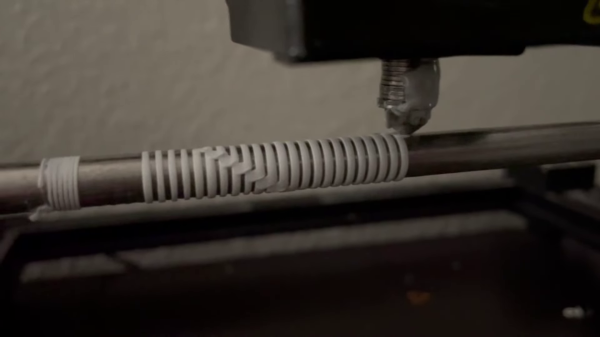
[Humphrey] modified a Creality CR-10 3D printer by removing the bed and installing a regular 8mm linear rod under the hotend. The rod is rotated by a stepper motor with a 3:1 belt drive. This lets him use the rod as the printing surface, laying down layers axially along the length of an object. This means parts that can stand up to bending forces much better than their upright-printed counterparts.

Additionally, this rotational action allows for printing functional coil and wave springs – even multi-layer ones – something that’s not exactly feasible with your run-of-the-mill printer. It can also create super smooth and precise threads as the print head follows their path. As an added bonus – it could also speed up your printing process as you’re just spinning a slim rod instead of slinging around an entire bed. So cylindrical parts like tubes and discs could be printed almost as quickly as your hotend can melt filament.

Of course, this approach isn’t without its challenges. It works best for cylindrical components and there’s a limit to how small you can go with inner diameters based on your chosen rod size. Then there’s also the task of freeing your prints from their rod once they’re finished. [Humphrey] addressed this by creating mesh sleeves that snugly fit over his center rod. This limits how much melted plastic can adhere to it, making removal a breeze.

Continue reading “3D Printing On A Spinning Rod”

Stretching The Flight Time On A Compressed Air Plane

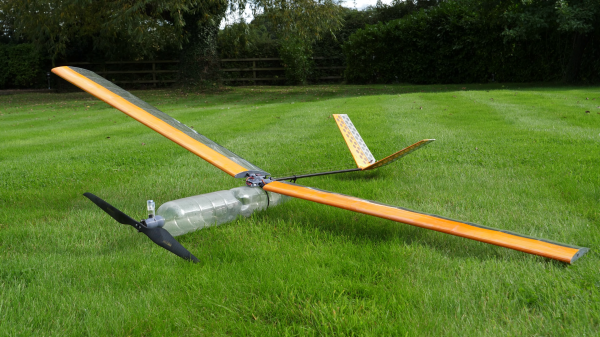
[Tom Stanton] has been experimenting with compressed air motors on model aircraft for a good few years, but keeping them aloft (and intact) for more than a few seconds has proven a tough nut to crack. His latest design represents a breakthrough — pulling off an impressive 1 minute and 26 seconds flight on 4 liters of compressed air.

The model incorporates an enhanced engine design featuring an expanding seal on the piston, a concept inspired by the old Air Hogs toy plane. For the airframe, he constructed lightweight wings using 3D printed ABS ribs on a carbon spar and reinforcing rods, all of which were wrapped in heat shrink film. Additionally, [Tom] incorporated a thin balsa former along the leading edge of the wing to help maintain its shape. The fuselage is also composed of a carbon fiber tube, and is outfitted with printed fittings to install the wings, V-tail, RC electronics, and soda/air bottles. A hollow nylon bolt holds the two bottles together end-to-end while allowing the motor to be screwed directly onto the front bottle. To conserve weight, each of the two V-tail control surfaces are actuated by single cables linked to servos, with piano wire torsion springs in the hinges to maintain tension

Despite successful flights, [Tom]’s trials were not without challenges. One crash threatened severe damage to his airframe, but thanks to a central 3D printed bracket that absorbed most of the impact, total destruction was avoided. Similarly, a printed shaft saved his expensive carbon fiber propeller from being damaged during multiple landings, an outcome that led [Tom] to devise a readily replaceable consumable connector.

A second video after the break offers a behind-the-scenes insights into this project including some fascinating technical details. For more on this project’s history, take a look at the initial diaphragm engines and his attempts to make them fly.

Continue reading “Stretching The Flight Time On A Compressed Air Plane”

Keeping Badgers At Bay With Tensorflow

Human-animal conflict is always a contentious issue, and finding ways to prevent damage without causing harm to the animals often requires creative solutions. [James Milward] needed a humane method to stop badgers and foxes from uprooting his garden, leading him to create the Furbinator 3000, a system that combines computer vision with audio deterrents..

[James] initially tried using scent repellents (which were ignored) and blocking access to his garden (resulting in more digging), but found some success with commercial ultrasonic audio repellent devices. However, these had to be manually turned off during the day to avoid annoying activation of the PIR motion sensors by [James] and his family, and the integrated solar panels couldn’t keep up with the load.

This presented a good opportunity to try his hand at practical machine vision. He already had a substantial number of sample images from the Ring cameras in his garden, which he turned into a functional TensorFlow Lite model with about 2.5 hours of training. He linked it with event-activated RTSP streams from his Ring cameras using the ring-mqtt library. To minimize false positives on stationary objects, he incorporated a motion filter into the processing pipeline. When it identifies a fox or badger with reasonable accuracy, it generates an MQTT event.

[James] modified the ultrasonic devices so they would react to these events using an ESP8266-based WeMos D1 Mini Pro development board and added an external 5 V power supply for sustained operation. All development was performed in a Docker container which simplified deployment on a Raspberry Pi 4.

After implementing the system, [James] woke up to the satisfying sight of his garden remaining untouched overnight, a victory that even earned him some coverage by the BBC.

Thanks for the tip [Laurent]!

E-Bikes Turned Solar Car

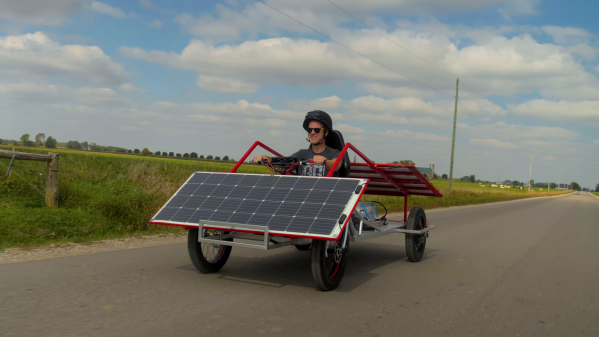
There is something to be said for a vehicle that gains range just by standing outside in the sun. In the video after the break, [Drew Builds Stuff] demonstrates how he turned a pair of bicycles into a solar-powered vehicle.

The inspiration for this build started with a pair of 20″ steel framed fat tire bikes [Drew] picked up in a liquidation sale. He welded up a simple steel chassis, and attached the partial bicycle frame and forks to the chassis, using them as steerable front wheels. A short arm was welded to each of the fork, linking them together with threaded rods and rod ends that connect to centrally mounted handlebars. The rear driving wheels are from a 20″ e-bike conversion kit, with the disk brake assembly from the cannibalized bikes.

The solar part of this build comes in the form of three 175W flexible solar panels mounted on cedar frames, coming in at 10 lbs per mounted panel. [Drew] considered using conventional rigid solar panels, but they would have been 4-6 times heavier. The two panels mounted to the rear of the vehicle are on a hinged frame to allow easy access to the electronics below. Battery storage is made up of two 24V 100Ah batteries wired in series, connected to a 60A solar charge controller and the e-bike motor controllers.

The vehicle has a top speed of about 45km/h and 100km range on batteries alone. It might not be fast or engineered for maximum efficiency, but it looks like a ton of fun and relatively simple to build. As [Drew] says, it’s not a how-to for building a perfect solar-powered vehicle, it’s how he built one.

Continue reading “E-Bikes Turned Solar Car”