Star Wars: Yoda Stories with a modified tile set

Reverse Engineering Star Wars: Yoda Stories

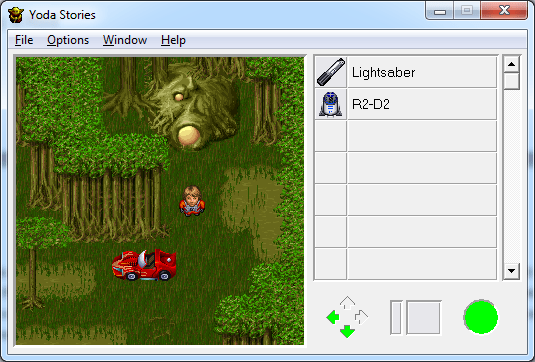
Star Wars: Yoda Stories was released by LucasArts in 1997 to minimal critical acclaim. As IGN said, “like Phantom Menace proved, just because it’s Star Wars doesn’t mean it’s good.” This didn’t stop [Zach] from playing it, and years later, taking an interest in reverse engineering the game.

[Zach]’s reverse engineering of Star Wars: Yoda Stories (google cache) takes a look at the game’s data file. This binary file is parsed by the game at run time to extract sound effects, sprites, and map tiles. Perhaps the best known game data file type was Doom’s WAD file, which had purpose built editing programs from third parties.

After a quick look at the data file in HxD, [Zach] began writing scripts in C# to extract different sections of the data file. Once the sections were found, more code was used to apply a color palette and generate bitmaps.

In the end, [Zach] managed to get a couple thousand tiles of the game’s data. He found some interesting ones, such as the sports car that he replaced the X-Wing with in his mod. The engine for an earlier Lucasarts game, Indiana Jones and His Desktop Adventures, should be very similar, and once we find the Mac install disk and a copy of ResEdit, we’ll post something on Hackaday.io.

A collection of boards that make up the LED Jacket

A Very Bright LED Jacket

Last year, [Ytai] went to Burning Man for the first time. He was a bit inexperienced, and lacked the lumens to make him visible on the Playa. This year, he made up for it by building an extra bright LED Jacket.

The jacket consists of 48 LEDs, at 150 lumens each. Each RGB LED module was placed on its own PCB, and controlled by the tiny PIC12F1571 microcontroller. This microcontroller was a great fit since it has three PWM channels (one for each color) and costs 50 cents. Firmware on the PIC allows the boards to be daisy-chained together to reduce wiring. This was done by using a protocol similar to the popular WS2811 LEDs.

Assembling 50 of the boards presented a challenge. This was addressed by using surface mount components, a solder stencil from OSH Stencils, an electric skillet, and a good amount of patience. The final cost of each module was about $3.

With 50 of the boards assembled, a two layer jacket was sewn up. The electronics were sandwiched between these two fabric layers, which gave the jacket a clean look. A wrist mounted controller allows the wearer to select different patterns.

For a full rundown of the jacket, check out the video after the break.

Continue reading “A Very Bright LED Jacket”

Intel Edison on a box

Running Golang On The Intel Edison

While most embedded development is still done in C and/or assembly, some people are working with more modern languages. The team over at Gobot has successfully managed to get Go running on the Intel Edison.

The Go programming language, which has been around for about five years, compiles to machine code like C. It has a number of modern features including concurrency, garbage collection, and packages.

We’ve looked at the Edison on Hackaday before, and even took a detailed look at the hardware. It features a Quark SoC, Bluetooth, and WiFi, which makes it well suited for connected devices.

Getting Go to work on the Edison hardware wasn’t particularly difficult, since it supports the Pentium instruction set and MMX. However, a library was needed to interface with the Edison’s peripherals. The Gobot team whipped up gobot-intel-iot, which makes it easy to work with GPIO, I2C, and PWM.

After the break, the team demos PWM on the Edison using Go.
Continue reading “Running Golang On The Intel Edison”

PCB of the NoteOn Smartpen showing components

THP Semifinalist: NoteOn Smartpen

There are a ton of apps out there for taking notes and recording ideas, but sometimes the humble pen is best. However, if you have the tendency to lose, crumple, or spill caffeinated beverages on your pen and paper notes, having a digital copy is quite nice.

The NoteOn Smartpen by [Nick] aims to digitize your writing on the fly while behaving like a normal pen. It does this by using the ST LSM9DS0TR: a 9-axis inertial measurement unit (IMU). These inertial measurements are processed by a STM32 Cortex M4F processor and stored on the internal flash memory.

To retrieve your notes, the Nordic nRF8001 Bluetooth Low Energy radio pairs the MCU with a phone or computer. The USB port is only used to charge the device, and the user interface is a single button and LED.

The major hardware challenge of this device is packaging it in something as small as a pen. Impressively, the board is a cheap 2 layer PCB from OSHPark. The assembled device has a 10 mm diameter, which is similar to that of ‘dumb’ pens.

The NoteOn doesn’t require special paper, and relies only on inertial measurements to reconstruct writing. With the hardware working, [Nick] is now tackling the firmware that will make the device usable.

SpaceWrencherThe project featured in this post is a quarterfinalist in The Hackaday Prize.

The Walltech Smartwatch

THP Quarterfinalist: WALLTECH Smartwatch

While there is lots of hype about a big company launching a new wearable product, we’re more interested in [Walltech]’s open source OLED Smartwatch. This entry into The Hackaday Prize merges a collection of sensors and an OLED screen into a wearable device that talks to your smartphone over Bluetooth Low Energy.

The device is based on the IMUduino BTLE development board. This tiny Arduino clone packs an inertial measurement unit (IMU), a Nordic nRF8001 Bluetooth radio, and an ATMEGA32u4 microcontroller.

The 1.5″ OLED display comes from [miker] who makes an OLED module based on the SSD1351. A STP200M 3D pedometer provides activity monitoring in a tiny package.

On the hardware side, packaging all these components into something that will fit on your wrist is quite difficult. The prototype hardware is built from mostly off the shelf components, but still manages to be watch sized.

At this point, it looks like the code is the main challenge remaining. There’s a lot of functionality that could be implemented, and [Walltech] even mentions that it’s designed to be very customizable. It even supports Android; the Apple Watch can’t do that.


SpaceWrencherThe project featured in this post is a quarterfinalist in The Hackaday Prize.

A 3D printed peristaltic pump with tubing

A 3D Printed Peristaltic Pump

After getting access to a Lulzbot 3D printer, [Tim] designed a 3D printable peristaltic pump. The design was done in OpenSCAD, which makes it parametric and easy to modify.

Peristaltic pumps work by squeezing a length of tubing to push fluids. This mechanism is similar to how your intestines work. The pump provides an isolated fluid path, which is why they’re commonly used in medical and food grade applications. Like many products in the medical space, these pumps tend to be rather expensive. Being able to print one for your own projects could save quite a bit of cost.

The pump is based on [emmett]’s gear bearing design. One nice thing about this design is that it is printed preassembled. Pop it out of the printer, add some tubing, and you’re ready to pump fluids.

On top of the isolated fluid path, this pump gives accurate volume measurement. For that reason, we can imagine it moving booze for a robotic bartender build. After the break, a video of the pump moving some fluid.

Continue reading “A 3D Printed Peristaltic Pump”

Hacking A Pogoplug Into A $20 PBX

The Pogoplug Series 4 is a little network attached device that makes your external drives accessible remotely. Under the hood of this device is an ARM processor running at 800 MHz, which is supported by the Linux kernel. If you’re looking to build your own PBX on the cheap, [Ward] runs us through the process. Since the Pogoplug 4 is currently available for about $20, it’s a cheap way to play with telephony.

Step one is to convert the Pogoplug to Debian, which mostly requires following instructions carefully. After the Pogoplug is booting Debian, the Incredible PBX bundle can be installed. We’ve seen this bundle running on a Raspberry Pi in the past. Incredible PBX’s preconfigured setup based on Asterisk and FreePBX gives a ton of functionality out of the box.

With your $20 PBX running, there’s a lot that can be done. Google’s Voice service allows unlimited free calling to the USA and Canada. With Internet connectivity, you get email notifications for voicemails, and can query WolframAlpha by voice.