A DIY Interface for Subaru Select Monitor 1

Hacking A 20 Year Old Subaru

While cars are slowing becoming completely computer-controlled, road vehicles have been relying on computers since the 1970’s. The first automotive use of computers was in engine control units (ECUs) which came along as fuel injection systems started to replace carburetors.

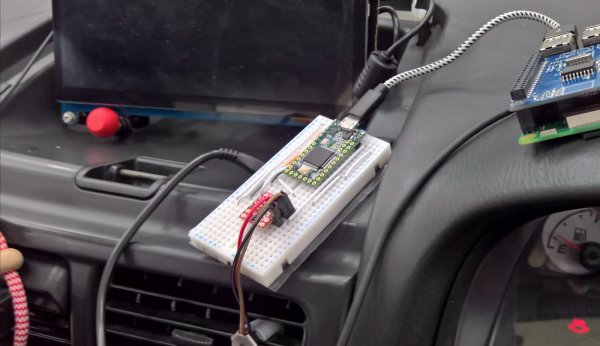
[P1kachu]’s 1997 Subaru Impreza STi, like most cars of this vintage, uses an ECU and provides a diagnostic connector for external communications. [P1kachu]’s Subaru hacking project includes building a diagnostic interface device, dumping the ECU’s firmware, and reverse engineering the binary to understand and disable the speed limiter. If this looks familiar, it’s because we just covered the infotainment hacks in this car on Saturday. But he added information about the communications protocols is definitely worth another look.

This era of Subaru uses a non-standard diagnostics protocol called SSM1, which is essentially a 5 volt TTL serial line running at 1953 bits per second. The custom interface consists of a Teensy and a 3.3V to 5V level shifter. Once connected, commands can be sent directly to the ECU. Fortunately, the protocol has been quite well documented in the past. By issuing the “Read data from ECU address” command repeatedly, the full firmware can be dumped.

[P1kachu] goes on to locate the various engine tuning maps and discover the inner workings of the speed limiter. With cars getting more computerized, it’s nice to see folks are still able to tune their rides, even if it means using Teensys instead of wrenches.

Rigol MSO5000 Hacked, Features Unlocked

Rigol’s test gear has something of a history of being hacked. Years ago the DS1022C oscillocope was hacked to increase bandwidth, and more recently the DS1054Z was hacked to unlock licensed features. Now, it’s the MSO5000’s turn.

Over on the EEVBlog forums a group has been working on hacking another Rigol, the MSO5000, a 70 MHz oscilloscope which can be upgraded to 350 MHz via software licensing. Various other features including a two channel, 25 MHz arbitrary waveform generator are also built-in, but locked out unless a license key is purchased. The group have managed to enable all the locked options without license keys.

The hack is quite simple. The Linux system running on the scope has a default root password of, you guessed it, “root”. After logging in over SSH with these credentials, the user just needs to modify the startup file to add the “-fullopt” flag to the “appEntry” application. This starts the application in a fully unlocked state, which gives access to all the features.

The MSO5000 costs about $1000, and the bandwidth option alone adds over $3000 to the price. If you’re willing to risk your warranty, and you have the skills to edit a file with vi, this hack provides a serious upgrade for free.

If you have a DS1022C you’ll find our reporting on its hack here, and likewise DS1054Z owners will find theirs here.

Header image: EEVBlog.

M5Stack Device Disassembled

Putting M5Stack On LoRa And The Things Network

LoRa is the new hotness in low-power, long-range communications. Wanting to let the packets fly, [Xose] was faced with a frequecny problem and ended up developing a Europe-friendly LoRa module for the M5Stack system. The hardware is aimed at getting onto The Things Network, a LoRa based network that provides connectivity for IoT devices. While there was an existing M5Stack module for LoRa, it only supported 433 MHz. Since [Xose] is in Europe, an 868 MHz or 915 MHz radio was needed. To solve this, a custom board was built to connect the HopeRF RFM69 series of modules to the M5Stack.

If you haven’t heard of it before, the M5Stack platform is a stackable development board platform. Like Arduino, you can add functionality by stacking PCBs using a standard header. Unlike Arduino, M5Stack fits in a case nicely and is designed for building devices with user interfaces. For $35, you get an ESP32 based system with WiFi, Bluetooth, a color LCD, battery, buttons, a speaker, and IO connectors.

With the hardware in place, [Xose] 3D printed a custom case to hold the board and added it to the stack. The firmware acts as a monitor for The Things Network, showing live coverage. The final product looks very clean for a prototype, maintaining the finished look of M5Stack.

The firmware, board design, and case design files for the project are all available on Github.

Fleming and De Forest Rectifier Patents

The History And Physics Of Triode Vacuum Tubes

The triode vacuum tube might be nearly obsolete today, but it was a technology critical to making radio practical over 100 years ago. [Kathy] has put together a video that tells the story and explains the physics of the device.

The first radio receivers used a device called a Coherer as a detector, relying on two tiny filaments that would stick together when RF was applied, allowing current to pass through. It was a device that worked, but not reliably. It was in 1906 that Lee De Forest came up with a detector device for radios using a vacuum tube containing a plate and a heated filament. This device so strongly resembled the Fleming Valve which John Fleming had patented a year before, that Fleming sued De Forest for patent infringement.

After a bunch of attempts to get around the patent, De Forest decided to add a third element to the tube: the grid. The grid is a piece of metal that sits between the filament and the plate. A signal applied to the grid will control the flow of electrons, allowing this device to operate as an amplifier. The modification created the triode, and got around Fleming’s patent.

[Kathy]’s video does a great job of taking you through the creation of the device, which you can watch after the break. She also has a whole series on the history of electricity, including a video on the Arc Transmitter which we featured previously.

Continue reading “The History And Physics Of Triode Vacuum Tubes”

Game Boy Camera mounted to Canon Lens using EF Mount

A Canon Lens Adapter For The Game Boy Camera

Released in 1998, the Game Boy camera was a bit ahead of its time. This specialized Game Boy cartridge featured a 128×128 pixel CMOS sensor and took 4-color greyscale photos. The camera even rotated, allowing for selfies years before that word existed.

The fixed lens on this camera meant no zoom was possible. [Bastiaan] decided to address this shortcoming by building a Canon EF Lens Mount. The resulting build looks hilarious, but actually takes some interesting photos.

[Bastiaan] designed the mount using Rhino 3D, and printed it out on a Monoprice 3D printer. After some light disassembly, the mount can be screwed onto the Game Boy Camera. With the massive 70-200 f4 lens and 1.4x extender shown here, the camera gets a max focal distance of just over 3000 mm.

One issue with the Game Boy Camera was the limited options for doing anything with the photos. They could be transferred to other Game Boy Camera cartridges, or printed using the Game Boy Printer. Fortunately, [Brian Khuu] has a modern day solution that emulates the Game Boy Printer using an Arduino. This lets you get PNG files out of the device.

Cloverleaf Satellite Antenna Mounted on a Pole

Tracking CubeSats For $25

CubeSats are tiny satellites which tag along as secondary payloads during launches. They have to weigh in at under 1.33 kg, and are often built at low cost. There’s even open source designs for these little spacecrafts. Over 800 CubeSats have been launched over the last few years, with many more launches scheduled in the near future.

[Thomas Cholakov] coupled a homemade cloverleaf antenna to a software-defined radio to track some of these satellites. The antenna is built out of copper-clad wire cut to the correct length to receive 437 MHz signals. Four loops are connected together and terminated to an RF connector.

This homebrew antenna is connected into a RTL-SDR dongle. The dongle picks up the beacon signals sent by the satellites and provides the data to a PC. Due to the motion of the satellites, their beacons can be easily identified by the Doppler shift of the frequency.

[Thomas] uses SDR Console to receive data from the satellites. While the demo only shows basic receiving, much more information on decoding these satellites can be found on the SDR Satellites website.

This looks like a fun weekend project, and probably the cheapest aerospace related project possible. After the break, watch the full video explaining how to build and set up the antenna and dongle.

Continue reading “Tracking CubeSats For $25”

Tiny FPGA Board Fits In Your Laptop

There are a bunch of FPGA development boards to choose from, but how many will fit inside your laptop? The PicoEVB is a tiny board that connects to a M.2 slot and provides an evaluation platform for the Xilinx Artix-7 FPGA family.The PicoEVB Block Diagram

This minimalist board sports a few LEDs, a PCIe interface, an integrated debugger, on-board EEPROM, and some external connectors for hooking up other bits and pieces. The M.2 connector provides the board with power, USB for debugging, and PCIe for user applications.

A major selling point of this board is the PCIe interface. Most FPGA boards with PCIe will cost over a grand, and will only fit in a large desktop computer. The lower priced options use older FPGAs. The PicoEVB is tiny and retails for $219. Not a bad deal when the FPGA on-board costs nearly $100.

The PicoEVB is also open source. Design files and sample projects can be found on Github.

[Thanks to Adam Hunt for the tip!]