TerraDome Gives Plants And Dinosaurs A New Home

Housing exotic plants or animals offer a great opportunity to get into the world of electronic automation. When temperature, light, and humidity ranges are crucial, sensors are your best friend. And if woodworking and other types of crafts are your thing on top, why not build it all from scratch. [MagicManu] did so with his Jurassic Park themed octagonal dome built from MDF and transparent polystyrene.

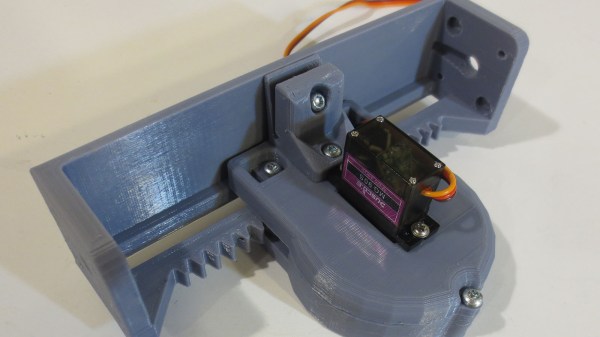
With the intention to house some exotic plants of his own, [MagicManu] equipped the dome with an Arduino powered control system that regulates the temperature and light, and displays the current sensor states on a LCD, including the humidity. For reasons of simplicity regarding wiring and isolation, the humidity itself is not automated for the time being. A fan salvaged from an old PC power supply provides proper ventilation, and in case the temperature inside the dome ever gets too high, a servo controlled set of doors that match the Jurassic Park theme, will automatically open up.

[MagicManu] documented the whole build process in a video, which you can watch after the break — in French only though. We’ve seen a similar DIY indoor gardening project earlier this year, and considering its simple yet practical application to learn about sensors, plus a growing interest in indoor gardening itself (pun fully intended), this certainly won’t be the last one.
Continue reading “TerraDome Gives Plants And Dinosaurs A New Home”

Your Own Sinclair Scientific Calculator

We’ve talked about the Sinclair scientific calculator before many times, and for some of us it was our first scientific calculator. If you can’t find yours or you never had one, now you can build your own using — what else — an Arduino thanks to [Arduino Enigma]. There’s a video, below and the project’s homepage on Hackaday.io describes it all perfectly:

The original chip inside the Sinclair Scientific Calculator was reverse engineered by Ken Shirriff, its 320 instruction program extracted and an online emulator written. This project ports that emulator, written in Javascript, to the Arduino Nano and interfaces it to a custom PCB. The result is an object that behaves like the original calculator, with its idiosyncrasies and problems. Calculating PI as arctan(1)*4 yields a value of 3.1440.

Special care was taken in the design of the emulator to match the execution speed of the
original calculator, which varies from acceptable to atrocious for trigonometric functions involving small angles.

Continue reading “Your Own Sinclair Scientific Calculator”

Fleming and De Forest Rectifier Patents

The History And Physics Of Triode Vacuum Tubes

The triode vacuum tube might be nearly obsolete today, but it was a technology critical to making radio practical over 100 years ago. [Kathy] has put together a video that tells the story and explains the physics of the device.

The first radio receivers used a device called a Coherer as a detector, relying on two tiny filaments that would stick together when RF was applied, allowing current to pass through. It was a device that worked, but not reliably. It was in 1906 that Lee De Forest came up with a detector device for radios using a vacuum tube containing a plate and a heated filament. This device so strongly resembled the Fleming Valve which John Fleming had patented a year before, that Fleming sued De Forest for patent infringement.

After a bunch of attempts to get around the patent, De Forest decided to add a third element to the tube: the grid. The grid is a piece of metal that sits between the filament and the plate. A signal applied to the grid will control the flow of electrons, allowing this device to operate as an amplifier. The modification created the triode, and got around Fleming’s patent.

[Kathy]’s video does a great job of taking you through the creation of the device, which you can watch after the break. She also has a whole series on the history of electricity, including a video on the Arc Transmitter which we featured previously.

Continue reading “The History And Physics Of Triode Vacuum Tubes”

Linear Track Makes Plasma Cuts Neat And Simple

No microcontroller, no display, and not even an LED in sight. That’s how [Made in Poland] decided to roll with this motorized linear plasma cutter, and despite the simplicity it really gets the job done when there’s metal to be cut.

Plasma cutting makes slicing and dicing heavy stock a quick job, but it’s easy to go off course with the torch or to vary the speed and end up with a poor edge. This tool takes the shakes out of the equation with a completely homebrew linear slide fabricated from square tubing. A carriage to hold the plasma cutter torch moves on a length of threaded rod chucked into the remains of an old cordless drill. The original clutch of the drill removes the need for limit switches when the carriage hits either end of the slide, which we thought was a great touch. Simple speed and direction controls are provided, as is a connection in parallel with the torch’s trigger. One nice feature of the carriage is the ability to swivel the torch at an angle, making V-groove welds in thick stock a snap. No need for a complicated bed with sacrificial supports and a water bath, either — just hang the stock over the edge of a table and let the sparks fall where they may.

Simple is better sometimes, but a CNC plasma table may still be your heart’s desire. We understand.

Continue reading “Linear Track Makes Plasma Cuts Neat And Simple”

Evolving The 3D Printed Linear Actuator

Our open source community invites anyone with an idea to build upon the works of those who came before. Many of us have encountered a need to control linear motion and adapted an inexpensive hobby servo for the task. [Michael Graham] evaluated existing designs and believed he has ideas to advance the state of the art. Our Hackaday Prize judges agreed, placing his 3D Printed Servo Linear Actuator as one of twenty winners of our Robotics Module Challenge.

[Michael]’s actuator follows in the footstep of other designs based on a rack-and-pinion gear such as this one featured on these pages, but he approached the design problem from the perspective of a mechanical engineer. The design incorporated several compliant features to be tolerant of variances between 3D printers (and slicer, and filament, etc.) Improving the odds of a successful print and therefore successful projects. Beginners learning to design for 3D printing (and even some veterans) would find his design tips document well worth the few minutes of reading time.

Another useful feature of his actuator design is the 20mm x 20mm screw mounting system. Visible on either end of the output slider, it allows mixing and matching from a set of accessories to be bolted on this actuator. He is already off and running down this path and is facing the challenge of having too many things to share while keeping them all organized and usable by everyone.

The flexible construction system allows him to realize different ideas within the modular system. He brought one item (a variant of his Mug-O-Matic) to the Hackaday + Tindie Meetup at Bay Area Maker Faire, and we’re sure there will be more. And given the thoughtful design and extensive documentation of his project, we expect to see his linear servos adopted by others and appear in other contexts as well.

This isn’t the only linear actuator we’ve come across. It isn’t even the only winning linear actuator of our Robotics Module Challenge, but the other one is focused on meeting different constraints like compactness. They are different tools for different needs – and all worthy additions to our toolbox of mechanical solutions.

VCF East XIII: Another Day In Retro Paradise

While the weather alternated between mist and monsoon for most of it, the thirteenth annual Vintage Computer Festival East was still a huge success. People came from all over the country, and indeed the world, to show off computers and equipment that was easily older than many of those in attendance. From 1980’s robots to recreations of the very first machines to ever carry the name “computer” as we understand it today, there were a dizzying array of fascinating exhibits to see for those who made the pilgrimage to the InfoAge Science Center in Wall, New Jersey. The people who own and maintain these technological touchstones were in many cases were just as interesting as the hardware they brought to show off; walking encyclopedias of knowledge about the particular piece of vintage gear that they’ve so lovingly shepherded into the modern day.

Through it all, save for a brief intermission to get chili dogs from the nearest WindMill, Hackaday was there. We got up close and personal with [Brian Stuart]’s impressive ENIAC emulator, listened to some ethereal chiptunes courtesy of [Bill Degnan]’s MITS Altair 8800, saw relics from the days when the “app store” needed stamps from [Allan Bushman]’s impressive colleciton, and got inspired by the [Alexander Pierson]’s somewhat more modern take on the classic kit computers of the 1970’s.

But those were’t the only things on display at the Vintage Computer Festival, not by a long shot. There were over 100 individual exhibits this year at VCF, and that doesn’t even include the workshops, classes, tours, or the daily keynote presentations. To say you get your money’s worth on the ticket is something of an understatement.

It’s fair to say that there’s no real substitute for seeing a show like this in person. But in addition to the aforementioned articles, a rundown (in no particular order) of some of the interesting exhibits and attractions from this year’s VCF is a decent consolation prize. If this piques your interest, we’d invite you to keep an eye out for the next Vintage Computer Festival. We’ll be there.

Continue reading “VCF East XIII: Another Day In Retro Paradise”

Beats An Extension Cord

What does your benchtop power supply have that [Pete Marchetto]’s does not? Answer: an extension cord draped across the floor. How often have you said to yourself, “I just need to energize this doodad for a couple seconds,” then you start daisy chaining every battery in the junk drawer to reach the necessary voltage? It is not uncommon to see battery packs with a single voltage output, but [Pete] could not find an adjustable one, so he built his own and put it on Tindie.

Presumably, the internals are not going to surprise anyone: an 18650 battery, charging circuit, a voltage converter, display, adjustment knob, and a dedicated USB charging port. The complexity is not what intrigues us, it is the fact that we do not see more of them and still wind up taping nine-volt batteries together. [Editor’s note: we use one made from an old laptop battery.]

This should not replace your benchtop power supply, it does not have the bells and whistles, like current regulation, but a mobile source of arbitrary voltage does most of the job most of the time. And it’s what this build hasn’t got (a cord) that makes it most useful.