Boy Off The Grid For Years Writes GUI For DOS

In a hacker version of Jumanji, when [fiberbundle]’s parents divorced, his thrice-fugitive new stepfather took him to a remote location in Australia without any access to technology or the outside world. With him he brought an old 486, a gift from his real dad. Lest the police discover them, [fiberbundle] was forbidden contact from most of society and even restricted in the books he was allowed to read.

The boy spent years trying to get the most he could out of his two-generations-old PC. Using only two textbooks from a decade and a half earlier, DOS 6.0, and QBasic he managed to write his own shell dubbed OSCI (pronounced “Aussie”), a ray-caster 3d engine and lots more. No mentors, no Internet. The computers at school were even more outdated Power Macs.

Eventually life returned him to civilization to be mindblown by modern technology 1000x as powerful. He went from playing text-based adventures he had to write for himself, to seeing Crysis. From QBasic to C++. From ASCII art “shooters” to Half-Life 2. From a 486 to a 4-core CPU. From a rural library to Wikipedia.

Follow the link above to see screens of his projects over the years. As of yet no one has verified the story, but, even if only that it is worth a read.

Thanks [Gustavo] for the tip.

Meet Registroid – Mutant Cash Register Music Sequencer

73 years ago WWII was in full swing, the world’s first computer had not yet crunched atomic bomb physics and department store cash registers had to add up your purchases mechanically. Back then, each pull caused the device to whirl and kerchunk like a slot machine. [David] & [Scott] kidnapped one of those clunkers and forced it to sing a new tune. Thus the Registroid was born, a self-described “mutant vintage cash register that is a playable, interactive electro-house looping machine.” Why did no one else think of this yet?

Inside, the adding gears and tumbling counters were gutted to make room for the electronics, amp and speaker. Keys were converted to Arduino inputs that then feed to MAX/MSP which serves as a basic midi controller. On top, five “antennae” lamps with LEDs serve as a color organ where they pulse with the audio as split up by an MSGEQ7 equalizer chip. Each row of latching keys corresponds to a different instrument: drum beats, baselines, synths, and one-shots.

We have seen similar things done to a Game Boy and typewriter before, but a cash machine is new to us. Perhaps someday someone will flip the trend and type their twitter messages from an antique harpsichord.

The Registroid appears quite popular when on display at local events, including some wonder when a secret code opens the cash drawer.

Continue reading “Meet Registroid – Mutant Cash Register Music Sequencer”

Redlining Your CPU Via Automotive Tachometer

Many CPU-usage widgets have stylistically borrowed from vehicles, displaying something mimicking the tachometer found in the dashboard. [Pat] took it a step further and tried his hand at re-borrowing this style. He figured, why not use an actual physical tachometer to display how hard the CPU on his Raspberry Pi was revving?

With the goal of tuning 0-100% CPU usage to 0-8000 RPM on the tach, the first step was diagnosing the range of PWM input frequencies that moved the needle across the tach’s full arc. Using his Tektronix 3252C function generator he quickly determined 0-440 Hz would be needed and graphed a handful of intermediate points. The response curve was not linear, so he drew up some fudging guidelines to make all the datapoints match.

Next, he wrote a few lines of Python (he shared) to make the Pi to poll its CPU usage and translate it to the proper frequency. The Pi makes outputting easy, GPIO pin 11 carried the signal to a 7404 for buffering, then out to the tach. The automotive tach itself ran on 12V, but its input signal required only 5V so he pulled a 7805 from his parts bin.

Once it was all put together it worked beautifully using just the one extra component. Some might see this as more clever than USB dependent or Arduino bloated based tachometer hacks.

See the video after the break of the tach twitching even when the mouse moved, and pegging the red when opening a browser. No more need to use up valuable screen real-estate (or use a screen at all) if you want to see at a glance when your Pi is putting in work.

Continue reading “Redlining Your CPU Via Automotive Tachometer”

1.37″ CRT Restored By Hacklab For Miniature MAME Cabinet

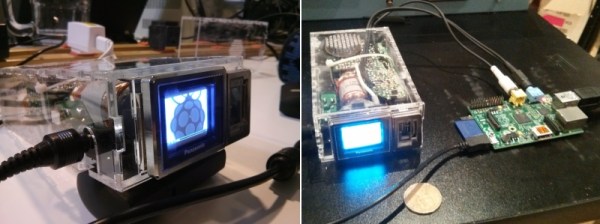
For $5, [William] of Toronto’s Hacklab hackerspace got a hold of one of the smallest CRT screens ever made – about the size of a large coin. Over the course of a couple sessions – including a public hack boothside at their Mini Makerfaire – [William], [Igor], and several other members managed to connect it as a monitor directly off a Raspberry Pi. The end-goal is the world’s smallest MAME cabinet (smaller by almost half than this LCD one).

As Canada followed the US and stopped broadcasting analog back in 2011, it became quite a challenge to feed the screen a video source. They disclosed early that the easiest solution would just be an RF transmitter on the Pi and then tune the micro-set to that channel. Too easy. They wanted something elegant and challenging so they went digging into the circuitry to find a place to insert a composite video signal directly.

The real story here is their persistence at reverse engineering. The PCB was folded like a cardboard box to fit in the original case, making large portions of the circuitboard and wiring inaccessible. Even when they managed to trace the signal to what they thought was the appropriate chip (marked C80580), they could not find any information on the 30 year old chip. Noting that every other chip on the board was Panasonic and started with “AN5”, [Igor] suspected the mystery silicon was just renamed and went through every single datasheet he could find with that prefix. Combined with form factor, pin count and purpose, his sleuthing was rewarded with a guess for a match – the AN5715. His hunch was correct – using that datasheet led him to the answers they required.

Then they just had to figure out how get the composite signal the Pi outputted into something the chip would use to display the correct image. There were no shortage of challenges, failures and dead ends here either, but they had help from the rest of their membership.

Their project log is an interesting narrative through the process and in the end of course, it worked. It is displayed beautifully with a clear acrylic case and ready for a cabinet to be built.

2014 Advent Calender Of Circuits

Every day this month and until Christmas, [vk2zay] is (has already been!) posting a simple but useful hack in his 2nd sort-of-annual “Advent Calender of Circuits” that many of you will want to be bookmarking. For those already saturated with the season of holiday hacks, don’t worry – other than being festively generous of him to tutor and demo a new hack every day, the hacks themselves have nothing to do with Christmas. Though he missed the last couple years we here at Hackaday covered his first month of hacks back in 2011 (now in playlist).

The daily hacks posted so far cover a wide variety of useful projects (leaning towards HV) for the electronics hobbyist who might not have all the fancy tools in their shop: DIY high voltage probes, a 1-hour tesla coil from junk, measuring RF power, a stud detector, how to test an  unknown transformer’s saturation, and many others. We cannot predict what will be posted the rest of the calender (the author hints to be making them up as he goes), but by now it is safe to say that they will not disappoint.

We would be stealing his thunder to cover them all, so, we will just pick our favorite for now:

The 1-hour tesla coil is a delightful all-shortcuts-taken hack project. If one were to listen to aficionados, teslacoiling is a highly precise hobby to get into. It appears to require careful planning, much calculation, special-ordered or soviet-surplus parts, custom jigs, fine tuning, etc. [vk2zay] shows otherwise.

Every single component of the assembly is itself a hack.

No fancy tungsten-infused grade 8 copper being water-cooled via heat pump here – the spark gap is just the bent leg of a capacitor hovering near the start of the primary winding. The power supply is a backlight inverter with a chain of Cockcroft-Walton voltage doublers. The high voltage resistor is a bunch of series-chained resistors shoved into a silicone tube. The topload is a couple cheap pie tins masking-taped together to “resemble something like a sphere.” The primary is a loose, unsupported spring of copper wire. The secondary was calculated to be whatever the height of the tube he had handy and coiled only as smoothly as a first attempt would allow. He does not even bother using wires or a switch – the circuit is completed by clipping a couple of test leads.

After all this hodgepodgery the circuit was then carefully tuned to optimize how little time it took to build (additional time used: zero). Since the frequencies do not match (1.7 vs. 2.6 mhz – 35% apart) the only thing this circuit resonates with is a hacker’s appeal for making do. Does not matter, still works. The streamers easily reach 2 inches and the author claims double that in dark lighting.

In the just 6 minute video he also manages to explain roughly what is going on theory-wise and suggest the time-effective things to considering upgrading. Almost a dozen hacks in the bag and over a dozen more to come before Christmas.

Continue reading “2014 Advent Calender Of Circuits”

Vintage Apple Keyboard Revived As Standalone Computer

Many of our readers are familiar with the gold standard of classic PC keyboards – the bunker with switches known as the IBM Model M. The Model M’s Apple contemporary is the Apple Extended Keyboard and they are just as highly sought-after by their respective enthusiasts. Though discontinued almost 25 years ago and incompatible with anything made in the last 15, the codenamed “Saratoga” is widely considered the best keyboard Apple ever made.

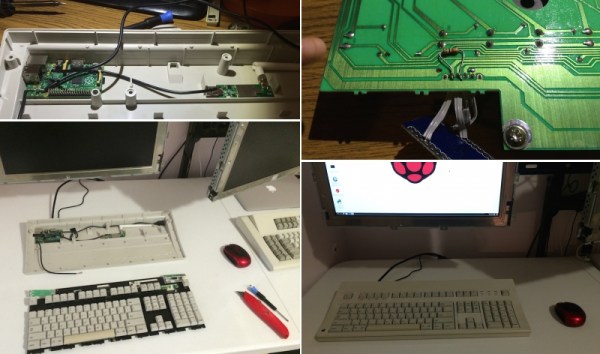
[Ezra] has made a hobby of modernizing these vintage heartthrobs and rescuing them from their premature obsolescence. In a superbly documented tutorial he not only shows how to convert them to USB (a popular and trivial hack), but teaches you how and where to smuggle a Raspberry Pi in as well.

After disassembly, the project requires only a little bit of chisel and Dremel work before the soldering iron comes out. [Ezra] was fairly meticulous in removing or redirecting the Pi’s connectors and hardwiring the internals. Only 3 pins need to be traced from the original keyboard and [Ezra]’s ADB–>USB Rosetta Stone of choice is the Hasu Converter running on a Atmega 32u4 clone. Balancing cost, range, and power draw from the Pi, he settled on the TP-LINK WN722N for his WiFi solution which is also tucked away inside the case. A single pullup resistor to finish it off and [Ezra] was delighted to discover it worked the first time he plugged it in.

Keyboards from this era use actual momentary switches that audibly click twice per keypress. In our world of screens-as-keys celebrating the lack of tactile constraints, using beasts like the Model M or the AEK to force transistors to do your bidding is like racking a shotgun during a game of lasertag – comically obtuse but delightfully mechanical.

If you are looking to expand on [Ezra]’s tinkering, he has already made a wishlist of additions: a toggle switch to lobotomize the Pi back into a plain USB keyboard, an internal USB hub, and a power switch.

Hear the video of an AEK in action after the break (or loop it to sound productive while you nap).

Continue reading “Vintage Apple Keyboard Revived As Standalone Computer”

Calculator Remote with Launchpad

Calculator + MSP430 + IR LED = TV Remote?

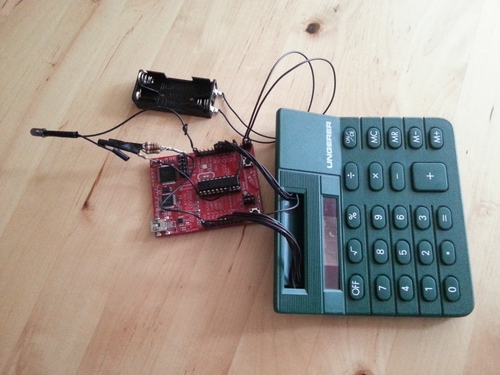
Eschewing the store-bought solution, [Stefan] managed to build a TV remote out of an old calculator. The brains of the calculator were discarded and replaced with an MSP430, leaving only the button matrix and enclosure. Rather than look it up, he successfully mapped the matrix manually before getting stumped with the infrared code timings. Some research pointed him to a peculiarity with Samsung IR codes and with help from an open source remote control library he got it working.

When the range was too limited to satisfy him he added a booster circuit and an LED driver which he snapped off the top of an old remote; now it works from 30 feet away. Some electrical tape and hot glue later and it all fit back into the original case.

It cannot take photos or play Super Smash Brothers, but it does what a remote needs to do: browses channels in the guide, control volume, and turn the TV on or off. Considering that all this calculator was built to do was boring basic arithmetic, it is a procrastination-enabling upgrade.

See the video after the break for some smiles.

Continue reading “Calculator + MSP430 + IR LED = TV Remote?”