2014 Advent Calender Of Circuits

Every day this month and until Christmas, [vk2zay] is (has already been!) posting a simple but useful hack in his 2nd sort-of-annual “Advent Calender of Circuits” that many of you will want to be bookmarking. For those already saturated with the season of holiday hacks, don’t worry – other than being festively generous of him to tutor and demo a new hack every day, the hacks themselves have nothing to do with Christmas. Though he missed the last couple years we here at Hackaday covered his first month of hacks back in 2011 (now in playlist).

The daily hacks posted so far cover a wide variety of useful projects (leaning towards HV) for the electronics hobbyist who might not have all the fancy tools in their shop: DIY high voltage probes, a 1-hour tesla coil from junk, measuring RF power, a stud detector, how to test an  unknown transformer’s saturation, and many others. We cannot predict what will be posted the rest of the calender (the author hints to be making them up as he goes), but by now it is safe to say that they will not disappoint.

We would be stealing his thunder to cover them all, so, we will just pick our favorite for now:

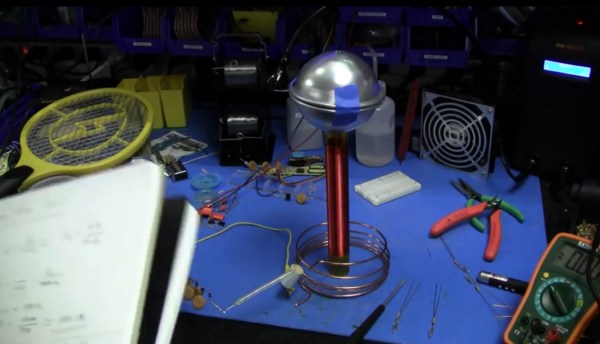
The 1-hour tesla coil is a delightful all-shortcuts-taken hack project. If one were to listen to aficionados, teslacoiling is a highly precise hobby to get into. It appears to require careful planning, much calculation, special-ordered or soviet-surplus parts, custom jigs, fine tuning, etc. [vk2zay] shows otherwise.

Every single component of the assembly is itself a hack.

No fancy tungsten-infused grade 8 copper being water-cooled via heat pump here – the spark gap is just the bent leg of a capacitor hovering near the start of the primary winding. The power supply is a backlight inverter with a chain of Cockcroft-Walton voltage doublers. The high voltage resistor is a bunch of series-chained resistors shoved into a silicone tube. The topload is a couple cheap pie tins masking-taped together to “resemble something like a sphere.” The primary is a loose, unsupported spring of copper wire. The secondary was calculated to be whatever the height of the tube he had handy and coiled only as smoothly as a first attempt would allow. He does not even bother using wires or a switch – the circuit is completed by clipping a couple of test leads.

After all this hodgepodgery the circuit was then carefully tuned to optimize how little time it took to build (additional time used: zero). Since the frequencies do not match (1.7 vs. 2.6 mhz – 35% apart) the only thing this circuit resonates with is a hacker’s appeal for making do. Does not matter, still works. The streamers easily reach 2 inches and the author claims double that in dark lighting.

In the just 6 minute video he also manages to explain roughly what is going on theory-wise and suggest the time-effective things to considering upgrading. Almost a dozen hacks in the bag and over a dozen more to come before Christmas.

Continue reading “2014 Advent Calender Of Circuits”

Robot Vision: Detecting Obstacles With FPGAs And Line Lasers

Somewhere down the road, you’ll find that your almighty autonomous robot chassis is going to need some sensor feedback. Otherwise, that next small step down the road may end with a blind leap off the coffee table. The first low-cost sensors we might throw at this problem would be sonars or IR rangefinders, but there’s a problem: those sensors only really provide distance data back from the pinpoint view directly ahead of them.

Rest assured, [Jonathan] wrote in to let us know that he’s got you covered. Combining a line laser, camera, and an FPGA, he’s able to detect obstacles that fall within the field of view of the camera and laser.

If you thought writing algorithms in software is tricky, wait till to you try hardware! (We know: division sucks!) [Jonathan] knows no fear though; he’s performing gradient computation on the FPGA directly to detect the laser in the camera image at a wicked 30 frames-per-second. Why roll up your sleeves and take the hardware route, you might ask? If we took a CPU-based approach at the tiny embedded-robot scale, Jonathan estimates a mere 10 frames-per-second. With an FPGA, we’re able to process images about as fast as they’re received.

Jonathan is using the Logi Board, a Kickstarter success we’ve visited in the past, and all of his code is up on the Githubs. If you crack it open, you’ll also find that many of his modules are Wishbone compliant, so developing your own projects with just some of these parts has been made much easier than trying to rip out useful features from a sea of hairy logic.

With computer-vision hardware keeping such a low profile in the hobbyist community, we’re excited to hear more about [Jonathan’s] FPGA-based robotics endeavors.

Continue reading “Robot Vision: Detecting Obstacles With FPGAs And Line Lasers”

Air Hoverboard

A Simple Hoverboard Everyone Can Understand

To be honest, we were wondering when we would see someone try this…

[Ryan Craven] has successfully built a working hovercraft that looks like a skateboard. It floats on two pockets of air generated by four Black and Decker leaf blowers — and by golly, it certainly looks like it works!

Ever since the HUVr hoax earlier this year, [Ryan] has had the goal to make a real, working hoverboard. Hendo may have beaten him to the punch with their $10,000 eddy current inducing halbach array board, but alas, it only works on copper or aluminum floors. [Ryan’s] can be used anywhere a normal skateboard can be. It’s far from sleek, but it’s only just the prototype — though we’re curious to see how far this could actually go.

Which is precisely why he’s shared it over on Hackaday.io and is hoping to draw some support and ideas from our wonderful community here.

What do you guys think? Is it worth continuing the pursuit of a hovercraft style hoverboard? Can we shrink the technology enough to make it feasible? It’s come a long way from the classic hover craft using a giant shop vac…

Continue reading “A Simple Hoverboard Everyone Can Understand”

Reverse Engineering Capcom’s Crypto CPU

There are a few old Capcom arcade titles – Pang, Cadillacs and Dinosaurs, and Block Block – that are unlike anything else ever seen in the world of coin-ops. They’re old, yes, but what makes these titles exceptional is the CPU they run on. The brains in the hardware of these games is a Kabuki, a Z80 CPU that had a few extra security features. why would Capcom produce such a thing? To combat bootleggers that would copy and reproduce arcade games without royalties going to the original publisher. It’s an interesting part of arcade history, but also a problem for curators: this security has killed a number of arcade machines, leading [Eduardo] to reverse engineering and document the Kabuki in full detail.

While the normal Z80 CPU had a pin specifically dedicated to refreshing DRAM, the Kabuki repurposed this pin for the security functions on the chip. With this pin low, the Kabuki was a standard Z80. When the pin was pulled high, it served as a power supply input for the security features. The security – just a few bits saved in memory – was battery backed, and once this battery was disconnected, the chip would fail, killing the game.

Plugging Kabuki into an old Amstrad CPC 6128 without the security pin pulled high allowed [Eduardo] to test all the Z80 instructions, and with that no surprises were found; the Kabuki is fully compatible with every other Z80 on the planet. Determining how Kabuki works with that special security pin pulled high is a more difficult task, but the Mame team has it nailed down.

The security system inside Kabuki works through a series of bitswaps, circular shifts, XORs, each translation different if the byte is an opcode or data. The process of encoding and decoding the security in Kabuki is well understood, but [Eduardo] had a few unanswered questions. What happens after Kabuki lost power and the memory contents – especially the bitswap, address, and XOR keys – vanished? How was the Kabuki programmed in the factory? Is it possible to reprogram these security keys, allowing one Kabuki to play games it wasn’t manufactured for?

[Eduardo] figured being able to encrypt new, valid code was the first step to running code encrypted with different keys. To test this theory, he wrote a simple ‘Hello World’ for the Capcom hardware that worked perfectly under Mame. While the demo worked perfectly under Mame, it didn’t work when burned onto a EPROM and put into real Capcom hardware.

That’s where this story ends, at least for the time being. The new, encrypted code is valid, Mame runs the encrypted code, but until [Eduardo] or someone else can figure out any additional configuration settings inside the Kabuki, this project is dead in the track. [Eduardo] will be back some time next week tearing the Kabuki apart again, trying to unravel the mysteries of what makes this processor work.

We’re Hiring A Full-Time Hackaday Prize Mythical Creature

On occasion we advertise jobs for Hackaday but this time around is an exceptionally big deal. The Hackaday Prize was an amazing adventure this year, and we’re already hard at work on the plans for the 2015 Hackaday Prize. To realize our vision for the movement we need someone who will live and breathe THP. We need to find the Hackaday Prize Mythical Creature.

This person will hold in their mind all things Hackaday Prize. The HPMC will gallivant across the land (both digital and real) heralding the message of grass-roots, high-level hardware development. Obviously this involves recruiting highly skilled Hackers, Designers, and Engineers to compete for the prize. But the HPMC will also make sure that the amazing creations competing for the Prize get the widespread recognition they deserve.

There are a lot of nuts and bolts to the job. The HPMC will lead the planning of all live events. The many talents of the Hackaday and Supplyframe crews will be fully and efficiently tapped thanks to the legendary organizational and people skills wielded by the HPMC. Can you see why we’re calling this job candidate a Mythical Creature?

The point is, we are going to accomplish great things in 2015 and beyond. We need the perfect person to make sure it happens smoothly. Mythical Creatures, sharpen your CV’s and apply now.

Hacklet 26 – Arduino Projects

Arduino is one of those boards that has become synonymous with hacking and making. Since its introduction in 2005, over 700,000 official Arduino boards have been sold, along with untold millions of compatible and clone boards. Hackers and makers around the world have found the Arduino platform a cheap and simple way to get their projects off the ground. This weeks Hacket focuses on some of the best Arduino based projects we’ve found on Hackday.io!

drawingbot[Niazangels] gets the ball – or ballpoint pen – rolling with Roboartist, a robot which creates line drawings. Roboartist is more than just a plotter though. [Niazangels] created a custom PC program which creates line drawings from images captured by a webcam. The line drawings are converted to coordinates, and sent to an Arduino, which controls all the motors that move the pen. [Niazangels] went with Dynamixel closed loop servo motors rather than the stepper motors we often see in 3D printers.

tape[Peter Edwards] is preserving the past with Tapuino, the $20 C64 Tape Emulator. Plenty of programs for the Commodore 64, 128, and compatibles were only distributed on tape. Those tapes are slowly degrading, though the classic Commodore herdware is still going strong. Tapuino preserves those tapes by using an Arduino nano to play the files from an SD card into the original Datasette interface. [Peter] also plans to add recording functionality to the Tapuino, which will make it the total package for preserving  your data. All that’s missing is that satisfying clunk when pressing the mechanical Play button!

infinity

[Dushyant Ahuja] knows what time it is, thanks to his Infinity Mirror Clock. This clock tells time with the help of some WS2812B RGB LED. [Dushyant] debugged the clock with a regular Arduino, but when it came time to finish the project, he used an ATmega328 to create an Arduino compatible board from scratch. Programming is easy with an on-board Bluetooth module. [Dushyant] plans to add a TFT lcd which will show weather and other information when those power-hungry LEDs are switched off.

alarm2[IngGaro] built an entire home alarm system with his project Arduino anti-theft alarm shield. [IngGaro] needed an alarm system for his home. That’s a lot to ask of a standard ATmega328p powered Arduino Uno. However, the extra I/O lines available on an Arduino Mega2560 were just what the doctor ordered. [IngGaro] performed some amazing point-to-point perfboard wiring to produce a custom shield that looks and works great! The alarm can interface with just about any sensor, and can be controlled via the internet. You can even disarm the system through an RFID keycard.

Want MORE Arduino in your life? Check out our curated Arduino List!

That’s about all the millis()  we have for this weeks Hacklet. As always, see you next week. Same hack time, same hack channel, bringing you the best of Hackaday.io!

AutoLeveller - PCB Milling Probe

Mill Warped PCB Blanks On An Uneven Bed

Milling a PCB at home is a great way to save some time and money if you are making one-off circuit boards. There is a downside though, it’s a little tough. Sure, just export your Eagle design to CNC-Machine-understandable g-code and fire up your mill…. well, it’s not that easy.

The copper on a PCB blank can be anywhere from about 0.001 to 0.006 inches thick. When milling a board the ideal situation is to mill just deep enough to get through the copper but not cut too deep into the fiberglass backer board. Cutting too deep can weaken the board, break a bit, or in an extreme case, cut through the entire board.

Shallow cuts can result in another problem, inconsistent cut depth over the surface of the board. Check out the left photo above. The traces on the left side of the board appears to have just faded away. This happened because the circuit board was not flat. The side where the traces are missing from is lower than the other so the tool bit is not able to reach that part of the board. Since an ideal depth of cut is about 0.010 inches, even a very small amount of waviness or out of flatness can cause a serious problem in the milling process. If you have a hard time picturing what 0.010 inches is, think the thickness of two pieces of paper, it’s not a lot. There are two main contributors to the flatness problem; the PCB board and/or the machine’s bed. If the bed is not flat, the PCB won’t be. Even if the bed is flat, the PCB may be warped or bent.

PCB fabrication enthusiast [daedelus] had this exact problem, and in true hacker fashion, decided to do something about it. He created a software program called AutoLeveller that takes a g-code file and adds a probing section to the beginning before the milling operation. When the modified g-code file is run on the CNC Machine, it first probes the surface of the PCB in a grid pattern and maps the flatness variation of the PCB’s surface. Then, when running the program, it adjusts the height of the tool bit on the fly so that the actual depth of cut is consistent over the entire board, regardless of how flat or not it is. The result is a clean and usable PCB on the first try.

There is one catch: the Machine Control Software has to be set up to accept a probe. This is easy to do if communicating to the CNC Machine via a computers parallel port. An input pin on the parallel port is pulled high with a resistor and connected electrically to the PCB board. The tool spindle is grounded with a clip lead. When the tool touches the board, the input pin is pulled low and the Machine Control Software records the tool height for that specific XY position.

Continue reading “Mill Warped PCB Blanks On An Uneven Bed”