Belt Up With A Redundant Car Part

The toothed belt that turns the camshaft in synchronization with the crankshaft on many motor vehicle engines is something of an under-appreciated component. Unless you are unlucky enough to ave had one fail and destroy your engine, it’s probably something you’ve never given a second thought to outside of periodic service intervals.

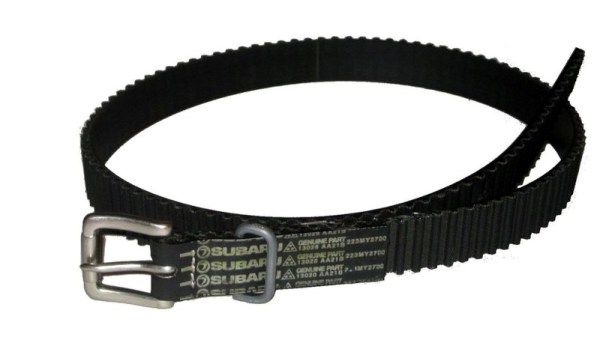
For something to perform such a task over so many thousands of miles of motoring it must be made of pretty strong stuff. Even when a belt is life-expired it is still in good physical shape, and [Crispyjones] saw the potential in a used Subaru belt to make a different type of belt. After keeping his engine in sync for so long it would serve no less vital a purpose, and keep his pants from falling down.

You can of course buy the hardware for a belt from a decent crafting store, but he chose to recycle a buckle from a worn-out leather belt. Cleaning the timing belt and cutting it carefully so that the Subaru logo would be on show to the outside world in the finished article, he secured it round the buckle with some epoxy glue and a bit of stitching. The original leather retaining loop is not really appropriate, so one is fashioned from wire. Finally we see the process for measuring where the holes should be placed, followed by their creation with a hole punch.

Hackaday isn’t a crafting site, so we don’t often feature projects like this one. But the humble timing belt is a component that we’ve probably all replaced and thrown away more than once without really thinking what the properties of the thing we’re throwing away are. So we like this relatively simple project for its re-use of something few of us would otherwise keep, as well as for its delivering rather a cool belt. We’ve featured plenty of cambelts here doing their traditional job, but this is the first time we’ve had one as an item of clothing. We’ll leave you with a glimpse of a future without cambelts at all.
An Englishman’s Home Is His (Drone-Defended) Castle

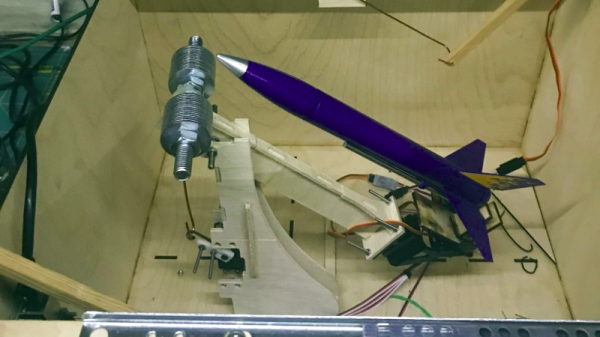
Retiring to the garden for a few reflective puffs on the meerschaum and a quick shufti through the Racing Post, and the peace of the afternoon is shattered by the buzz of a drone in the old airspace,what! What’s a chap to do, let loose with both barrels of the finest birdshot from the trusty twelve-bore? Or build a missile battery cunningly concealed in a dovecote? The latter is what [secretbatcave] did to protect his little slice of England, and while we’re not sure of its efficacy we’re still pretty taken with it. After all, who wouldn’t want a useless garden accoutrement that conceals a fearsome 21st century defence system?

The basic shell of the dovecote is made from laser cut ply, in the shape of an innocuous miniature house. The roof is in two sliding sections which glide apart upon servo-controlled drawer runners, and concealed within is the rocket launcher itself on a counterweighted arm to lift it through the opening. The (toy) rocket itelf is aimed with a camera pan/tilt mechanism,and the whole is under the control of a Raspberry Pi

It’s understood that this is a rather tongue-in-cheek project, and the chances of any multirotors falling out of the sky are somewhat remote. But it does serve also to bring a bit of light back onto a theme Hackaday have touched upon in previous years, that of the sometimes uneasy relationship between drone and public.

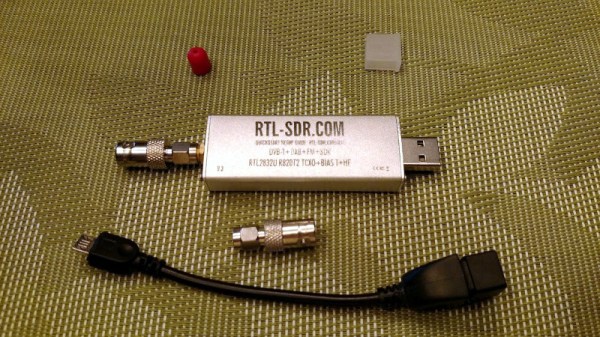
All The Goodies You Need For Your RTL-SDR

When the RTL2832-based USB digital TV sticks were revealed to have hidden capabilities that made the  an exceptionally cheap software-defined radio receiver, it was nothing short of a game-changing moment for the home radio experimenter. The RTL might not be the best radio available, but remains a pretty good deal for only $10 from your favourite online supplier.

Having bought your RTL SDR, you will soon find yourself needing a few accessories. A decent antenna perhaps, an HF upconverter, and maybe an attenuator. To help you, [IgrikXD] has come up with a repository containing open-source implementations of all those projects and more. There’s an HF upconverter handily in both SMD and through-hole versions, as well as a wideband active antenna. A resonant antenna for a single band will always out-perfom a wideband device if your interest lies on only one frequency, but when your receiver has such a wide range as that of the RTL it’s irresistible to look further afield so the wideband antenna is a useful choice.

The RTL SDR is a device that just keeps on giving, and has featured innumerable times here since since its first appearance a few years ago. Whether you are into passive radar or using it to decode data from RF-equipped devices it’s the unit of choice, though we rather like it as a piece of inexpensive test equipment.

Via Hacker News.

Header image: Joeceads [CC BY-SA 4.0].

A 3D-Printed Egg-Shaped Speaker Cabinet

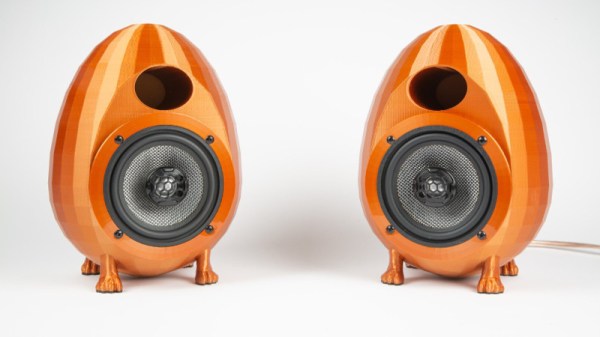
There are few limits to the extent audiophiles will go in their quest for the perfect sound. This applies in particular to the loudspeaker, and with that aim [Heine Nielsen] has created an eye-catching set of 3D-printed egg-shaped enclosures.

The theory of a loudspeaker enclosure is that it should simulate an infinite space behind an infinite plane in which the speaker driver is mounted, and the reasoning behind spherical or egg-shaped enclosures goes that they better achieve that aim through presenting a uniform inner surface without the corners of a more conventional rectangular enclosure. [Heine]’s enclosures 3D-printed ported enclosures achieve this more easily than traditional methods of building this shape.

A loudspeaker enclosure is more than just a box though, whatever material it is made from must adequately dampen any resonances and absorb as much energy as possible. Conventional speakers try to achieve this by using high-mass and particulate materials, but 3D-printing does not lend itself to this. Instead, he created a significant air gap between two layers which he hopes will create the same effect.

This is an interesting design and approach to speaker cabinet construction, but we think from an audio perspective its one that will be well served by more development. What would be the effect of filling that air gap with something of higher mass, for example, and should the parameters of the egg shape and the port be derived for a particular driver by calculation from its Thiele-Small parameters. We look forward to more on this theme.

These aren’t the first 3D-printed enclosures we’ve seen, but if you’re after something truly unusual how about an electrostatic?

A Clay Oven For Perfect Pizza Every Time

Perhaps your taste for pizza has never taken you beyond your local fast-food chain or a frozen pizza from the supermarket, but there are some people for whom only the most authentic will do. A wood-fired clay oven and nothing less is their pre-requisite, and lesser methods of pizza preparation simply aren’t good enough.

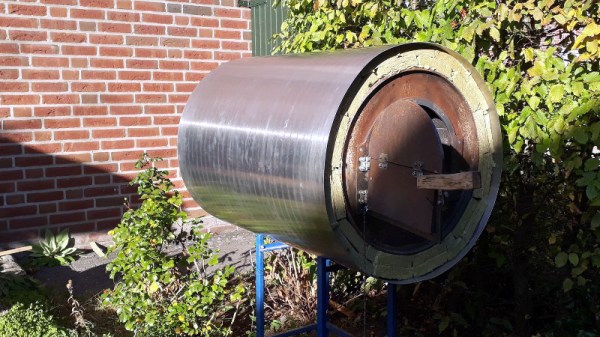
[Jan] is one of these pizza perfectionists, and his wood-fired oven is an interesting one because it eschews the traditional dome for a cylinder. His very detailed write-up gives us an interesting insight into its construction. He’s taken the bottom half of an oil drum as his base, and built and fired the clay oven itself around a wooden former. We see his early attempts at a former which distorted under the weight of clay, and we hear about how the clay required reinforcement with chicken wire and straw. Finally, we see the structure being dried out, before an impressive display when firing for the first time. The oven receives a coat of Rockwool insulation but [Jan] has a way to go to learn the oven’s characteristics. Still, this is an oven that will last to refine the perfect morsel given a bit of time.

We like the cylindrical design as an alternative to domed ovens, which can be a bit tricky to build. An oven may be a bit low-tech compared to some of Hackaday’s usual fare, but they can be no less difficult to get right. We’re no stranger to novel flame-based cookery, perhaps you might like to also take a look at this rocket grill.

A QR Code, Step By Step

We should all be familiar with QR codes, those blocky printed patterns containing encoded text, URLs, or other data. A few years ago they were subject to their own cloud of hype, but now they have settled down in their niche of providing a handy route for a smartphone owner to reach a website without having to type an address.

Have you ever wondered how they work? There are plenty of dry technical guides out there, but if they’re not your thing you might find [Nayuki]’s step-by-step guide to be of interest. It explains the encoding and error checking bit generation process before starting on the familiar three-squares pattern and timing bars of the QR code itself. The really interesting part comes with its explanation of overlays, a set of repeating patterns that are added to the final data segment, and how the pattern used is chosen to minimise penalties due to large blocks of the same colour in the final piece. The chances are most of us will never have to create a QR code from scratch, but it is this type of fascinating technical general knowledge that makes guides like this such an interesting read.

QR codes have appeared in quite a few projects here over the years, but the one we find particularly amusing is this project to hack them by changing one QR into another.

Via Hacker News.

Who’s Going On Your Fifty?

You can tell a lot about a country, its history and its politics, by taking a look at its banknotes. Who features on them, or in the case of studiously engineered international compromises such as the Euro, who doesn’t feature on them. Residents of the UK  have over the years been treated to a succession of historical worthies on their cash, and when a new revision of a banknote is announced you can be certain that the choice of famous person to adorn it will be front page news. Today we have a new banknote on the way, and this time the selection is squarely in Hackaday’s sphere of interest because the public is being urged to nominate a scientist for the honour. The note in question is the £50, the one that nobody uses and plenty of shops won’t even accept, but still, it’s an important choice that will replace the incumbents on the present version, steam engine pioneers Matthew Boulton and James Watt.

So, given a blank £50, who would you put on it? Candidates must be British, not fictional, and also no longer alive. Names in the frame include Ada, Countess Lovelace, Stephen Hawking, and Alan Turing, though with such a wide field to choose from there are sure to be many more front-runners. You might, for example, wish to consider Rosalind Franklin, but you can forget Isaac Newton, Charles Darwin, or Michael Faraday as they have all already featured on British banknotes.

Hackaday does not take sides in such endeavors, but it’s still an opportunity to back your most inspiring figure. As your scribe, it’s a tough one between Lovelace and Turing, though Turing probably wins by a short head. Who would you like to see on the next £50 note? The bank has produced a short promotional video which we’ve placed below the break.

Continue reading “Who’s Going On Your Fifty?”