An OpenSCAD Mini-ITX Computer Case

We’re no strangers to 3D printed enclosures here at Hackaday. From the plethora of printed Raspberry Pi cases out there to custom enclosures for electronic projects, small plastic boxes turn out to be an excellent application for desktop 3D printing. But as printers get bigger and filament gets cheaper, those little boxes don’t always need to be so little. We aren’t talking about running off boxes for your sneaker collection either, if you’ve got the time and the print volume, you could whip up an enclosure for your PC.

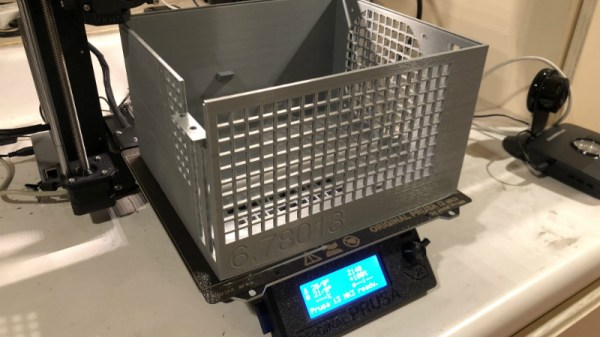
[Nirav Patel] writes in to share his impressive 3D printed Mini-ITX computer case project, which would be a neat enough trick in its own right, but he took the concept one step farther and made it a parametric design in OpenSCAD. This allows the user to input their particular hardware configuration and receive STL files for a bespoke case. The list of supported hardware isn’t that long yet, but with the OpenSCAD code up on GitHub and released under the BSD license, hopefully the community can improve on that as time goes on.

To keep things simple (and strong), [Nirav] implemented what he refers to as a “bucket” design. The majority of the case is a single print, which does take a long time (just shy of 40 hours on his Prusa i3 MK3), but nearly eliminates any post-printing assembly. Only the optional feet and the lid need to be printed separately. Threaded inserts are used throughout the design for mounting hardware, so you don’t run the risk of blowing out the printed holes during hardware changes or upgrades.

A particularly neat feature, and a testament to the power of OpenSCAD, is the fact that the case’s internal volume is calculated and embossed into the side of the design. Does this have any practical purpose? Not exactly, but [Nirav] thought it would be appealing to the Mini-ITX case modding community which apparently measures their accomplishments in liters of volume.

We’ve seen a 3D printed computer case before, but it used acrylic sheets and couldn’t be made without a large format printer. There’s something to be said for a project that can be completed on the hacker community’s favorite printer.

A QR Code, Step By Step

We should all be familiar with QR codes, those blocky printed patterns containing encoded text, URLs, or other data. A few years ago they were subject to their own cloud of hype, but now they have settled down in their niche of providing a handy route for a smartphone owner to reach a website without having to type an address.

Have you ever wondered how they work? There are plenty of dry technical guides out there, but if they’re not your thing you might find [Nayuki]’s step-by-step guide to be of interest. It explains the encoding and error checking bit generation process before starting on the familiar three-squares pattern and timing bars of the QR code itself. The really interesting part comes with its explanation of overlays, a set of repeating patterns that are added to the final data segment, and how the pattern used is chosen to minimise penalties due to large blocks of the same colour in the final piece. The chances are most of us will never have to create a QR code from scratch, but it is this type of fascinating technical general knowledge that makes guides like this such an interesting read.

QR codes have appeared in quite a few projects here over the years, but the one we find particularly amusing is this project to hack them by changing one QR into another.

Via Hacker News.

Homebrew Attachment Turns Angle Grinder Into Slimline Belt Sander

If there’s a small power tool as hackable as the angle grinder, we haven’t found it yet. These versatile tools put a lot of power in the palm of your hand, and even unhacked they have a huge range of functionality, from cutting to grinding to polishing and cleaning, just by choice of what goes on the arbor.

With a simple homebrew attachment, [Darek] turned his angle grinder into a micro-belt sander that’s great for those hard-to-reach places. The attachment that clamps where the disc guard normally lives adds a drive roller to the grinder’s arbor; idler rollers ride on the end of a small pneumatic spring that keeps the belt under tension. The belts themselves are cut down from wider sanding belts, and the attachment can take belts of various widths. And best of all, he did it all without any fancy machine tools. No lathe? No problem – the drive roller was ground to the proper crowned profile needed to keep belts centered using the angle grinder itself. The only problem we see is that the attachment can’t be easily removed from the grinder, but that’s OK. Grinders are like potato chips, after all – you can’t stop at one.

This isn’t [Darek]’s first angle grinder hacking rodeo, of course. And if you’re looking for inspiration on how to hack yours, look no further: a floor sander, a precision surface grinder, or even an e-bike can be built.

Continue reading “Homebrew Attachment Turns Angle Grinder Into Slimline Belt Sander”

Wind turbine pumping air to an underwater scuba helmet

Breathing Underwater Using Wind Power

As hackers, our goal is to reuse something in a way in which it was not intended and [Rulof Maker] is a master at this. From his idyllic seaside location in Italy, he frequently comes up with brilliant underwater hacks made of, well, junk. This time he’s come up with a wind-powered pump to move air through a hose to a modified scuba mask.

The wind turbine’s blades look professional but you’ll be surprised to see that they’re simply cut from a PVC pipe. And they work great. The air compressor is taken from a car and the base of the wind turbine’s tower started life as a bed frame. As you’ll see in the video below, the whole setup is quite effective. It would have been nice to see him using his leg mounted, beer bottle propulsion system at the same time, but the air hose may not have been long enough to make good use of them.

Continue reading “Breathing Underwater Using Wind Power”

Scratch Built Toe Clamps Keep Your Work In Place

[Kevin] owns a benchtop CNC mill that has proven itself to be a capable tool, but after becoming familiar with some of its shortcomings, he has made a few modifications. In order to more efficiently hold and access workpieces on his custom fixturing table, he designed and made his own toe clamps and they look beautiful.

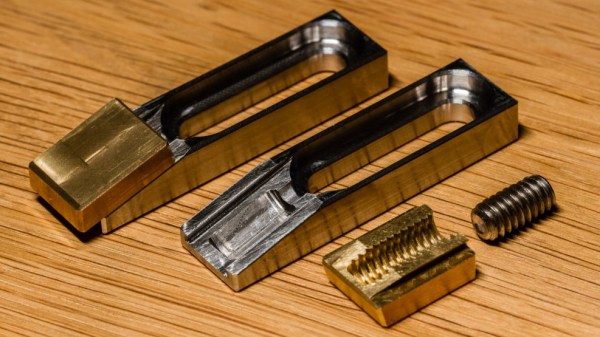
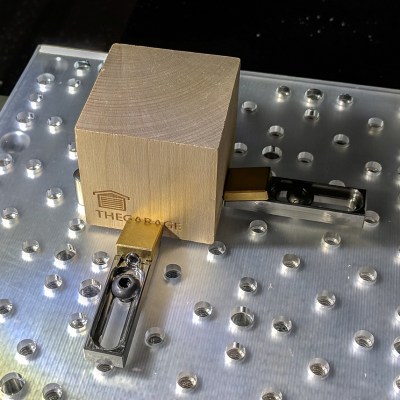
The usual way to secure a piece of stock to a fixturing table is to use top-down clamps, which hold the workpiece from the top and screw down into the table. However, this method limits how much of the stock can be accessed by the cutting tool, because the clamps are in the way. The most common way around this is to mount a vise to the table and clamp the workpiece in that. This leaves the top surface completely accessible. Unfortunately, [Kevin]’s benchtop Roland MDX-450 has a limited work area and he simply couldn’t spare the room. His solution was toe clamps, which screw down to the table and have little tabs that move inwards and downward. The tabs do the work of clamping and securing a piece of stock while maintaining a very low profile themselves.

The clamp bases are machined from stainless steel and the heads are brass, and the interface between the two is a set screw. Inserting a hex wrench and turning the screw moves the head forward or back, allowing a workpiece to be clamped from the sides with minimal interference. His design was done in Fusion 360 and is shared online.

Another option for when simple clamps won’t do the job is a trick from [NYC CNC], which is to use an unexpected harmony of blue painter’s tape and superglue which yields great results in the right circumstances.

Better 3D Printing Through Magnets

Just like Goldilocks found some porridge too hot and some too cold, 3D printers often have beds that don’t stick well enough or stick too well. A few weeks ago I switched two of my three printers to use magnetic beds and thought I’d share with you how that worked out. Spoiler alert: like most things it has its plusses and minuses.

It isn’t a secret that 3D printing is not a plug-and-play operation, especially at the price most of us are willing to pay for printers. There are lots of variables to get right: temperature, speeds, bed leveling, and a bunch of other things. However, one of the things that vexes many people is the relationship between getting that first layer to stick and being able to get the print off the bed when you are done. It is hard to find a happy medium. If the first layer won’t stick, you print is doomed. If the first layer sticks too well, you are likely to damage the part or your fingers getting it removed. I switched to BuildTak surfaces long ago, and many people like PEI. But it is sometimes hard to get a big part removed. A few weeks ago, I took the plunge and bought some magnetic build surfaces for two of my printers. These were “no name” inexpensive affairs from Ali Express.

The idea is simple. There are two sheets that look like a rubberized plastic and have magnetic properties. One piece has some 3M adhesive on the back. The other has one surface that resembles BuildTak. Once you glue down the one sheet you leave it alone. Then you put the other sheet on top and print on it. When you are done, you can pull the sheet out and flex it to pop the print off. That’s the theory, anyway. Continue reading “Better 3D Printing Through Magnets”

ESP8266 Monitor Keeps An Eye On OctoPrint

At this point, you’ve almost certainly heard of OctoPrint. The web-based control interface for 3D printers is especially popular for those who’s primary computers run on an operating system that has a penchant for occasionally imploding. Even if you aren’t laboring under that common software handicap, OctoPrint offers a wide away of compelling features. Perhaps chief among them the ability to monitor your printer over the network, and if you insist, over the Internet. But while OctoPrint provides the server side for getting your printer on the net, you’re on your own for the client.

Rather than using a web browser like some kind of peon, [David Payne] has come up with a very slick desktop OctoPrint monitor using the WeMos D1 Mini ESP8266 board. With an exceptionally low part count and housed in a (what else) 3D printed enclosure, this is a cheap and easy OctoPrint accessory that we suspect will be decorating many a hacker’s desk before too long.

The electronics are simple to the extreme, just hook the 4 wires of an 128×64 OLED I2C display to the appropriate pins of the ESP8266 board, and you’re ready to upload the Arduino code [David] has come up with.

His code is very polished, from using WiFiManager for initial network setup to providing its own web-based configuration menus to get the device linked up to your OctoPrint instance, [David] clearly wanted this to be as smooth an experience as possible for the end user. When the 3D printer isn’t working on a job, the monitor will even switch over to showing you the time and weather. We’ve seen commercial products that weren’t this user-friendly.

We also love the case design on this little gadget. While the aesthetics are perhaps debatable (sort of reminds us of the little fellows from Darwinia), we appreciate any functional print that doesn’t require supports. You’ll need to provide a couple of little screws to keep the back panel on, but other than that everything snaps into place.

Of course, you could always just use your smartphone to keep an eye on OctoPrint, and even if the remote management capabilities don’t grab your interest, there’s plenty of interesting plugins to keep you occupied.

Continue reading “ESP8266 Monitor Keeps An Eye On OctoPrint”