The SHA2017 Badge Revealed

It’s that excellent time of year in which one slowly comes to the realisation that the summer’s eagerly anticipated events are now no longer at some impossibly distant point in the future, but in fact only a matter of a few months or even weeks away. For our European readers, this means that August’s SHA2017 hacker camp is appearing on the horizon, four days of outdoor technological indulgence for our community in a scout camp on the Dutch polders.

As it is a tradition of such events to have an electronic badge incorporating ever more impressive levels of computing power, it follows that the pre-production announcement of an event badge has become an important milestone in the countdown to the day. SHA2017 is no exception, and thus today we see the announcement of their take on the essentials for a hacker camp badge in 2017.

The most immediately obvious thing about the badge is its 296×128 pixel e-ink display, which should provide an immediate benefit in terms of battery life. There are the usual plethora of interfaces, GPIOs, USB, and Neopixels, and the user input is via a set of capacitive buttons. Powering the device is an ESP32, and a key design goal was to have a network for the badges that does not put pressure on the 2.4GHz infrastructure. We’re guessing they’re doing this using raw WiFi packets in the same way as the MAGfest swadge. On the software front it will provide a straightforward development route via MicroPython, and there will be an app library for those without the inclination to code their own. You can get an early look at the schematic from the project repo (PDF).

Their target is to have the badge ready and with stable software on day 1 of the event, a laudable aim if they can manage it.

Members of the Hackaday team will be making the trip to the Netherlands for SHA2017, we look forward to seeing you if you attend too, and please show us anything interesting you do with your badges! Keep your eyes peeled for the Jolly Wrench, and come say hello. You’ll find me with the OxHack contingent and giving a talk on the kit biz which I have also published in the Project to Kit series of articles.

We’ve covered so many badges here at Hackaday that we could almost serve of a retrospective exhibition of the art form. Of particular interest to us though is our own [Voja Antonic]’s badge for last year’s Hackaday SuperConference.

Thanks [Sebastius] for the tip.

A Digital Tacho For A Harley

If you are a lover of motorcycling, you’ll probably fit into one or other of the distinct groups of riders. Maybe you’re a sportsbike lover always trying to get your knee down, a supermotard who gets their knee down without trying, a trailie rider for whom tarmac is an annoyance between real rides, or a classic bike enthusiast who spends more time in the workshop than riding.

[Xavier Morales] is none of these, for he cruises the roads of his native Catalonia on a Harley-Davidson Sportster. If you’re familiar with Harleys only from popular culture, or you’re a sportsbike rider who derides them for anachronistic handling and brakes, it’s worth taking a look at a modern Harley from a technical standpoint. Despite styling and brand ethos that evokes another era with the trademark large V-twin engine that looks to the untrained eye the same as it did decades ago, today’s Harley is a very modern machine, and much more capable than the sneering sportsbiker would give it credit for.

There is one area though in which [Xavier]’s Harley was sorely lacking. Its single instrument was a speedometer, it had no rev counter. You might think this would be less of an issue with the lower-revving Harley engine than it would be with a Japanese sportsbike that exists in a hail of revs, but it was annoying enough to him that he built his own tachometer. His write-up of the project is both lengthy and fascinating, and well worth a read.

The Sportster’s data bus follows an established but obsolete standard, SAE J1850 VPW. Since driver chips for this bus are out of production, he had to create his own using a transistor and a couple of resistors. Once he has the data he feeds it to a PIC 18F2553 which in turn runs a display driver chip controlling a brace of 7-segment LEDs. There are also a set of LEDs to indicate gear changes. The whole is installed in a 3D-printed housing alongside the original speedometer, behind the glass from another dial. As a result it looks as though the bike was always meant to be a two-clock design, with a professional appearance.

If you’d like to see it in action, he’s posted a few videos, and we’ve put one below the break. The beautiful Catalan scenery and the mountain twisties look very inviting.

Continue reading “A Digital Tacho For A Harley”

The Internet Connected Dog Treat Machine

[Eric] and [Shirin] have a dog called [Pickles], who is the kind of animal that if you are a dog lover you will secretly covet. They evidently dote upon [Pickles], but face the problem that they can’t always be at home to express their appreciation of him. But rather than abandon him entirely, they’ve applied technology to the problem. [Eric] has built an Internet-connected dog treat dispenser, through which they can dispense treats, and watch the lucky mutt wolfing them down.

The body of the machine has been made with lasercut acrylic, and the dispenser mechanism is a rotating hopper driven by a stepper motor. The whole thing — in all its transparent glory — is controlled through a Raspberry Pi, which plays a sound clip of [Shirin] calling [Pickles] for his treat, records his dining enjoyment with its camera, and emails the result to his owners. Behind the scenes it hosts an MQTT server, which can be triggered via an iPhone app, Alexa, or the adafruit.io site. Imagine for a moment: “Alexa, feed my dog!”. It has a ring to it.

He makes the point that this machine is not simply limited to dispensing treats, it could be used to engage [Pickles] in more activities. He hints at a future project involving a ball throwing device (have you ever seen such joy from a dog). There’s no substitute for being there with your dog, but maybe with this device they can make their dog’s life a little less of, well, a dog’s life.

You can see the machine in action in the video we’ve posted below the break.

Continue reading “The Internet Connected Dog Treat Machine”

Sorting Two Tonnes Of Lego

Have you ever taken an interest in something, and then found it’s got a little out of hand as your acquisitions spiral into a tidal wave of bags and boxes? [Jacques Mattheij] found himself in just that position with Lego. His online purchases had run away with him, and he had a garage packed with “two metric tonnes” of the little coloured bricks.

Disposing of Lego is fairly straightforward, there is a lively second-hand market. But to maximise the return it is important to be in control of what you have, to avoid packaging up fake, discoloured, damaged, or dirty parts. This can become a huge job if you do it by hand, so he built a Lego sorting machine to do the job for him.

The machine starts with a hopper for the loose Lego, with a slow belt that tips individual parts down a chute to a faster belt derived from a running trainer. On that they run past a camera whose images are analysed through a neural net, and based on its identification the parts are directed into appropriate bins with carefully timed jets of compressed air.

The result is a surprisingly fast way to sort large amounts of bricks without human intervention. He’s posted some videos, one of which we’ve placed below the break, so you can see for yourselves.

Continue reading “Sorting Two Tonnes Of Lego”

Hackaday Prize Entry: Device For Seismic Noise Analysis

Whenever there is an earthquake somewhere in the world, our TV screens fill with images of seismic data. Those news report graphics with simplified bite-sized diagrams that inform the masses, but usually get something wrong. Among the images there will invariably be one of a chart recorder drawing a significant earthquake trace on paper, which makes good TV, but is probably miles away from the state of the art in seismology.

We are not seismologists here at Hackaday, so it was extremely interesting to find [Michael D]’s project, Device for Seismic Noise Analysis. In it, he gives a basic primer in seismic sensors, and outlines his take on the subject, a sensitive wideband seismic sensor designed to capture the seismic background noise. It seems that many seismic sensors are designed to capture big events, yet ignore the noise between them from which using suitable software one can glean advance warning of seismic events.

The sensor is a simple design, a ball of significant mass rests upon three piezoelectric microphone elements spaced at 120 degree intervals. An extremely high impedance op-amp circuit converts and integrates the charge from the piezo element to a voltage that can be read by an Arduino Yun which harvests the data. It is a bold claim, but the device is said to have already given advance warning of minor seismic events near its Tennessee test site.

Seismology has featured here a few times before. There was this seismometer using a subwoofer as its sensor, and this project using commercial geophones, just to name a couple of examples.

Hackaday Prize Entry: Arduino Splash Resistant Toilet Foamer

There are some universal human experiences we don’t talk about much, at least not in public. One of them you’ll have in your own house, and such is our reluctance to talk about it, we’ve surrounded it in a fog of euphemisms and slang words. Your toilet, lavatory, john, dunny, khazi, bog, or whatever you call it, is part of your everyday life.

For his Hackaday Prize entry, [VijeMiller] tackles his smallest room head-on. You see, for him, the chief horror of the experience lies with the dreaded splashback. Yes, a bit of projectile power dumping leaves the old rump a little on the damp side. So he’s tackled the problem with some maker ingenuity and installed an Arduino-controlled foam generator that injects a mixture of soap and glycerin to fill the bowl with a splash-damping load of foam. Rearward inundation avoided.

The parts list reveals that the foam is generated by a fish tank aerator, triggered by a relay which is driven by an Arduino Uno through a power transistor. A solenoid valve controls the flow, and a lot of vinyl tubing hooks it all together. There is an HC/06 Bluetooth module with an app to control the device from a phone, though while he’s posted some Arduino code there is no link to the app. There are several pictures, including a cheeky placement of a Jolly Wrencher, and a shot of what we can only surmise is a text, as foam overflows all over the bathroom. And he’s put up the video we’ve placed below the break, for a humorous demonstration of the device in action.

Continue reading “Hackaday Prize Entry: Arduino Splash Resistant Toilet Foamer”

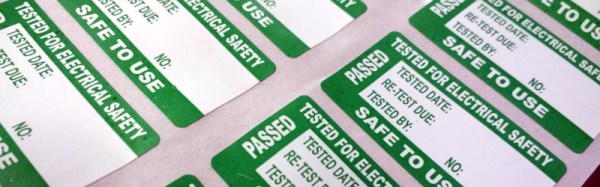
We’ve Got It Down PAT: Appliance Electrical Safety Testing

Everywhere we look in our everyday lives, from our bench to our bedroom, there are the ubiquitous electrical cords of mains-powered appliances. We don’t give our electrical devices a second thought, but in addition to their primary purpose they all perform the function of keeping us safe from the dangerous mains voltages delivered from our wall sockets.

Of course, we’ve all had appliances that have become damaged. How often have you seen a plug held together with electrical tape, or a cord with some of its outer sheath missing? It’s something that we shouldn’t do, but it’s likely many readers are guiltily shuffling a particular piece of equipment out of the way at the moment.

In most countries there are electrical regulations which impose some level of electrical safety on commercial premises. Under those regulations, all appliances must be regularly tested, and any appliances that fail the tests must be either repaired or taken out of service

In the United Kingdom,where this piece is being written, the law in question is the Electricity At Work Regulations 1989, which specifies the maintenance of electrical safety and that there should be evidence of regular maintenance of electrical appliances. It doesn’t specify how this should be done, but the way this is usually achieved is by a set of electrical tests whose official name: “In-service Inspection & Testing of Electrical Equipment”, isn’t very catchy. Thus “Portable Appliance Testing”, or PAT, is how the process is usually referred to. Join me after the break for an overview of the PAT system.

Continue reading “We’ve Got It Down PAT: Appliance Electrical Safety Testing”