A Ridiculous Way To Light An LED: Candle-power

If you have ever entertained yourself by reading comprehensive electronic-theory textbooks you’ll have seen references to technologies that sound really interesting but which you will rarely hold in your hand. They may be dead-ends that have been superseded by more recent innovations, or they may be technologies that have found uses but in other fields from those in which they originally showed promise. What if you could take these crazy parts and actually build something?

[Fedetft] has an interesting project that combines two of those intriguing textbook references, he’s created a thermopile that lights an LED through an inverter whose oscillator is a tunnel diode. Dig out the textbook.

If you’ve used a thermocouple thermometer or a semiconductor thermoelectric generator then you’ll have encountered the thermoelectric effect. Perhaps you’ve even operated a Peltier cooling element in this mode. When a circuit is made with two junctions between different types of conductor with a temperature difference between the two junctions, a current will flow in the circuit which is dependent on both the scale of the temperature difference and the properties of the conductors.

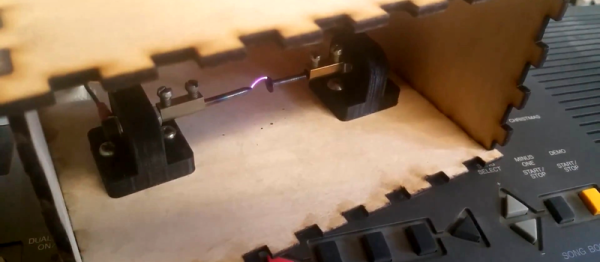
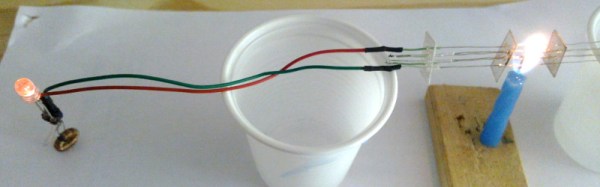
A thermopile is a collection of these thermoelectric junction circuits between metal conductors, arranged in series to increase the voltage. [Fedetft]’s thermopile uses chromel and alumel wires taken from a K-type thermocouple. He’s made six sets of junctions, and supported them with small pieces of mica sheet. Using the heat from a candle he found he could generate about 200mV with it, at about 3.7mW.

The RCA tunnel diode inverter circuit

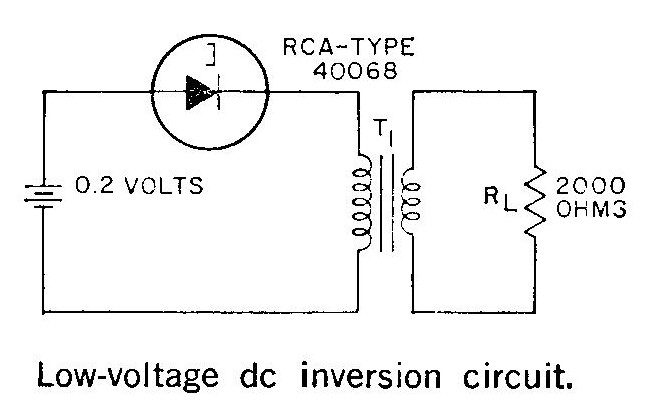
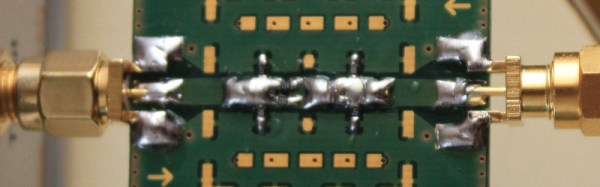
Such a tiny source of electricity would be of little use to light an LED directly, so he needed to build an inverter. And that’s where the tunnel diode comes in. Tunnel diodes have a negative-resistance region that can be used to amplify and oscillate at extremely high frequencies in extremely simple circuits, yet they’re not exactly a device you’d encounter very often in 2016. [Fedetft] has a Russian tunnel diode, and he’s used it with a toroidal transformer in an inverter circuit he found in an RCA tunnel diode manual from 1963. It’s a two-component Joule Thief. The RCA manual is a good read in itself for those curious about tunnel diodes.

The resulting circuit produces a 15kHz oscillation with 4.5v peaks, and has just enough power to light an LED.

While it might seem pointless to barely light an LED from a brightly lit candle, the important part of [Fedetft]’s project is to gain some understanding of two of those technological backwaters from the textbooks. And we applaud that.

It’s the mark of a truly esoteric technology that it features rarely on Hackaday, and neither of these two disappoint. We’ve only mentioned tunnel diode in passing when looking at diodes in general, and we’ve tended to use “thermopile” in another sense to refer to thermal imaging cameras.

Retrotechtacular: Hallicrafters Goes To War

When the USA entered World War Two, they lacked a powerful mobile communications unit. To plug this gap they engaged Hallicrafters, prewar manufacturers of amateur radio transmitters and receivers, who adapted and ruggedized one of their existing products for the application.

The resulting transmitter was something of a success, with production running into many thousands of units. Hallicrafters were justifiably proud of it, so commissioned a short two-part film on its development which is the subject of this article.

The transmitter itself was a very high quality device for the era, but even with the film’s brief insight into operating back in the AM era the radio aspect is not what should capture your interest. Instead of the radio it is the in-depth tour of an electronics manufacturing plant in the war years that makes this film, from the development process of a military product from a civilian one through all the stages of production to the units finally being fitted to Chevrolet K-51 panel vans and shipped to the front. Chassis-based electronics requiring electric hoists to move from bench to bench are a world away from today’s surface-mount micro-circuitry.

So sit back and enjoy the film, both parts are below the break.

Continue reading “Retrotechtacular: Hallicrafters Goes To War”

555 Plasma Speaker

The 555 can do anything. OK, that’s become a bit of a trope in our community, but there is quite a lot of truth behind it: this little timer chip is an astonishingly versatile component.

[Alexander Lang] has added another achievement to the 555’s repertoire, he’s used one in the creation of a plasma speaker. Working at Hackspace Manchester, he’s used the 555 as a pulse-width modulator that drives a flyback transformer through a MOSFET, which feeds a spark gap mounted in a lasercut enclosure. The results maybe aren’t yet hi-fi, but it works, and is very audible.

We’ve been following this project for a while, as he’s updated his progress through several iterations. From initial design idea through PCB and enclosure design, to a first working prototype and some audio refinements, and finally this latest post with the spark gap in its enclosure. He is still refining his speaker, so there is more to come

In the video below the break he demonstrates his pulse width modulator, and tests the device using a keyboard as an input.

Continue reading “555 Plasma Speaker”

RF Biscuit Is A Versatile Filter Prototyping Board

As anyone who is a veteran of many RF projects will tell you, long component leads can be your undoing. Extra stray capacitances, inductances, and couplings can change the properties of your design to the point at which it becomes unfit for purpose, and something of a black art has evolved in the skill of reducing these effects.

RF Biscuit is [Georg Ottinger]’s attempt to simplify some of the challenges facing the RF hacker. It’s a small PCB with a set of footprints that can be used to make a wide range of surface-mount filters, attenuators, dummy loads, and other RF networks with a minimum of stray effects. Provision has been made for a screening can, and the board uses edge-launched SMA connectors. So far he’s demonstrated it with a bandpass filter and a dummy load, but he suggests it should also be suitable for amplifiers using RF gain blocks.

Best of all, the board is open source hardware, and as well as his project blog he’s made the KiCad files available on GitHub for everyone.

It’s a tough challenge, to produce a universal board for multiple projects with very demanding layout requirements such as those you’d find in the RF field. We’re anxious to see whether the results back up the promise, and whether the idea catches on.

This appears to be the first RF network prototyping board we’ve featured here at Hackaday. We’ve featured crystal filters before, and dummy loads though, but nothing that brings them all together. What would you build on your RF Biscuit?

An Atari 2600 In Your Pocket

If there’s one console that holds a special place in the hearts of console gamers of a certain age, it’s the Atari 2600. A 6502 based system with a cartridge slot and a couple of joysticks, it plugged into your home TV and if you had one for Christmas in the late ’70s you were suddenly the coolest kid in the neighbourhood.

The last new 2600s were sold in the early 1990s, but all was not lost for 2600 fans. In the last decade the format was revived as the Atari Flashback, an all-in-one console containing a selection of games and no cartridge slot. The Flashback had a flaw though, it stayed true to the original in that it needed a TV set. Rather a pity in a world of hand-held consoles.

[Lovablechevy] set out to release the Flashback from the TV set, and created a very tidy hand held Atari 2600 console with sound and a screen, all in the casing of an original 2600 cartridge.

There isn’t a lot of room in a 2600 cartridge, so as her worklog shows, she had to cut up the PCB and be very careful with her wiring to ensure it all fits. She’s using the Flashback 2 as her source console, and she tells us it has 42 games to choose from.

If the worklog pictures weren’t enough she’s posted a video of the device in action, and it shows a very neat and playable hand-held console. We would have done anything to get our hands on one of those had it been available in 1980!

Continue reading “An Atari 2600 In Your Pocket”

Retrotechtacular: Blacksmithing To The Stars!

When most of us think of forge work, the image that comes to our mind is likely to be a rather traditional one, of the village blacksmith’s shop, roaring coke-fired hearths, and an anvil ringing to the beat of hand-wielded hammers. Iron and steel, worked through the sweat of the human brow.

Precision metalwork probably doesn’t figure in there, yet there is another type of forging used to create some of the most highly stressed components on rockets, missiles, and aircraft as well as the more mundane ironwork of your garden fence. Drop forging allows reproducible shapes to be forged while maintaining tight control over the metallurgical properties of the finished product, exactly what is required for such high-performance applications.

The video below is a promotional film about drop forging in the aeronautical industry from the late 1950s, made for and about Wyman Gordon, still specialists in the field. With the charming optimism of the period and a very catchy title it goes into the detail of the plant, development, and quality control of a range of parts for the missiles and rockets of the day, and along the way shows the cutting edge of machine tooling in the days before CNC. A whole Periodic Table of metals are forged with an expertise probably not seen in many other places in the world.

There are also some sights you’d never see in today’s safety culture, for example a running press with men darting in to adjust the position of a forging while it is still moving. It’s not a short video, but definitely worth watching all the way through.

Continue reading “Retrotechtacular: Blacksmithing To The Stars!”

An Affordable Panasonic Grid-EYE Thermal Imaging Camera

Thermal imaging cameras are objects of desire for hackers and makers everywhere, but sadly for us they can be rather expensive. When your sensor costs more than a laptop it puts a brake on hacking.

Thankfully help is at hand, in the form of an affordable evaluation board for the Panasonic Grid-EYE thermal imaging camera sensor. This sensor has sparked the interest of the Hackaday community before, featuring in a project that made the 2014 Hackaday Prize semifinals, but has proved extremely difficult to obtain.

All that has now changed though with this board. It features the Grid-EYE sensor itself, an Atmel ATSAM-D21G18A microcontroller, and onboard Bluetooth, but has an interesting feature that, as well as being a standalone device, can be used as an Arduino shield. A full range of APIs are provided, and the code is BSD licensed.

This module is not the highest-spec thermal imaging camera on the market by any means, after all it has a resolution of only 64 pixels in an 8×8 grid. But its affordability and easy availability should trigger a fresh crop of thermal camera projects in our community, and we applaud that.

Thermal camera projects have featured quite a few times here on Hackaday. Some have been based on the FLIR Lepton module, like this one that combines its image with a 640×480 visible camera and another that claims to be one of the smallest thermal cameras, while others have harnessed raw ingenuity to create a thermal camera without a sensor array. This pan-and tilt design for example, or this ingenious use of light painting. Please, keep them coming!

[via oomlout]