Machining Waveguides For 122 GHz Operation Is Delicate Work

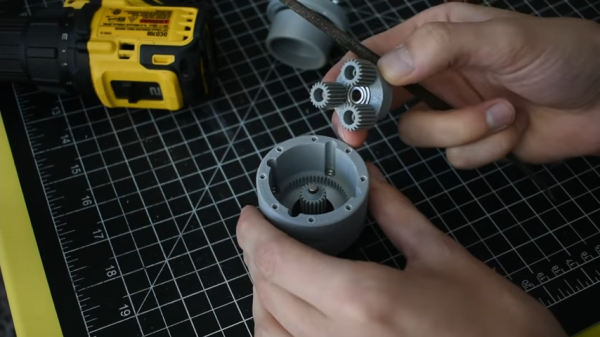
Millimeter-wave Radars used in modern cars for cruise control and collision avoidance are usually designed to work at ranges on the order of 100 meters or so. With some engineering nous, however, experimenters have gotten these devices sending signals over ranges of up to 60 km in some tests. [Machining and Microwaves] decided to see if he could push the boat out even further, and set out machining some waveguide combiner cavities so he could use the radar chips with some very high-performance antennas.

Precision-machined components are required to successfully use these 122 GHz components for long-range transmissions.

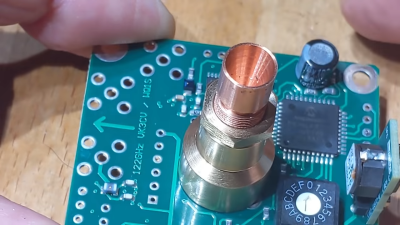
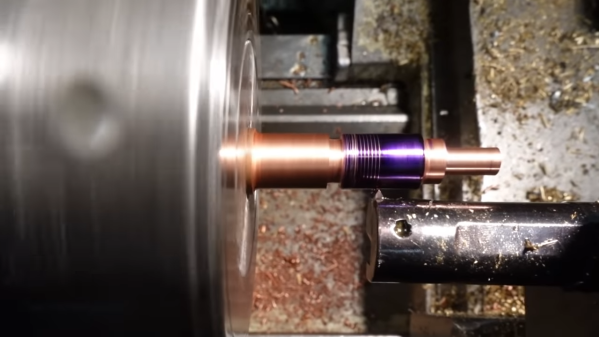
The end goal of the project is to produce a 53 dBi antenna for the 122GHz signal put out by the mmWave radar chips commonly found in automotive applications. Working at this frequency requires getting tolerances just so in order to create an antenna that performs well.

Plenty of fine lathe work and cheerful machining banter later, and the precision waveguide is done. It may not look like much to the untrained eye, but much careful design and machining went on to make it both easy to attach to the radar and parabolic antenna system, and to make it perform at a high enough level to hopefully break records set by other enterprising radio experimenters. If that wasn’t all hard enough, though, the final job involved making 24 of these things!

There aren’t a whole lot of microwave antenna-specific machining channels on YouTube, so if you’ve been thirsty for that kind of content, this video is very much for you. If you’re more interested in antennas for lower frequencies, though, you might find some of our other stories to your liking. Video after the break.

Continue reading “Machining Waveguides For 122 GHz Operation Is Delicate Work”

Color Dot Puzzle Will Wrinkle Your Brain

2022 is a good year for puzzles, and if you’re getting tired of Wordle, you might be after a new challenge. This color puzzle from [Sebastian Coddington] could be just what you’re looking for. 

[Sebastian] describes the 4×4 Color Dot Puzzle as a sort of combination of the ideas behind the Rubik’s Cube and the 15 puzzle. The aim is to arrange the 16 colored tiles on the board to form four single-colored 2×2 squares in the overall 4×4 board. The puzzle is 3D printed, using 6 colors of filament – black for the body of the puzzle, white for the control sticks, and yellow, green, red, and blue for the individual tiles.

We haven’t seen any mathematical proofs of how to beat the game, but we’re sure [Sebastian] has gotten good at beating the puzzle having designed it himself. According to tipster [Michael Gardi], who knows a thing or two about 3D printing games himself, the puzzle makes for a fun little mind teaser.

If you’re more of a jigsaw person, consider this advanced illuminated build.

Tutorial Teaches You To Use Neopixels With Micropython

Addressable LEDs are wonderful things, with products like Neopixels making it easy to create all kinds of vibrant, blinking glowables. However, for those without a lot of electronics experience, using these devices can seem a bit daunting. [Bhavesh Kakwani] is here to help, with his tutorial on getting started with Neopixels using the MicroPython environment. 

The tutorial flows on from [Bhavesh’s] Blink example for MicroPython, and is aimed at beginners who are learning for the first time. It explains the theory behind RGB color mixing that allows one to generate all manner of colors with WS2812B-based LED strings, and how to code for the Raspberry Pi Pico to make these LEDs do one’s bidding.

The guide even covers the use of the Wokwi simulation tool. This is a great way for beginners to test their projects before having to play with actual hardware. This is useful for beginners, because it’s a great way to catch mistakes – is there a software problem, or did they push the soldering iron through the microcontroller? It’s also a technique that pays dividends when working on more complicated projects.

Whether you’re entirely new to the embedded world, or just want to learn the intricacies of talking to addressable LEDs and make sense of color mixing theory, this tutorial will serve you well. Before you know it, you’ll be building glowing projects with the best of them!


Pyrotechnic Posters Are Fireworks Drawn On Paper

There’s a deep love many humans feel for fire; it’s often cited as one of the most important discoveries that led to the founding of civilization. The work of French artistic duo [Pinaffo-Pluvinage] definitely hits upon that, combining pyrotechnics with paper to make what are probably the most exciting posters you’ve ever seen, as reported by Heise Online.

The artworks are made with a variety of powders, including those for blue and red flames and one with a special “scintillating” effect.

The posters aren’t huge, measuring 50 cm x 70 cm. However, what they lack in size, they make up for with literal flames. Yes, the posters are laced with a variety of pyrotechnic powders that combust in a variety of designs and patterns to create a dynamic burning artwork once ignited.

Each poster is thus a work of art in both the visual and combustible realms. Different parts of the artwork burn at differnt rates and with different colored flames, adding to the performance when the poster is burned. Impressively, the artworks are not destroyed in the process; the pyrotechnic material burns off with much flame and smoke without destroying the poster itself.

Putting together the posters wasn’t as simple as simply doodling some designs. The duo had to develop their own methods to apply the pyrotechnic material to the paper. Reportedly, the effort took hundreds of experiments to get right.

It’s unclear exactly how the effect is achieved without burning the whole poster down; one suspects some kind of protective layer may be used. It’s quite the opposite of flash paper, which consumes the paper itself in the combustion.

In any case, fireworks experts will likely have some good ideas of the chemicals used to achieve the flaming effects; sound off in the comments if you know what’s what!

The pieces could be interpreted as a commentary on the transience of all things, or the artist’s intention could have been something different entirely. Who can say? Video after the break.

Continue reading “Pyrotechnic Posters Are Fireworks Drawn On Paper”

A Most Unconventional Lego Walker

Lego Technic is a wonderful thing, making it easy to toy around with all manner of complicated mechanical assemblies without needing to do any difficult fabrication. [touthomme] recently posted one such creation to Reddit – a walker design that is rather unconventional.

The design dispenses with individually-actuated legs entirely. Instead, the two front legs are joined by an axle which pivots the legs about the body, which is shaped like an oval track. The rear legs are the same. A motorized carriage then travels along the oval track. When the weighted carriage reaches the front of the oval track, it forces the body to tip forwards, pivoting around the front legs and flipping the entire body over, swinging the rear legs forwards to become the front. The cycle then repeats again.

The flipping design, inspired by a toy, is something you wouldn’t expect to see in nature, as few to no animals have evolved mechanisms capable of continual rotation like this. It’s also unlikely to be a particularly efficient way of getting around, and the design would certainly struggle to climb stairs.

Some may claim the method of locomotion is useless, but we don’t like to limit our imaginations in that way. If you can think of a situation in which this walker design would be ideal, let us know in the comments. Alternatively, consider other walking designs for your own builds.  Video after the break.

Continue reading “A Most Unconventional Lego Walker”

DIY Nanoleaf LED Panels Offer Peace Of Mind

Nanoleaf light panels are a popular product for creating glowing geometric designs on walls. However, for those that like to avoid IoT devices that integrate with big cloud services, they’re not ideal, and involve compromising on one’s privacy, somewhat. [Viktor] decided to build something of his own instead to avoid this problem.

The design is that of an equilateral triangle, which allows the panels to tesselate well. Each panel consists of two 3D printed parts. The black PLA base holds the WS2812B LED strips, cabling, and ESP8266 controller, while a white PLA cover goes over the top, which acts as a diffuser to spread the light from the individual LEDs. Each triangle contains 24 LEDs, and six triangles together consume around 1.6 amps when in use.

The benefit of the system is that it’s not controlled from a company’s cloud system, which can be shutdown at any time. [Viktor’s] setup runs entirely independently, and can be controlled from a simple web page. Plus, there’s nothing stopping him from modifying the code to use the panels for any purpose; commercial products like Nanoleaf don’t offer anywhere near the flexibility of building your own.

We’ve seen others build their own smart lighting with similar techniques before, too. Video after the break.

Continue reading “DIY Nanoleaf LED Panels Offer Peace Of Mind”

Resin-Printed Gears Versus PLA: Which Is Tougher?

When it comes to making gearboxes, 3D printing has the benefit that it lets you whip up whatever strange gears you might need without a whole lot of hunting around at obscure gear suppliers. This is particularly good for those outside the limited radius served by McMaster Carr. When it came to 3D printed gears though, [Michael Rechtin] wondered whether PLA or resin-printed gears performed better, and decided to investigate.

The subject of the test is a 3D-printed compound planetary gearbox, designed for a NEMA-17 motor with an 80:1 reduction. The FDM printer was a Creality CR10S, while the Creality LD02-H was on resin duty.

The assembled gearboxes were tested by using a 100 mm arm to press against a 20 kg load cell so that their performance could be measured accurately. By multiplying the force applied to the load cell by the  length of the arm, the torque output from the gearbox can be calculated. A rig was set up with each gearbox pushing on the load cell in turn, with a closed-loop controller ensuring the gearbox is loaded up to the stall torque of the stepper motor before letting the other motor take over.

Continue reading “Resin-Printed Gears Versus PLA: Which Is Tougher?”