Cramming A DS Inside A Gameboy

Many holiday recipes and console hacks share a common theme: cramming a thing inside another thing. Whether it’s turducken or a Nintendo DS inside a Gameboy, the result is always unexpected. The chassis for this mod is a humble Gameboy color with a Gameboy SP screen tackled on the top to serve as the secondary display. Unfortunately, this mod lost touch screen functionality, limiting some of the games you can play.

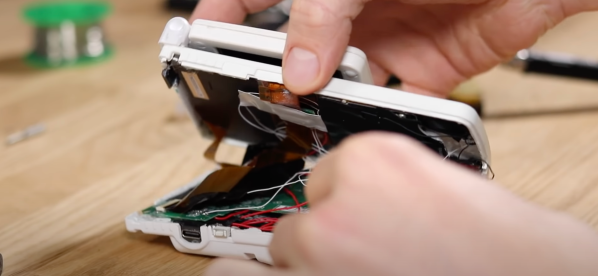
[TheRetroFuture] received the custom handheld from [GameboyCustom], which was somewhat damaged in shipping. The original screw mounts had to be removed and the case glued back together to fit the DS motherboard. So for [TheRetroFuture] to get inside to start troubleshooting involved a razor blade and patience. Testing various points and swapping components got [TheRetroFuture] closer to the root problems. The fix ended up being a few wires that came loose during shipping. Finally, after reseating a display connection and some careful soldering, it booted and started playing games.

Overall, it’s pretty impressive to see Mario Kart DS running on both screens on the tiny handheld. But you might be asking, why? Why shove one handheld inside another handheld? Sometimes it’s to gain new functionality like this Raspberry Pi inside a PSP body. Sometimes, it’s just because we can. Video after the break.

Continue reading “Cramming A DS Inside A Gameboy”

Making Your Own Touchpad With PWM And Rust

The modern touchpads are incredible feats of engineering, with everything from complex signal processing for noise and tremendous economies of scale driving prices low. So [Kevin] decided to see if he could make his own touchpad. Partially out of curiosity of what makes one touchpad better than another, but also because he was curious if he could. Using an STM32 and a custom PCB, he was off to the races in an incredibly cost-effective way.

After writing some quick firmware in Rust, he was reporting the values read by the PWM channels. Using python, he could get a good idea of the raw values that were being written over USB and visualized. So rather than implement filtering in hardware or firmware, he elected to do the filtering and processing on the host computer side in Python. We suspect this gave him much shorter iteration cycles.

If you like the idea of making your own touchpad but perhaps are dreaming a little bigger, why not make a tablecloth-sized touchpad?

Battery pack of e-bike being welded

Extending An E-Bike Range From Good To Wheelie Good

It may not look like it in some parts of the world, but electric vehicles are gaining more and more market share over traditional forms of transportation. The fastest-growing segment is the e-bike, which some say are growing at 16x the rate of conventional bikes (which have grown at 15% during the pandemic). [Jacques Mattheij] rides an S-Pedelec, which is a sort of cross between a moped and an e-bike. There were a few downsides, and one of those was the pitiful range, which needed to be significantly upgraded.

The S-Pedelec that [Jacques] purchased is technically considered a moped, which means it needs to ride in traffic. The 500 watt-hour battery would only take him 45km (~28 miles) on a good day, which isn’t too bad but a problem if your battery runs down while in traffic, struggling to pedal a big heavy bicycle-like thing at car speed. You can swap batteries quickly, but carrying large unsecured extra batteries is a pain, and you need to stop to change them.

There were a few challenges to adding more batteries. The onboard BMS (battery management system) was incredibly picky with DRM and fussy about how many extra cells he could add. The solution that [Jacques] went with was to add an external balancer. This allowed him to add as many cells as he wanted while keeping the BMS happy. The battery geometry is a little wonky as he wanted to keep the pack within the frame. Putting it over the rear wheel would shift the center of gravity higher, changing the bike’s handling. After significant research and preparation, [Jacques] welded his custom battery back together with a spot welder. The final capacity came in at 2150wh (much better than the initial 500wh). An added benefit of the extra range is the higher speed, as the bike stays in the higher voltage domain for much longer. In eco mode, it can do 500km or 180km at full power.

It’s awe-inspiring, and we’re looking forward to seeing more e-bikes in the future. Maybe one day we’ll have tesla coil wireless e-bikes, but until then, we need to make do with battery packs.

a money shot of the hidden arcade

Arcade Machine Pack And Play

There’s something about the large imposing wooden box of an arcade machine that lends a confident presence to a room. The problem with a tall and heavy box is that it takes up quite a bit of space and readily draws the eye. So [Alexandre Chappel] set out to avoid that and build an arcade machine that could hide in plain sight.

Extra points awarded for neat wiring on the inside.

The idea is a wooden box hung on the wall that folds up when not in use. [Alex] starts with Baltic birch plywood cut into the panels. Next, he applies edge banding (a thin veneer with some glue on the backside) so that all the exposed edges look like natural wood. Next, a screen hole is routed into the face frame, allowing an LCD monitor to sit snuggly in. A combination of pocket holes and biscuits allows [Alex] to assemble everything with no visible screws or fasteners.

With the help of a 3D printer, he quickly fabricated a locking mechanism to keep the front panel attached when it folds up. The hinge is also 3D printed. The typical Raspberry Pi 4 powers this particular machine. Two french cleats hold the box onto the wall, and once the system is on the wall, we have to say it looks incredible.

If you’re looking for a smaller but more traditional arcade cabinet, why not take a look at this arcade cabinet for toddlers? Or, if you loved the solid wood look of the hidden arcade, this full-sized solid oak cabinet would be something you would enjoy. Video after the break.

Continue reading “Arcade Machine Pack And Play”

showing the ramp and sprayer of the cider press

The Spiced (Cider) Must Flow

A fresh-squeezed glass of orange juice with breakfast seems like a trope that’s straight from a late 1980s sitcom. Making orange juice is easy; press until the liquid comes out. Apple juice (and, by extension, apple cider) is the same principle but requires much more force to squeeze out the juice. So what if you, like [Peter], have 900 lbs (408.2 kg for those metrically minded) of apples that you want to make cider out of? The obvious solution is to create a somewhat automated homemade cider press with lasers.

An earlier effort to make 25 gallons of cider took several full days of struggle for four people, so [Peter] knew he had to plan better next year. [Peter’s wife] milled and glued red oak into a large, sturdy frame that could press down with proper force and not break. [Peter] reached out to the local metal shop to fabricate a stainless steel tray with a custom drain. The cider basket itself and the pressboard were maple with waterproofing oil.

However, just because you can press apples, doesn’t mean you’re ready to make cider. They still need to be washed, cut, and ground into a pulp. A ramp was fashioned that it could be set in a truck bed with sprayers to wash the apples as they rolled by. A laser circuit with an LM393 opamp and a photoresistor allowed the sprayers to only activate when there was actually an apple to spray. Apple grinders are tricky as they need to survive the drop of several one-pound balls while staying at a reasonable speed. The grinder dispenses the pulp into a mesh nylon bag in a 5-gallon bucket, ready to be pressed. For the curious reader, 900lbs of apples yielded 60 gallons of delicious cider.

If you’re looking for a smaller scale press, here’s a cider press that’s a little simpler to make.

Pumpkin OS running on x86

Palm OS: Reincarnate

[pmig96] loves PalmOS and has set about on the arduous task of reimplementing PalmOS from scratch, dubbing it Pumpkin OS. Pumpkin OS can run on x86 and ARM at native speed as it is not an emulator. System calls are trapped and intercepted by Pumpkin OS. Because it doesn’t emulate, Palm apps currently need to be recompiled for x86, though it’s hoped to support apps that use ARMlets soon. Since there are over 800 different system traps in PalmOS, he hasn’t implemented them all yet.

Generally speaking, his saving grace is that 80% of the apps only use 20% of the API. His starting point was a script that took the headers from the PalmOS SDK and converted them into functions with just a debug message letting him know that it isn’t implemented yet and a default return value. Additionally, [pmig96] is taking away some of the restrictions on the old PalmOS, such as being limited to only one running app at a time.

As if an x86 desktop version wasn’t enough, [pmig96] recompiled Pumpkin OS to a Raspberry Pi 4 with a ubiquitous 3.5″ 320×480 TFT SPI touch screen. Linux maps the TFT screen to a frame buffer (dev/fb0 or dev/fb1). He added a quick optimization to only draw areas that have changed so that the SPI writes could be kept small to keep the frame rate performance.

[pmig96] isn’t the only one trying to breathe some new life into PalmOS, and we hope to see more progress on PumpkinOS in the future.

Trying And (Mostly) Failing To 3D Print A Hydrofoil

[Sam Barker] had a boring dingy that he wanted to spice up a bit, so he resolved to 3D print a hydrofoil wing for it so that it could fly across the water. (Video, embedded below.)

With a large wing designed and sliced into several pieces, and a total print time of 200 hours, [Sam] was ready to glue the foil wing together when he realized his scale was way off and the wings were far too large for his boat. With some hacking, [Sam] was able to use a single wing across the bottom of the ship. [Tom Stanton] came over to help with fiberglassing, and they were ready for a test.

As you might have guessed from the title, the test wasn’t particularly successful. Swapping the engine on the boat for a more potent motor gave the lift he needed in the front, but without a back foil, it was a wheelie rather than what [Sam] hoped for. Back at home, they printed a second wing and went back for a second test. The boat would start to lift out the water, but the shaft of the engine lifted out of the water, sending him back down. Unfortunately, a downpour cut the test short.

Not to be defeated entirely, [Sam] connected it to a much larger boat once the weather cleared and pulled his dingy along behind. To [Sam’s] credit, they did get some solid foiling, and the ship did lift out of the water until the wings sheared off from the stress. All in all, an entertaining story of engineering while racing against the weather.

We admire [Sam’s] ambition, and if you’re thinking about building a whole hydrofoil, we suggest starting with a smaller RC model and scaling up from there.