Although Ethernet is generally considered to be a settled matter, its history was anything but peaceful, with its standardization process (under Project 802) leaving its traces to this very day. This is very clear when looking at the different Ethernet frame types in use today, and with many more historical types. While Ethernet II is the most common frame type, 802.2 LLC (Logical Link Control) and 802 SNAP (Subnetwork Access Protocol) are the two major remnants of this struggle that raged throughout the 1980s, even before IEEE Project 802 was created. An in-depth look at this history with all the gory details is covered in this article by [Daniel].
We covered the history of Ethernet’s original development by [Robert Metcalfe] and [David Boggs] while they worked at Xerox, leading to its commercial introduction in 1980, and eventual IEEE standardization as 802.3. As [Daniel]’s article makes clear, much of the problem was that it wasn’t just about Ethernet, but also about competing networking technologies, including Token Ring and a host of other technologies, each with its own gaggle of supporting companies backing them.
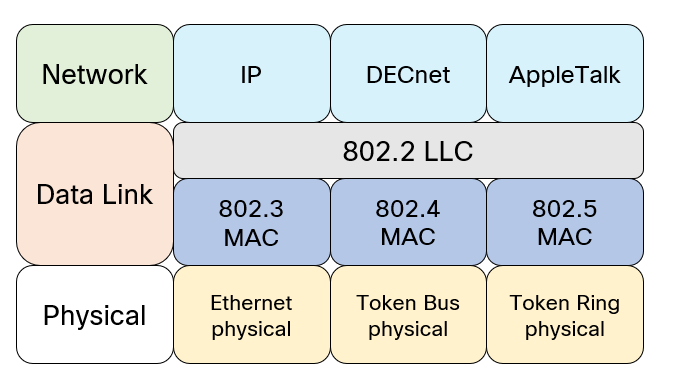
Over time this condensed into three subcommittees:
- 802.3: CSMA/CD (Ethernet).
- 802.4: Token bus.
- 802.5: Token ring.
An abstraction layer (the LLC, or 802.2) would smooth over the differences for the protocols trying to use the active MAC. Obviously, the group behind the Ethernet and Ethernet II framing push (DIX) wasn’t enamored with this and pushed through Ethernet II framing via alternate means, but with LLC surviving as well, yet its technical limitations caused LLC to mutate into SNAP. These days network engineers and administrators can still enjoy the fallout of this process, but it was far from the only threat to Ethernet.
Ethernet’s transition from a bus to a star topology was enabled by the LANBridge 100 as an early Ethernet switch, allowing it to scale beyond the limits of a shared medium. Advances in copper wiring (and fiber) have further enabled Ethernet to scale from thin- and thicknet coax to today’s range of network cable categories, taking Ethernet truly beyond the limits of token passing, CSMA/CD and kin, even if their legacy will probably always remain with us.