How Thermal Post-Curing Resin Prints Affects Their Strength

Tensile strength of resin parts. (Credit: CNC Kitchen)
Credit: CNC Kitchen

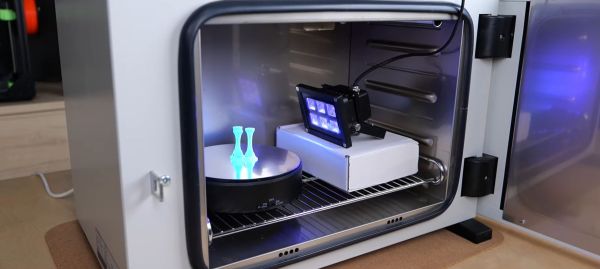
Resin 3D prints have a reputation for being brittle, but [Stefan] over at [CNC Kitchen] would like to dispel this myth with the thing which we all love: colorful bar graphs backed up by scientifically appropriate experiments. As he rightfully points out, the average resin printer user will just cure a print by putting it in the sunshine or in a curing station that rotates the part in front of some UV lights. This theoretically should cause these photosensitive resins to fully cure, but as the referenced Formlabs documentation and their Form Cure station indicate, there’s definitely a thermal element to it as well.

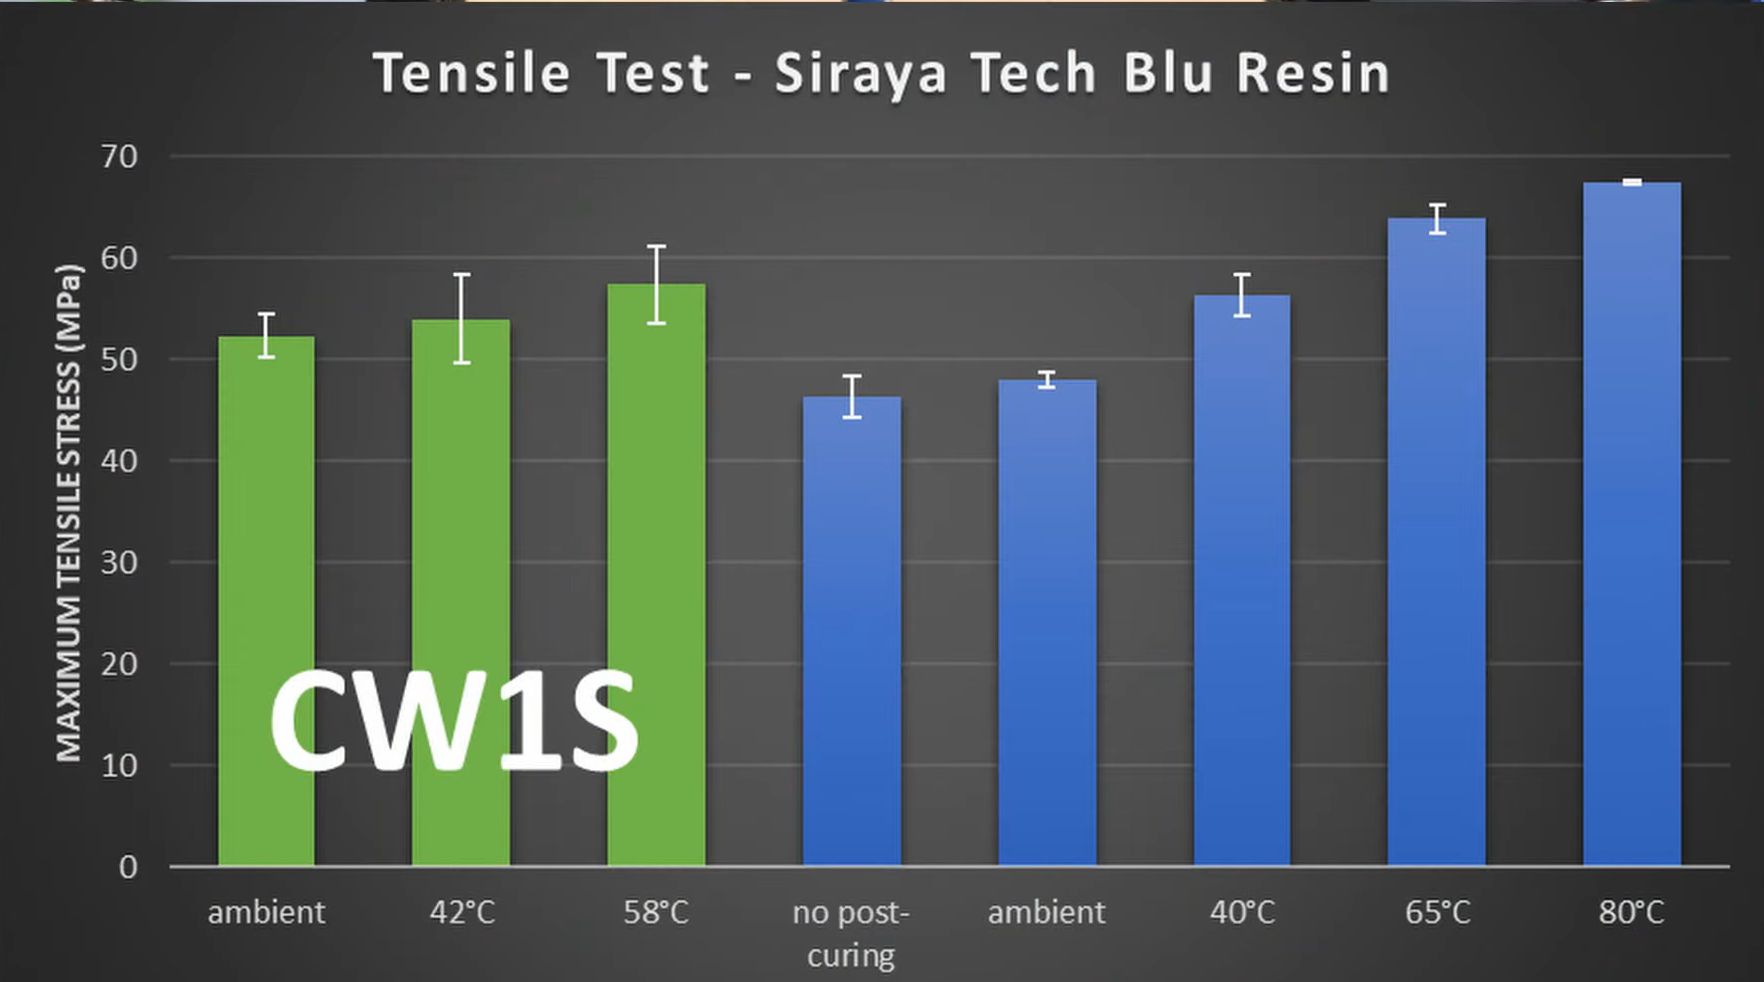
To test the impact of temperature during the UV curing process, the test parts were put into an oven along with the UV lamp. Following this uncured, ambient cured and parts cured at 40 to 80 ºC were exposed to both tensile strength tests as well as impact strength. The best results came from the Siraya Tech Blu resin cured at 80 ºC, with it even giving FDM-printed parts a run for their money, as the following graphs make clear. This shows the value of thermal post-curing, as it anneals the resin prints. This reduces their impact strength somewhat, but massively improves their tensile strength.

Continue reading “How Thermal Post-Curing Resin Prints Affects Their Strength”

2D Plotter attachment for 3D printer.

Ender 3 Plotter Attachment For Printing Onto Cassettes

One way to look at FDM 3D printers is as machines that turn filament into three-dimensional objects, but at their core they are much more versatile than that. Since they can move just about any tool around in 3D space, you can also use them for plotter tasks, a fact that [Geoffrey Gao] made use of when he had to write labels for a stack of music tapes. The resulting FS-Plotter project is based around a Creality Ender 3 FDM printer. Standard g-code from PrusaSlicer is used to move a pen around, after the latter has been fitted into a (3D-printed) spring-loaded fixture.

The cassette tape is fitted into its own fixture that is attached to the printer bed to hold it in place, while the writing utensil can move in its spring-loaded fixture to account for some unevenness on the surface it’s writing on. In the linked GitHub project a PrusaSlicer profile is provided that can generate 2D plotter Gcode. Where [Geoffrey] says that this project is very useful to him as a musician is that it enables him to make small runs of tapes with professional printing, without running into extra expenses.

Beyond putting a writing utensil into the holder, it could also be used for light engraving and similar tasks, while still making it possible to switch between the FDM hotend and this plotter attachment as needed. For about $30 in parts, it doesn’t seem like a bad deal to get a small-ish plotter and maybe give that old Ender 3 a second life.

Infotainment system playing back from USB. (Folkert van Heusden)

Create Virtual USB Sticks With A Raspberry Pi Zero

Playing back music files from USB sticks is a common feature these days, and is built-into the infotainment system in [Folkert van Heusden]’s Opel Astra. Unfortunately such USB playback features often come with a range of limitations on things like audio codecs, and in the case of [Folkert]’s car, a 1000 file limit. This had him looking at an alternative to lugging a lot of USB sticks around to avoid the horror of hearing the same songs within a week while commuting. The solution? Make a Raspberry Pi Zero into a virtual USB mass storage device using the Mass Storage Gadget (MSG) driver in the Linux kernel.

Picking USB storage as the ideal option here comes mostly from the age of the infotainment system, which lacks Bluetooth, and the audio input jack is rather crackly. Of course, having the Raspberry Pi Zero pretend to be a storage device via the MSG driver wouldn’t solve the file limit, but to get around this two Python scripts were written: one which creates images from a folder of music files, and another which randomly picks one of the available images from the Zero’s SD card and configures the MSG driver to use it.

As for the list of future improvements, there is mounting the RPi Zero’s SD card as read-only to deal with the power-off when the car is shut down, and the creating of images requires to be run as root due to the use of loopback devices. As a Proof-of-Concept it does seem to be on the right track.

It’s not just the older infotainment systems that get to have all the fun. If you’re lucky enough to have Linux running in the dashboard, you might be little more than a Bash script away from bending the system to your will.

Extracting SecOC Keys From A 2021 Toyota RAV4 Prime

With the recently introduced SecOC (Secure Onboard Communication) standard, car manufacturers seek to make the CAN bus networks that form the backbone of modern day cars more secure. This standard adds a MAC (message authentication code) to the CAN messages, which can be used to validate that these messages come from a genuine part of the car, and not from a car thief or some third-party peripheral.

To check that it isn’t possible to circumvent SecOC, [Willem Melching] and [Greg Hogan] got their hands on the power steering (EPS) unit of a Toyota RAV4 Prime, as one of the first cars to implement this new security standard.

The 2021 Toyota RAV4 Prime's power steering unit on the examination bench. (Credit: Willem Melching)
The 2021 Toyota RAV4 Prime’s power steering unit on the examination bench. (Credit: Willem Melching)

As noted by [Willem], the ultimate goal is to be able to run the open source driver assistance system openpilot on these SecOC-enabled cars, which would require either breaking SecOC, or following the official method of ‘rekeying’ the SecOC gateway.

After dumping the firmware of the EPS Renesas RH850/P1M-E MCU via a voltage fault injection, the AES-based encryption routines were identified, but no easy exploits found in the main application. This left the bootloader as the next target.

Ultimately they managed to reverse-engineer the bootloader to determine how the update procedure works, which enabled them to upload shellcode. This script then enabled them to extract the SecOC keys from RAM and send these over the CAN bus. With these keys the path is thus opened to allow any device to generate CAN messages with valid SecOC MACs, effectively breaking encryption. Naturally, there are many caveats with this discovery.

Continue reading “Extracting SecOC Keys From A 2021 Toyota RAV4 Prime”

Yuzu And Citra Emulators Shut Down After Legal Pressure From Nintendo

In a move that came rather like a surprise to many, the company behind the well-known Switch and 3DS emulators Yuzu and Citra – Tropic Haze LLC – as reported by PC Gamer has shutdown both projects and associated websites as part of a US$2.4M settlement with Nintendo with a last message left on the Yuzu website. This comes in the wake of Nintendo suing Tropic Haze LLC over the Yuzu emulator, claiming that there’s ‘no lawful way to use Yuzu’, as it requires files extracted from a real Switch device to decrypt game files. Although Citra is not part of the lawsuit, it being made by the same developers seems to have resulted in it getting axed along with Yuzu as collateral damage.

What makes this issue so legally hairy is that even though an emulator by itself isn’t illegal, requiring proprietary firmware and keys already gets one into contested territory about the legality of dumping said files from a console, even if you own it. This was already an issue with the first Playstation emulators, which require the Playstation BIOS image to even boot, but left the emulator developers mostly untouchable. What seems to have set off Nintendo’s lawyers here would seem to be the way that the Yuzu developers leaned into the copyright infringement (often incorrectly called ‘piracy’) angle, giving Nintendo’s legal team enough exposed flesh to launch a ballistic legal strike.

Continue reading “Yuzu And Citra Emulators Shut Down After Legal Pressure From Nintendo”

Making A Crystodyne Radio With Zinc Oxide And Cat’s Whiskers

Zinc negative resistance oscillator circuit. (Credit: Ashish Derhgawen)

During the first half of the 20th century radio technology was booming, albeit restricted by the vacuum tube technology of the time which made radios cumbersome in size and power needs. The development of a solid state alternative to the vacuum tube was in full swing, but the first version pioneered by [Oleg Losev] in the form of crystal radios failed to compete. Even so these ‘crystal radios’ laid much of the groundwork for subsequent research. The ease of creating this type of radio also makes it a fun physics experiment today, as [Ashish Derhgawen]  demonstrates in a blog post.

In the January 1925 issue of Radio News the theory  of the circuit is explained by [Oleg Losev] himself (page 1167). At the core is a material capable of negative resistance, as a non-linear (non-Ohmic) material, which means that the current passing through them decreases as voltage increases over part of their I-V curve. This enables it to work as an amplifier or oscillator. After the cessation of research on crystal radio technology by [Losev] and others, the negative resistance diode was rediscovered in 1957 with the tunnel diode.

Continue reading “Making A Crystodyne Radio With Zinc Oxide And Cat’s Whiskers”

Gaming On A TP-Link TL-WDR4900 Wireless Router

When you look at your home router, the first thought that comes to mind probably isn’t about playing games on it. But that doesn’t stop [Manawyrm] and [tSYS] from taking on the task of turning the 2013-era TP-Link TL-WDR4900 router into a proper gaming machine using an external GPU. This is made possible by the PCIe lanes on the mainboard, courtesy of the PowerPC-based SoC (NXP QorIQ P1014) and remappable Base Address Registers (BARs). This router has been an OpenWRT-favorite for years due to its powerful hardware and feature set.

This mod required a custom miniPCIe PCB that got connected to the PCIe traces (after cutting the connection with the Atheros WiFi chipset). This allowed an external AMD Radeon HD 7470 GPU to be connected to the system, which showed up in OpenWRT. To make full use of this hardware by gaining access to the AMD GPU driver, full Debian Linux was needed. Fortunately, the distro had a special PowerPCSPE port that supports the e500v2 CPU core in the SoC. After this it was found that the amdgpu driver has issues on 32-bit platforms, for which an issue ticket got filed.

Using the legacy Radeon driver helped to overcome this issue, but then it was found that the big endian nature of the CPU tripped up the Grand Theft Auto: Vice City game code which has not been written with BE in mind. This took a lot of code patching to help fix this, but eventually the game was up and running, albeit with glitches. Whatever the cause of these graphical glitches was will remain unknown, as after updating everything things began to work normally.

So now it’s possible to convert a 2013-era router into a gaming console after patching in an external GPU, which actually could be useful in keeping more potential e-waste out of landfills.

Continue reading “Gaming On A TP-Link TL-WDR4900 Wireless Router”