Hacking Apple’s Magic Mouse To Fix Its Worst Flaws

The Magic Mouse was first released by Apple in 2009 and was a major departure from previous designs. It was sleek, low-profile, and featured a touch pad on the top for gestures. Although the first generation was powered by two AA batteries and didn’t lead to much commentary, the 2015 redesign caused a lot of scathing memes and worse, mostly due to the rechargeable battery and the Lightning charging port that had been located on its bottom, leading to Dead Magic Mouse syndrome when you wanted to charge it. Since then myriad hackers have tried to fix the Magic Mouse’s issues, with [Ivan Kuleshov]’s recent attempt being perhaps the most straightforward and possibly successful.

Essentially, the Magic Mouse has two major flaws: ergonomics and the worst possible location of the charging port. Although both 3D models and commercial products exist to alleviate the former issue – and some of these even add wireless charging in between mousing sessions – all attempts to relocate the charging port were met by failure, as the Magic Mouse cannot be both charged and used at the same time due to how Apple designed the circuit.

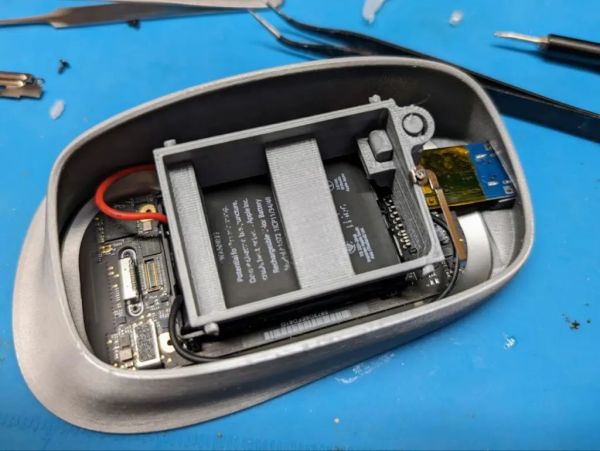
What [Ivan] did differently is that aside from tweaking some existing 3D models for Magic Mouse extensions to his liking, he also fixed the charging issue by avoiding Apple’s circuitry altogether and adding a USB-C port in the process. He also added a TP4056-based charging module, directly soldered to the battery’s terminals, that will top off the battery when plugged in. During experimentation on a live Magic Mouse, this led to the battery charge reported in MacOS increasing correspondingly. More or less, at least.

The 3D printed shell isn’t just a wrapper around the original mouse either, but splits the squat rodent into its upper and lower sections, so that the optical sensor isn’t suspended off the surface, while also keeping the touch-sensitive top section where it should be. According to [Ivan] the project files will be made available on his GitHub account in the near future.

Pineberry Pi HatDrive: Using NVMe SSDs With The Raspberry Pi 5

When the Raspberry Pi 5 launched, many were left chomping at the bit after seeing the PCIe FPC connector alongside the promise that an ‘NVMe SSD HAT would be forthcoming’. Although the official Raspberry Pi NVMe HAT is still a long while off, the Polish company Pineberry Pi is ramping up to release its Top & Bottom versions of its very wittily called HatDrive.

They sent a prototype to [Jeff Geerling], who has been putting his grubby mitts all over them before putting together a video showing off the HatDrive Top, which can accept 2230 and 2242 size NVMe drives.

The primary goal of adding an NVMe drive to the RPi is of course to get rid of those slow and fragile SD cards. Although the SD card standard supports near-NVMe-like speeds with UHS-III, the Raspberry Pi 5 bottoms out at UHS-I, around 100 MB/s. Despite this, using an NVMe drive for booting still takes some work, as [Jeff] lays out in a clear article. Most of this involves tweaking the /boot/config.txt file to enable external PCIe support, editing the onboard EEPROM to change the boot order (in lieu of having a PC-like BIOS screen) and getting the OS image flashed onto the NVMe drive you intend to boot from.

Although things seem to work fine during [Jeff]’s testing, some caveats remain, such as the RPi 5 officially supporting only PCIe Gen 2 x1, with Gen 3 possible, but with potential data integrity issues. There’s also the fundamental limit of having only a single lane of PCIe available. If that’s no problem, then Pineberry Pi offers the aforementioned HatDrive Top for traditional HAT-style mounting, and a Bottom version that can accept up to 2280 format NVMe SSDs. Including the provided ribbon cables, you can order the Top and Bottom for €20 and €25.99 respectively, with the first batch to ship in early December.

Continue reading “Pineberry Pi HatDrive: Using NVMe SSDs With The Raspberry Pi 5”

Additive Manufacturing Of Nickel Nanopillars Using Two-Photon Lithography

The multistep, two-photon-lithography-based additive manufacturing method forms intermediate products of blank polymer, Ni-infused polymer, and NiO while fabricating Ni
nanopillars. (Credit: Zhang et al., 2023)

Manufacturing nano-sized features is rapidly becoming an essential part of new technologies and process, ranging from catalysts to photonics and nano-scale robotics. Creating these features at scale and in a reproducible manner is a challenge, with previous attempts using methods ranging from dealloying and focused ion beams to templated electrodeposition all coming with their own drawbacks. Here recent research by Whenxin Zhang and colleagues as published in Nano Letters demonstrates a method using additive manufacturing.

Specifically, nanopillars were printed in a hydrogel polymer with a laser-based lithography method called two-photon absorption which allows for a femtosecond laser to very precisely affect a small region within the targeted material with little impact on the surrounding area. This now solid and structured polymer hydrogel was then submerged into a Ni(NO3)2 solution to infuse it with nickel. After drying, the resulting structure had the polymer burned away in a furnace, leaving just the porous Ni nanopillars.

Subsequent testing showed that these nanopillars were more robust than similar structures created using other methods, presumably due to the less ordered internal physical structure of each pillar. Based on these results, it’s likely that the same approach could be used for other types of nano-sized structures.

The Linux Scheduler And How It Handles More Cores

Sometimes you read an article headline and you find yourself re-reading it a few times before diving into the article. This was definitely the case for a recent blog post by [The HFT Guy], where the claim was made that the Linux kernel has for fifteen years now been hardlocked into not scheduling for more than 8 cores. Obviously this caused a lot of double-checking and context discovery on both Hacker News and the Level 1 Techs forum. So what is going on exactly? Did the Linux developers make an egregious error more than a decade ago that has crippled Linux performance to this day? Continue reading “The Linux Scheduler And How It Handles More Cores”

XMems Cowell MEMS-based tweeter on top of dynamic driver. (Credit: xMEMS)

After MEMS Microphones, MEMS Speakers Enter The Market

These days it’s hard to not come across solid-state (micro-electromechanical systems, MEMS) microphones, as they are now displacing electret microphones almost everywhere due to their small size and low cost. Although MEMS speakers are not impossible, creating a miniature speaker that can both displace a lot of air (‘volume’) and accurately reproduce a wide range of frequencies – unlike simple piezo buzzers – is a lot tougher. Here a startup called xMEMS figures that they have at least partially cracked the code with their piezoMEMS speakers, with Creative using the Cowell version in their brand-new Aurvana Ace in-ear monitors. Continue reading “After MEMS Microphones, MEMS Speakers Enter The Market”

Underwater Kites Buoying The Prospect Of More Tidal Power Generation

Swedish start-up Minesto has been for years trying to float the idea of having underwater turbines that generate power for use on-shore. These would be anchored to the seafloor by a long tether and move around in figure-of-eight patterns like a kite, which would increase the flow over the turbine’s blades. After a few years of trials, its 1.2 MW Dragon 12 kite will now be installed off the coast of the Faroe Islands.

Previously, Minesto had installed its much smaller DG500 (0.5 MW) kite turbine at Holyhead Deep, in Wales, where a single unit has been tested at a depth of between 65 and 91 meters. So far, only this unit has seen continuous operation. As noted in the linked Tethys report, this one unit was not connected to the grid, and research on its environmental impact is still ongoing as of September 2022. The main concerns are how it might affect cetaceans (whales, dolphins, etc.), including potential collisions with these as well as diving birds who might end up diving in the midst of a swarm of kites moving about at fairly high speeds.

One of the proposed Minesto Dragon 12 kite array installation sites at the Faroe Islands. (Credit: Minesto)

Although by itself putting a turbine into the much stronger and energetic ocean currents – not to mention near-continuous – makes sense, the marine environment is a tough one to survive. The DG500 prototype has seen a few years of use, but this would be the first large-scale deployment of such a system and thus the first significant long-term durability test. The goal at the Faroe Islands is to install 120 MW of capacity, across four kite groups, joining the smaller Dragon 4 (0.4 MW) unit that was grid-connected in May of last year.

Depending on the results, including the economics, this technology could prove to be either much better and cheaper than off-shore wind turbines, or turn out to be saddled with fundamental flaws that has plagued previous attempts to make use of the strong currents and tides that make the world’s oceans and seas into one of Nature’s most impressive sights.

The Quaint History Of The Commodore ChessMate

The Commodore International of the 1970s was a company which dabbled in a bit of everything when it came to consumer electronics, with the Commodore ChessMate being a prime example of the circuitous way that some of its products came to be. Released in 1978, its existence was essentially the result of MOS Technology releasing the KIM-1 single board computer in 1976. In May of that year, [Peter Jennings] traveled all the way from Toronto, Canada to Cleveland, USA to attend the Midwest Regional Computer Conference and acquire a KIM-1 system and box of manuals for a mere $245. On this KIM-1 he’d proceed to develop his own chess game, called MicroChess, implemented fully in 6502 ASM to fit within the 1 kB of RAM.

As one of the first major applications to run on the KIM-1, it quickly became an international hit, which caught the attention of Commodore – which had acquired MOS Technology by then – who ended up contacting [Peter] about a potential chess computer project. This turned out to based on the custom MOS 6504 CPU, while sharing many characteristics with the KIM-1 SBC. Being a MicroChess-only system, the user experience was optimized for more casual users, with the user manual providing clear instructions on how to start a new game and how to enter the position of a newly moved piece, along with no less than eight difficulty settings.

If you’re feeling like making your own ChessMate, or want to dig into the technical details, this excellent article by [Hans Otten] has got you covered.

Top image: Commodore ChessMate Prototype in 1978. (Credit: Peter Jennings)

(Thanks to [Stephen Walters] for the tip)