Retrotechtacular: An Ax Factory Of Yore

When your mind’s eye thinks of an ax factory you may envision workers loading blanks into a machine that refines the shape and profile before heading to an annealing furnace. But this is Retrotechtacular, and we’re tickled to feature a look at a different time in manufacturing history. This ax factory tour looks at every step in the manufacturing process at a factory in Oakland, Maine. It was shot on film in 1965 just a few months before the factory shut down. [Peter Vogt] did a great job of shooting and editing the reel, and an equally fine job of converting it to digital so that we can enjoy it on his YouTube channel.

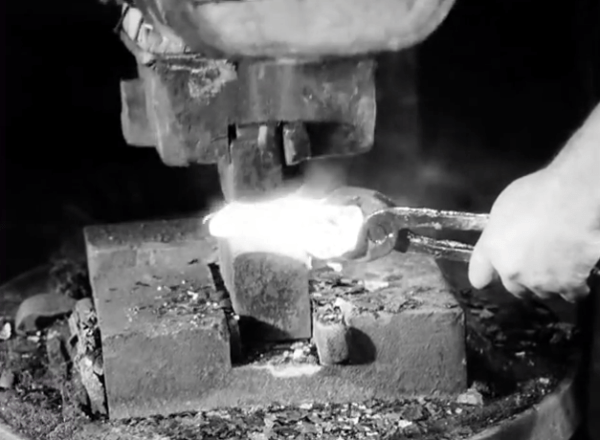
Above you can see the automatic hammer — known as a trip hammer — that is driven by cam action. At this point a lot of work has already been done. Blanks were cut from steel bars by two workers. These were shaped on the trip hammer before being bent in half to create the loop for the ax handle. From there a piece of high-carbon steel was added to form the cutting surface. This brings us to the step above, shaping the two glowing-hot pieces into one.

We don’t want to undermine the level of craftsmanship, and the labor-intensive process shown off here. But we can’t end this write-up without at least mentioning the kitsch that is smoking cigarettes and pipes on the job. At one point a worker actually lights his pipe using a the glowing-hot ax head.

To give you an idea of how this contrasts with modern manufacturing, here’s How It’s Made episode on axes (although we think whats being made would more appropriately be called hatchets).

Continue reading “Retrotechtacular: An Ax Factory Of Yore”

New Contest: Win One Of 20 Microchip Fubarino SD Boards

We had a blast with the Trinket Contest in October and November and can’t wait to see what you can come up with for this month’s competition. Microchip Technology is one of our advertisers and they offered us 20 Fubarino SD boards to give away as prizes. The challenge for you is to add our URL as an Easter Egg in your own microcontroller project. Rise to the top of our seemingly arbitrary system for picking winners and one will be delivered to your door for your future hacking pleasure.

Obviously we mean http://hackaday.com when we say URL, but what constitutes an Easter Egg? We figure it’s anything that is not apparently obvious in a piece of hardware. We built a quick example to get you thinking. Shown off in the clip after the break is a clock that displays our web address every day at 1:37pm. What did we pick that time? Because our clock displays in 24-hour time format and 13:37 is leet. See the code we used in our repo.

We thought of a few others, like making an embedded gaming that uses the Konami Code to reveal the Easter Egg, or a man-in-the-middle device that attaches to your keyboard and redirects your feeble attempts to load Facebook by closing the tab and opening Hackaday. The sky’s the limit with how creative these things can be!

Follow these rules to submit your qualifying entry:

  • You must somehow hide http://hackaday.com in your microcontroller project (embedded Linux doesn’t count unless you do some type of bare-metal programming)
  • Preference will be given to projects that are both clever and well documented. Notice we made a video, and posted code and an explanation of our project.
  • Write an email that has “[Fubarino]” in the title, includes the information on your documented entry, and lists your name and mailing address. Your name and mailing address will be used for shipping only and NOT for anything else. Emails should be sent to: contests@hackaday.com
  • Entries must be received before 12:00am Pacific time on 12/19/2013.
  • Employees and their families of Hackaday, SupplyFrame, and Microchip Technology are not eligible to win.

What are you waiting for? Dust off those chips and get hacking!

Continue reading “New Contest: Win One Of 20 Microchip Fubarino SD Boards”

Advice About Over-Driving LEDs

advice-about-overdriving-leds

We usually stay within the recommended Amperage with LEDs, but multiplexed displays provide an interesting opportunity to push them outside of that range. Because multiplexing scans a set of LEDs, they are not on all of the time. If your multiplexing setup allows you to remain within a certain time frame and duty cycle they can be driven past the constant current specifications. [Bryanduxbury] decided to take a look at the best way to overdrive LEDs.

The example that he gives is that his 30 mA constant current rated parts can accept up to 185 mA but only for 0.1ms with a duty cycle of 10%. If you know how to apply these figures you can get them to shine much brighter. This becomes especially useful when your multiplexed display already has the light off for the majority of the time because the resulting average luminosity will be much higher. His side-by-side test is shown above. With a current limited LED on the left of each color group, a multiplexed LED driven at normal voltage in the middle, and multiplexing with overdrive on the right.

The biggest drawback that [Bryan] mentions is that if your firmware hangs for more than the spec’ed time you’ll definitely fry these diodes.

Scratch-built Smart Flashlight

scratch-built-smart-flashlight

This flashlight has a face; one of the many tricks which [Hobbyman] included during the development process. The smart flashlight build turned out to be a great way to practice so many different aspects of product development.

It was envisioned as a light for use when walking or biking that could do more than just light your way or flash on and off. Of course we know it’s really just a reason to spend way too much time in his lair. He started with the electronics, driven by a PIC 16F88. The 5×5 LED matrix gives him just enough to work with for patterns and rudimentary text. The prototype is wrapped up into a pretty tight package which leaves enough room in the 3D printed case for 4 AAA batteries. As the project progressed more and more features were added in. The most current offering includes a temperature sensor as well as the ability to react to ambient sound. See for yourself after the break.

Continue reading “Scratch-built Smart Flashlight”

Newsstand Shotgun Hack Poised To Further Ruin Air Travel

The people who go nuts over 3D printed guns are going to have a field day with this one. It’s a shotgun and ammo built entirely from items you can purchase after passing through airport security. Now look, obviously the type of folks who read Hackaday understand that security in any form is something of an illusion. House keys don’t keep people from breaking into your home. Encryption doesn’t keep the government from looking over your shoulder. And no level of security screening can eliminate every possible hazard. So let’s just enjoy this one for the fine act of hacking that it is.

[Evan Booth] put his mind to work on the items you can buy at the stores inside of an airport terminal. Above you can see the diagram of all the parts. The break action accepts a Red Bull can that acts as the cartridge for the shotgun (our calculations put this at just under 0.25 Gauge). The bottom of the can contains water separated from Lithium metal (from cellular phone accessories?) by a condom. When the nonet of 9V batteries are connected to the heating element from the hair dryer it melts a hole in the prophylactic, mixing the water with the metal causing a reaction that propels pocket change as the projectile. The video after the break shows that this does take a while… perhaps 10 seconds from the time the trigger is pulled. Oh, and you might not want to be holding the thing when it goes off. We’d say the firearm can barely contain the explosion.

If you like this (or were horrified by it) [Evan’s] got a whole collection of weapons built inside the airport terminal. For those that care, here’s a link to the most recent of 3D printed gun posts which we referenced earlier.

Continue reading “Newsstand Shotgun Hack Poised To Further Ruin Air Travel”

Nose Cone Parachute Deployment From A Soda Bottle, Rubber Band, And Servo

nose-cone-parachte

This piece of engineering is so simple and elegant, you’ll want to build a pretty serious water rocket just so you can try it out. It’s an automatic parachute deployment system that you build into the nose-cone of your rocket. The main portion of the build is made out of plastic soda bottles (2 liter size) to end up with a chamber to store the chute, as well as a friction joint that holds the thing together.

The video after the break shows a complete tutorial on how to build one of these. It starts by tracing out a sine-wave-like pattern on the wall of the bottle. The staggered tongues that are left after cutting along this line make up the friction joint. After gluing a cone (the blue thing) to the bottom of the bottle, it receives the parachute and is then slipped over another bottle that makes up the body of the rocket. The rubber band wraps around the outside of the chassis, holding those plastic tongues in place. The loose end of the rubber band is hooked around the horn of a servo motor, which can then be triggered remotely, or by using a sensor of your choosing. There is even a spring made out of a loop of plastic bottle — you can see it just on top of the chute in the image above.

Need a launching system that is as fancy as the parachute system? Here you go.

Continue reading “Nose Cone Parachute Deployment From A Soda Bottle, Rubber Band, And Servo”

Sterling Engine Kludged Together From Whatever

Watching [Jam BD] build this working Sterling Engine from nothing is awe-inspiring. He literally did with what he had on hand. Even his build log forgoes phrases like “I ordered a…” in exchange for “I didn’t have any so…”.

The cylinder heated by a candle is a pipe stuffed with aluminum foil which was hammered flat to get the best seal possible. The CDs prominently featured on the final product act as the fly-wheel. To ensure that there is enough mass [Jam] ganged three of them together. There is also a counter-weight affixed just off-center to help keep the wheel turning. The gears shown above were actually used more like mounting plates to build a cam. Looking at the body and frame of the device makes us wonder how in the heck this thing actually came together?

We can’t get enough of these kinds of hacks, which is why we had to go back and watch the tuna can Sterling Engine one more time.

Continue reading “Sterling Engine Kludged Together From Whatever”