Retrotechtacular: Steam Locomotive Construction In The 1930’s

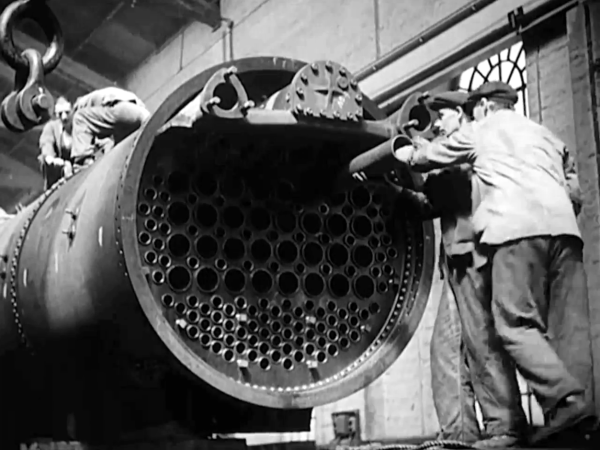
Here’s a fascinating look at high-tech manufacturing in the 1930’s. This week’s Retrotechtacular features the building of a steam-powered locomotive. The quality of the black and white footage, and the audio accompanying it are almost as impressive as the subject material — which is nothing short of a machinist’s wet-dream but also includes much forging and smithing. Digging through the video for a suitable still image was a tough task, as every step in the process was interesting to us. But this image showing some of the 2700 feet of tubing used in the locomotive seems most appropriate.

The build covers all aspects of the build. Huge sheets of steel make up two side plates between which the cast engine block is mounted. The mold for casting was huge, required twelve hours dry time before the pour, and took a day or two to cool before breaking the mold. That yielded a rough block which then headed off for machining.

We were delighted by the crane used to transport steel sheets from the oven to a stamping machine. The counterweight is workers (and lots of them) on the other side of the fulcrum. After a glimpse of the ancillary part fabrication you begin to get a look at the complexity of the machine as it is assembled.

Does anyone feel a deep appreciation for the pedagogy that went into making something like this? What we mean is that the teams building No. 6207 don’t seem to be using skills learned in a book or from a class, but rather those passed down from the masters that have been on the job most of their lives. Watching them all work is nothing short of astounding!

Continue reading “Retrotechtacular: Steam Locomotive Construction In The 1930’s”

Hackaday Links: October 20, 2013

hackaday-links-chain

Winter is coming. We’ve see those gloves in stores made specifically to work with your smartphone. [hardsoftlucid] isn’t buying it. He made his own version using… well, you just have to see it.

Here’s an eBookmark for a real book. What? Well, you know how an eReader does a great job of keeping your place between reading sessions? This is an electronic bookmark for paper books which uses LEDs to show you where you last left off reading. [via Adafruit]

[Thomas Brittain] wrote in to share his BLE Module and Pulse sensor updates. Both were featured in a recent Fail of the Week column and the latest iteration takes them from fail to functioning!

You may be able to get a free XMOS xCORE starter kit. The company is giving away 2500 of them. [Thanks Tony]

After learning about custom labels for microcontroller pinouts from [John Meachum] we’re happy to get one more helpful tip: a breadboard trench is a great place to hide axial decoupling capacitors.

A bit of cutting, solder, and configuring lets you turn a simple gamepad into a 4-controller interface for MAME.

Many of the Hackaday Staff are into Minecraft (between Let’s Play videos, running servers, and building computers in-game it’s a wonder we get anything done around here). We restrained ourselves by not making this video of a Restone circuit Blender animation on your desktop into a full front page feature. [via Reddit]


HHH: CNC Storage Base From The Rabbit Hole

henchmen-rabbithole-cnc-storage-base

Remember when we announced the Hackaday Hackerspace Henchmen program and asked you to send in the best CNC hacks from your Hackerspace? Well so far this is the only entry, which puts [Mazz] in the top spot to take all the loot for himself. Send in your projects by 10/31/13 if you want a shot at stickers, shirts, and a parts vendor gift card.

What he sent in is a storage cabinet base built for his hackerspace — The Rabbit Hole in Rochester, Minnesota. The group managed to get their hands on a CarveWright CNC machine but didn’t have a spare bench to put it on. The thought of dropping a lot of cash into something wasn’t appealing to them. But as luck would have it, about the same time this arrived at the space one of the members spied a free filing cabinet curbside.

The cabinet was a vertical four-drawer unit. It was chopped in half, with the resulting two-drawer units bolted side-by-side to each other. From here a frame was built to support the cabinets, along with locking casters so that it’s easy to move around. The inaugural run with the new machine/cabinet combination was to mill a sign for the space:

rabbit-hole-carved-sign

Keyboard Spoofs 4 NES Controllers For Chiptune Goodness

NES-keyboard

This toy keyboard is being used to play music on an NES. As you probably already know, the hardware inside those original controllers was dead simple. They’re just a parallel to serial shift register that reads from all of the keys. To get this keyboard up and running [heavyw8bit] simply mounted eight chips inside the gutted toy, connecting two of them to the keyboard keys, and the rest to the array of push buttons he added to the right.

So what’s the point of using this as a quadruple game controller? Are you expecting to see what a full speed-run of Contra looks like using this as the controls? That’s not the point at all. This becomes a musician-friendly frontend for the NES synthesizer ROM called NESK-1. [heavyw8bit] wrote the game/program in order to allow you to use the original console hardware to play all of the sounds you know and love. Our favorite is the arpeggio example heard at about 2:35 into the clip after the break.

Continue reading “Keyboard Spoofs 4 NES Controllers For Chiptune Goodness”

Laptop Keyboard EL Panel Backlight

keyboard-el-panel-backlight

[nullpointr] wanted a backlit keyboard for his Asus Transformer Prime so that it would be a bit easier to use in low-light situations. He considered a few different options and ended up adding electroluminescent panels behind the keys.

Those paying close attention might wonder why we called this a laptop in the title. Well, it’s a tablet with a keyboard dock and that’s a mouthful. This actually really helps to simplify the modifications because the motherboard and other bits are all in the screen portion of the device. EL panels are also a nice choice because you can cut them to size and they still function. With a bit of case work, three panels were made to fit side-by-side.

The part that just isn’t going to make it in the original enclosure is the inverter that drives the panels. It’s the black box to the left. [nullpointr] added a USB-form-factor jack to the side of the case that allows the inverter to be disconnected quite easily. This way the Transformer Prime can still go with him on the road, it just won’t light up unless he also hauls around that add-on.

Way way back we saw someone do this with fiber optics and an LED. Unfortunately that project link seems to be dead so we figure it’s about time someone revisited the concept.

Fail Of The Week: [Caleb’s] Phosphorescent CD Player

fotw-caleb-hackfail

When [Caleb Kraft] was in full production for Hackaday he pumped a pile of awesome videos. But not every project worked out. He’s been a fan of the Fail of the Week posts, and sent in his own recollection of a project gone wrong. Above you can see his phosphorescent CD player. He prototyped the project in May of last year but technical issues and looming deadlines meant it never saw the light of day. We’ll fill you in on his fail after the jump.

Editor’s note: We need more tips about your own failure! There are a handful of submissions left in our reserves, but to keep this topic as a weekly column we need help tracking down more failed projects. Please document your past failures and send us a link to the write-up. If you don’t have a blog to post it on you may do what [Caleb] has done and email us directly. Remember to include any images and links to video which you may have.

Continue reading “Fail Of The Week: [Caleb’s] Phosphorescent CD Player”