Real Life Mario Karts React To Launchable Items

real-life-mario-kart

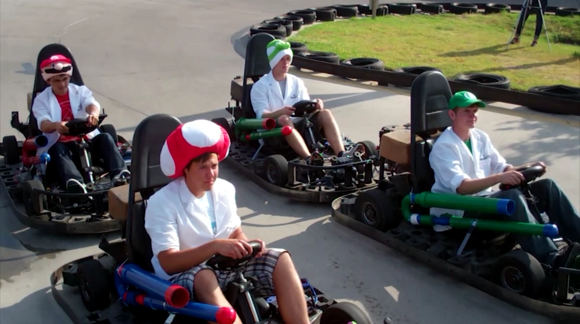
The team over at Waterloo Labs reasserts their reputation for creativity with this real life Mario Kart project. One of the team members must work at Austin’s Park because they seem to have had free rein when it comes to modifying the go-karts and filming the delightful video presentation found after the break.

It’s one thing to put on some costumes and head off to the go-kart track. It’s another to modify the vehicles to react to items launched by another rider. You can see the painted PVC launcher hardware to the right of each driver. By stuffing a plush item (banana, star, mushroom, etc.) in the barrel the driver can use compressed air to launch it quite a distance. Inside of each item is an RFID tag. When the RFID reader on a kart detects the tag it can take control of the steering, brake pedal, or speed limiter to inflict the appropriate actions.

If you don’t have this kind of insider access to your local go-kart track don’t fret. You just need to build your own set of karts.

Continue reading “Real Life Mario Karts React To Launchable Items”

Raspberry Pi Power Controller Adds Shutdown And Startup Functionality

This breadboarded circuit uses a PIC chip to control the Raspberry Pi’s power supply. We first noticed this gap in the RPi features when we built an XBMC setup around the RPi board. It’s not the end of the world, but since installing the Raspberry Pi we have been unplugging it after each use. [Kevin Sangeelee’s] circuit could be the path to automating this process.

This is not really aimed at media applications. The PIC circuit does switch power to the RPi, but the goal was to add a push-button to do so. Other goals of the project include scheduled shutdown and data logging of brownout events on the power rail. As you can see, there’s a coin cell in the mix which keeps time when the system is in power down. The RPi communicates with the PIC via i2c. This facilitates full power-down using the Linux command ‘shudown -h’, as well as the ability to schedule a restart time.

Adding an IR receiver and tweaking the PIC code are all it would take to trigger the power controller from the couch.

[Thanks Donn]

LED Cloud Lamp In Any Color You Can Imagine

rgb-cloud-lamp

This lamp which [Dablondeemu] built will add a little whimsy to your home decor. The project started as coursework for a Digital Art and Installations class. But the remote controlled color changing cloud ended up being a pretty neat gift for her little brother.

The prototype uses an Arduino, breadboard, and a collection of LEDs to perform its tasks. [Dablondeemu] admits the next revision should have a standalone circuit board. The electronics are housed in a clear plastic container which was then adorned with Polyfill stuffing which would commonly be found inside a decorative pillow. The polyester fibers do a great job or filtering and diffusing the light. But they don’t seem to interfere with the incoming IR signals from the remote control.

If you like the idea of creatively shaped diffusers you should take a look at this giant LED lamp. It’s molded to look like a through-hole package with the leads hiding the power cord.

Continue reading “LED Cloud Lamp In Any Color You Can Imagine”

Build And Install Your Own High-end Cycling Power Meter

Cycling power meters can set you back quite a pretty penny. [Keith] quotes prices starting at $1500 and going up to $4000. We know several serious cyclists who would think twice about spending that on a bike, and wouldn’t even consider putting that kind of investment into an accessory for it. But if you’ve got the time [Keith] will show you how to build and install your own cycling power meter.

The link above is a roundup of all the posts and videos [Keith] made along the way. We’ve embedded his introduction video after the break where he discusses the goals of the project. The system allows for independently measuring the power of each leg. This is accomplished using strain gauges on the cranks to monitor torque. This data is combined with cadence measurements (how fast the rider is turning the cranks) which is all that is necessary to calculate the power output of the rider.

The parts list comes in at about $350. This doesn’t include the equipment he used to test and calibrate his calculations.

Continue reading “Build And Install Your Own High-end Cycling Power Meter”

Script Defeats Minteye CAPTCHA

minteye-captcha-defeated

We hadn’t heard of minteye CAPTCHA before, but we’ve seen evidence of a script that can break the system. Minteye combines two things which you probably don’t love about the Internet: advertisements and CAPTCHA. The system uses a slider to distort an advertiser’s image. Once the slider is in just the right spot the image becomes clear and you can click on submit to see if you passed the challenge.

Challenges like this are impossible for the visually impaired, so there is usually an audio option as well. In this case the audio button will instruct you to move the slider to the right, left, or that it’s already in the correct place. [Samuirai] used the text2speech API available in Google Chrome to parse these commands. As you can see above, “movies later” is a misinterpretation of “move the slider”, but he was still able to get enough accuracy to solve the challenge. See the script in action in the video after the break.

Audio challenges have been exploited like this in the past. Check out this talk about beating reCAPTCHA through the audio option.

Continue reading “Script Defeats Minteye CAPTCHA”

Coffee Table Arcade Hides Its Controls

arcade-coffee-table-with-self-hiding-controls

[Hoogen] did a fantastic job of building arcade hardware into this Ikea coffee table. Sound familiar? We just looked at another Ikea coffee table arcade, but this one goes quite a different route. It uses a Ramvik table which has a very deep drawer in the end where the controls are located. The image to the left shows that you’re going to have a problem with the joystick when you try to close it. [Hoogen] came up with a clever mechanism to overcome this issue.

This is not an emulated system. It uses a JAMMA board called the iCade 60-in-1 to bring sixty classic arcade games to the build. To interface with this hardware [Hoogen] included a JAMMA full cabinet wiring harness. The inset image on the right is pretty small, but it shows the speaker mounted in the back of the drawer, as well as the control surface angled down. This tilting surface is what allows the controls to move out of the way when closing the drawer. This happens automatically as described by [Hoogen] in his write-up.

Polaroid Catcher Make Print Screen Do What It Says

polaroidcacher_2

As part of their coursework at ITP New York a group of students developed the Polaroid Catcher. It’s a way to make your digital experiences more permanent. When you have something on-screen that you’d like to keep as a memory you can print the screen on this old Polaroid camera. Of course you’re not going to get the chemical-filled container you may remember from ages past. But we thing you’d agree the nostalgic camera makes a nice enclosure for a modern image printer.

The workings of the system are shown off quite well in the clip after the break. But we’re always interested in the particulars of how they pulled it off. The system uses a Google Chrome extension to capture what is being displayed in the browser. Before the image is sent to the printer the user has the opportunity to frame up the subject of the photo. Once decided, the image is pushed to a Bluetooth photo printer using some scripts written by the team.

Continue reading “Polaroid Catcher Make Print Screen Do What It Says”