LiveLight Is An Expertly Crafted Ambilight Clone

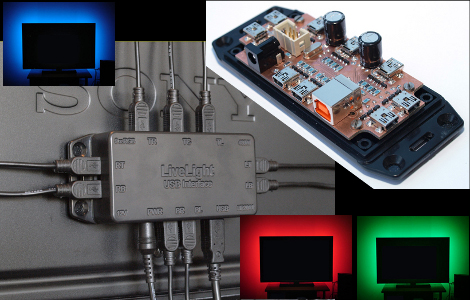
[SunWind] (Edit 2018: who now goes as [nerdaxic]) developed his own version of the Phillips Ambilight system which he is calling LiveLight. We’ve seen more than a few of these hacks, many of them are based around Arduino, and most use LED strip lighting. [Nerdaxic] is using strip lighting as well, but his design is clean and polished quite a bit more than anything else we’ve seen. In our minds this would be welcomed by even the most discriminating of A/V enthusiasts.

He found just the right size of project box and managed to fit everything in on a nicely milled PCB. The enclosure itself has also been milled to allow the mini USB B connectors for each of the nine RGB LED strips. But he didn’t stop there, the top of the enclosure has labels milled into it to help when hooking everything up.

An ATmega32 addresses the LED strips based on data pushed in from a computer. An on-board FTDI chip adds USB connectivity and [nerdaxic] used a hack to rewrite the EEPROM on that chip so that it enumerates with the name “LiveLight USB Interface”. A program called Boblight gathers the data from the currently playing video. You can see the final project in the video embedded after the break.

Continue reading “LiveLight Is An Expertly Crafted Ambilight Clone”

Washing Machine Mechanical Timer Replaced With Microcontroller

After the electromechanical timer on [Paul Canello’s] washing machine broke for the third time he decided he needed to stop repairing it and find a more permanent fix. He decided to build his own microcontroller-based system for washing his clothes (translated). Caution: The image links on [Paul’s] page seem to be broken and will unleash a never-ending storm of empty pop-up windows if you click on them. We’ve embedded all of the images after the break to save you some hassle.

The controller on a washing machine is nothing more than a mechanical alarm clock. It starts the cycle, then moves through various modes based on the passage of time. [Paul] started his hack by observing how long the delay between cycles was meant to be, and recording which parts of the machine were switched on and off at each stage.

It turns out that when the mechanical knob is turned, it reroutes how water flows through the detergent chamber. Since that knob won’t be in the new system [Paul] came up with a way for the microcontroller to handle this by using a servo motor. The rest of the control involves relays to control the motor, and solenoid valves for the water. There are also pressure switches that give feedback for the level of the water in the machine. A PIC 16F872 serves as the new controller, with the help of a 7 segment display, a buzzer, and a pair of buttons as the user interface.

This is an older project, but after reading about the Arduino controlled dishwasher [Ramiro] sent us a link. Thanks! Continue reading “Washing Machine Mechanical Timer Replaced With Microcontroller”

Faking High-speed Video Photography Of Repetitive Events

[Destin] has been doing some high-speed and high-resolution video photography using a standard DSLR. He accomplishes this using a bit of ingenuity to capture images of repetitive events at slightly different points in time.

The banner image above shows a bullet travelling through a set of matchsticks. [Destin] uses the sound of the gun firing to trigger the flash that captures the image. A piezeo transducer picks up the sound, triggering a precision pulse generator. That pulse generator then triggers the flash, adding a delay based on the settings. In this way, [Destin] can capture video by firing a bullet for each frame, but adjusting the delay period of the pulse generator to capture the image when the bullet is in a slightly different place from the previous frame. It’s an old technique, but after some post-processing it produces a high-quality output without sinking thousands of dollars into an actual high-speed camera. Check out the video we’ve embedded after the break.

We like this guy’s style. We saw him strapping a camera onto a chicken back in December and we hope to see a lot more from him in the future.

Continue reading “Faking High-speed Video Photography Of Repetitive Events”

Programming Robots Like You Would Train A Pet

[Jim] has been working with a team from various Universities to develop an intuitive way to guide and train assistance robots. They focused on one particular technique, training a robot to follow on a leash in the same way you would a pet dog (PDF).

He was inspired to send in a link to his research after reading about the Kinect-powered shopping card robot. He figures that that project is similar to his own, but his does have several added benefits. The first being that if a robot is on a leash, everyone knows who that bot is following or assisting. But there is the added benefit of the user needing no training whatsoever. That’s because the act of walking a dog on a leash is commonplace in developed societies; you may not have ever owned a dog, but you’ve seen others walking them on leashes numerous times and could do so yourself without any training.

The leash connects to a sensor-filled turret in the center of the robot’s body. The bot can sense when, and in which direction the user is pulling the leash. There’s also an emergency kill switch on the handle for added functionality. Take a look at some of the test video after the break to see how quickly humans can adapt to this type of user interface.

Continue reading “Programming Robots Like You Would Train A Pet”

Canon A70 CCD Replacement/repair

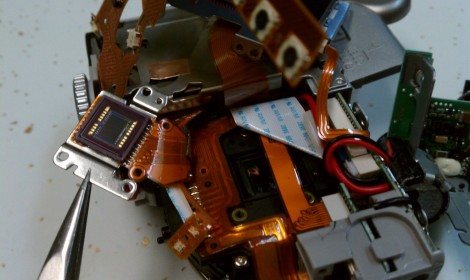
Looking for an underwater camera setup, [Imsolidstate] picked up a Canon A70 and a Canon water-tight housing on eBay for around $45. Unfortunately the camera arrived with a non-functioning CCD. Another trip to the online auction site landed him a replacement CCD which he set about installing.

We have this exact model of camera with a cracked LCD display. Being that we like to hack around on things we’ve pulled it apart in order to replace the screen and believe us, there’s no extra room inside that thing. The video after the break shows the teardown, and you can see what a pain it is to get the unit apart. That process in only eclipsed in difficulty by the reassembly itself.

In the end it wasn’t a problem with the CCD itself, but with the connector on the PCB that received the flat cable. It wasn’t holding the contacts tight, but [Imsolidstate] fixed that with a strategically placed piece of foam.

Continue reading “Canon A70 CCD Replacement/repair”

Shop Lighting: Weighing Cost And Efficiency

[Ben Krasnow] wanted to upgrade his shop lighting but before he made any decisions he decided to educate himself about the options that are out there. Luck for us, he shares the facts about different lighting in terms of cost and efficiency.

His old setup uses fluorescent light fixtures with T12 bulbs. These are rather bulky and inefficient bulbs. Many folks, ourselves included, would think of LED as a logical replacement. [Ben] started by looking into the various high-intensity LED modules that are available. He grabbed a catalog and started doing a couple of different calculations to compare Lumens/dollar for the upfront cost, and Lumens/Watt for the operational costs. Hands down, newer fluorescent bulbs come in cheaper on both counts and provide a wider spectrum of light.

The next decision was between purchasing the newer T5 bulbs which are rated at very high efficiencies, or to go with T8 bulbs which are better than the T12 standard but can use the same fixtures. After doing some digging he found that T5 is not much more efficient than T8, but they use an electronic ballast to boost efficiency. He ended up replacing his old magnetic ballasts with electronic ones to get high T8 efficiency at a cost that was lower than buying new T5 fixtures.

See [Ben’s] own recount of this process in the clip after the break.

Continue reading “Shop Lighting: Weighing Cost And Efficiency”

Precision Frequency Measurement Library For 8-bit Microcontrollers

[Paul] has been working on porting over Arduino libraries for use with the Teensy microcontroller platform. This tends to be pretty simple since they both use the same Atmel chip architecture. But once in a while he finds the Arduino libraries are not what they’re cracked up to be. When looking to port over a frequency measurement library he ended up writing his own that works better and is much more portable.

He had two big beefs with the Arduino Frequency Counter Library. The first is that it required the compensation factor the be calibrated using an accurate frequency counter. That’s a chick-and-egg problem since many people who build a frequency counter with an Arduino are doing so because they don’t already have a standalone tool. The second problem is that the Arduino library was hardcoded for ATmega168 or ATmega328 chips.

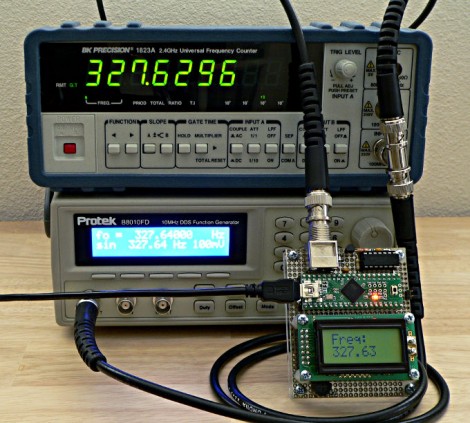
This new library fixes both issues with just one trade-off. Your hardware setup must be using a crystal oscillator. You can see above in the image above that the frequency measurement is quite accurate with this method. The package also uses a thin abstraction layer which will make it easy to port to any 8-bit microcontroller which is programmed in C.