Free Home Phone Method Uses Parts We’re Familiar With

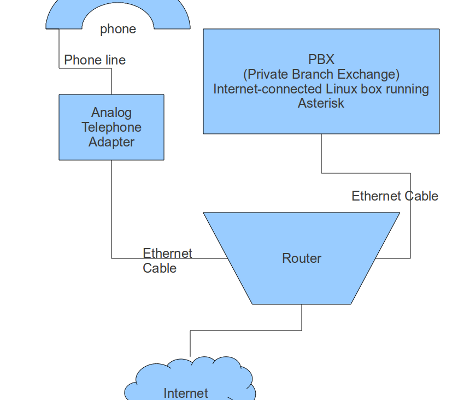
[Headsheez] found a way to get his home phone service for free. He’s using a set of tools that we’re familiar with to route service from a typical analog phone system (which involves the extensions wired into your home) through a server to the Internet. On the hardware side of things this starts out with an Analog Telephone Adapter which translates the analog signal for use in a PBX system. He uses a copy of the open source PBX project called Asterisk which we’ve also seen used on devices like routers and the SheevaPlug. The actual telephone number comes from a Google voice account which for now is a free service but there’s no guarantee that it will remain that way in the future.

This should provide seamless service just like you’re used to with a traditional home phone line. There’s even caller ID for the number – but not the name – for incoming calls. The one big feature that is missing from this setup is the ability to call 911 for emergencies.

[via Reddit]

Robot Gets Around On Lopsided Wheels

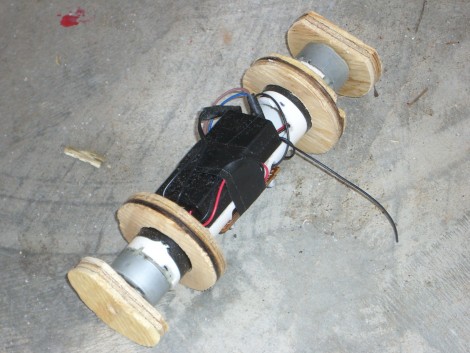
This concept robot uses angular momentum to roll around. You can see that on either end of the robot there are two discs which have been cut on one side to make them off-balance. For locomotion, two DC motors spin the outer discs which are not in contact with the floor. This spinning action exerts a force in the opposite direction on the body of the vehicle, causing it to move.

It’s not a perfect system and there is one major flaw with using this system. When the forces have equalized acceleration will stop and it will eventually come to a standstill. You can’t just stop spinning the motors because that will act as a braking mechanism. But still, it’s a concept we haven’t seen before and we love the experimentation that’s happening here. Take a look at the test footage after the break and don’t hesitate to let us know if this starts causing light bulbs to flip on above your head.

Continue reading “Robot Gets Around On Lopsided Wheels”

Bill Hammack Explains How LED Backlit LCD Monitors Work

We had a basic understanding of how LCD monitors worked, and you may too. But the thing is, [Bill Hammack] doesn’t just explain the basics. Since he’s the Engineer Guy he explains the engineering principles behind how LED backlit LCD screens operate. But he does it in a way that everyone can understand.

After the break we’ve embedded his five-minute video. In it you’ll see him strip down a monitor to the back plate and then build it up piece-by-piece. We enjoyed his discussion of how the diffuser panels work together to even out and distribute the light. Theses are made of several layers and, although we knew they were there from working with salvaged LCD screens, we never knew quite what they were doing. He also covers how each liquid crystal cell works along with polarizing sheets to either block or allow light passage. And he’ll bring it on home by show how thin-film transistors in each subpixel of the screen work to multiplex the display, just like we did with that pumpkin back in October.

Continue reading “Bill Hammack Explains How LED Backlit LCD Monitors Work”

Pitch Shifter Makes Your Band Sing Higher

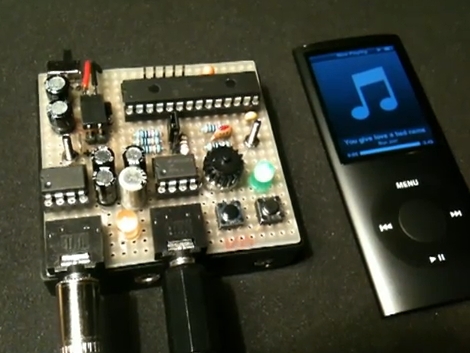
[Markus Gritsch] tipped us off about this little module he built to shift the pitch of audio playback. It uses a PIC 24FJ along with a couple of LM386 amplifier chips to manage the input and output signals. At the push of a button, audio being fed through the device can be modulated to a different key without changing the playback rate. Here it’s being used with a iPod but because this device just sits between an audio source and a signal input we wonder if you can have some fun on the cellphone with this circuit?

Check out the video after the break to hear it in action. We must compliment [Markus] on his layout. We haven’t seen the underside of that protoboard but he’s done a great job of fitting everything into a small area. You can find the schematic for the circuit by following the link at the top of this feature. He took a picture of his hand-drawn plans which saves him time from laying it out with something like KiCAD but still gives us the details that we love to see with your projects.

Continue reading “Pitch Shifter Makes Your Band Sing Higher”

Writing Python Drivers For Input Devices

[Stealth] put together a post explaining how he writes drivers for input peripherals. He’s using Python which makes the process fairly painless (we’ll get to that in a minute) but the value of his post is in the explanation surrounding how to interpret the data. Once you know how the communications are coming in from a device you can write the driver using any language you want. [Stealth] wrote in to let us know about this post after reading the PlayStation 3 Sixaxis controller sniffing hack. He’s pretty much doing the same thing but the background information is much more bountiful.

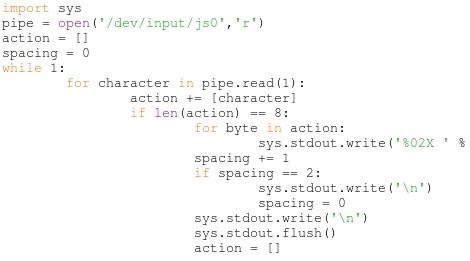
There are a couple of prerequisites to the process. First, [Stealth] is working in a Linux environment. That’s not to say you couldn’t do this on another OS, but you’re going to need to do some research to find out how to tap into the data stream from the device. Secondly, the input you are working with must already be set up and working on the machine. That means if there isn’t any support at all for the peripheral (in this case a USB joystick) you’re not going to be able to sniff the commands. That being said, a short Python snippet is all you need to dump the raw data coming in from the device. With data in hand it’s time to do some pattern hunting. As you start to figure out the size and scope of the incoming packets you can try out your own code to make sure you’ve got it right. Check out the demo video after the break which features a joystick button mapper written in Python.

Continue reading “Writing Python Drivers For Input Devices”

The Basics Of Controlling An Arduino With PHP

You can easily add Internet-based control for your Arduino if it is close enough to your server to be connected via USB. This tutorial will give the basics you need to get it working.

The gist of this method involves a webpage that includes PHP elements. When one of those elements is manipulated, a command is sent via serial connection to the Arduino which then reacts based on what it received. This example uses an Ubuntu box that is running an Apache server. The Arduino sketch sets up the serial connection and then listens for incoming traffic. Whenever it receives a non-zero character an LED will blink. On the server side of things you’ll need to make sure that the system user that runs Apache (www-data) has permission to write to a serial port.

This base example may seem extremely simple, but there’s no end to what you can build on top of it. Different PHP events can be added to push new commands over the serial connection with matching test conditions added to the sketch.

[Thanks Jarryd]

Adding Digital Storage To An Analog Scope

This is a hack in the finest sense of the term. It not only allows you to capture data from an analog oscilloscope for later analysis, but provides you with a great tool if you’re posting on the Internet about your projects. [J8g8j] used an empty cashew container to add a camera mount to the front of his scope. This is possible because the bezel around the display has a groove in it. A bit of careful measuring helped him make an opening that was just right.

You can see that the red cap for the jar holds the camera and gave him a bit of trouble in the original prototype. This version has a tray where camera sits, which replaces the Velcro with didn’t hold the camera level the first time around. He’s also painted the inside of the clear plastic to reduce glare on the oscilloscope readout. Black and white images seem to come out the clearest, but it can be difficult to make out the grid lines. The addition of LEDs to help them stand out is one of the improvements we might see in the future.