drill battery retrofit

Frankensteined Cordless Drill Lives Again

With tools, especially cordless tools, you’re going to pay now or pay later. On one hand, you can spend a bunch of money up front and get a quality tool that will last a long time. The other option is purchasing a cheap cordless tool that won’t last long, having to replace it later and thus spending more money. With cheap cordless tools it is common for the battery to fail before the physical tool making that tool completely unusable. Sure, another battery could be purchased but sometimes they cost just as much as the tool and battery combo originally did. So what’s a cordless tool user to do?

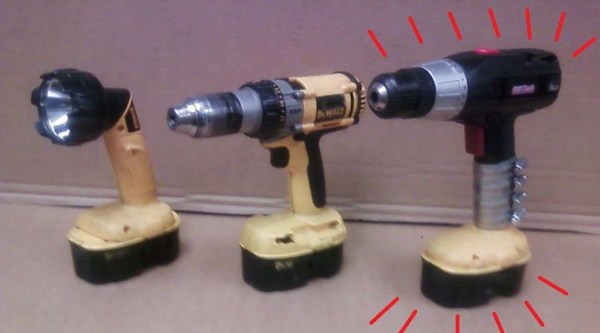
[EngergySaver] had a set of DeWalt cordless tools with a bunch of working batteries. He also had a cheap drill where the battery had died. His bundle of tools included two flashlights, one of which the case physically broke in half, probably from a clumsy drop. Instead of tossing the broken flashlight pieces in the garbage, [EngergySaver] kept them around for a while. Then one day he had the idea of combining the base of the broken DeWalt flashlight with the top of the old battery-less drill. He had the parts so why not?

The battery pack was 18 volt and the cheap drill expected 16.8 volts. [EngergySaver] figured the voltages were close enough and decided not to worry about the difference during his hack. He started by disassembling both the drill and flashlight down to the bare plastic housings. He marked an appropriate place to splice the handles and made some cuts. After the wiring was spliced together and the tool casings reassembled, a piece of sheet metal was cut and bent around the handle at the joint between flashlight and drill. Hose clamps hold the sheet metal tight around the handles, keeping the new hybrid tool together. And although we’re not crazy about the sheet metal and hose clamp method, it seems to be working just fine. With a little work and ingenuity [EngergySaver] resurrected an old tool for our favorite price; $0.

diy foot switch

Foot Pedal Switch Specifically Made For PCB Drilling

Using the Toner-Transfer and Etch method for making prototype circuit boards is fairly common. One downside to this process is that any holes still need to be drilled. [Giorgos] hand drills boards all the time. He has a Dremel with a drill press attachment but he still prefers using a small pen-style mini drill to make the holes. There is one problem with this tool though, the on/off switch is in an non-ergonomic location. After flipping the switch tens of times during a drill job, [Giorgos] has felt some digit discomfort. He knew there had to be a better way.

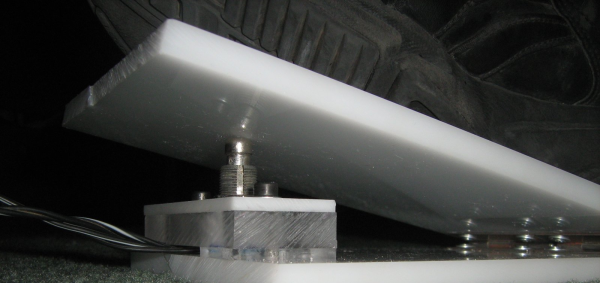
His solution: a foot pedal on/off switch. This isn’t some off-the-shelf foot switch, [Giorgos] made it from parts and pieces kicking around in one of his junk drawers. The foot pedal frame is made from acrylic sheet. A couple of hinges allow the pedal to press down on an old switch, very similar to the ones found in guitar effect pedals. This switch was heavy-duty and had a strong spring that easily pops the switch and pedal back up after being pressed.

Wiring was easy, the positive lead of the DC wall wart was split and attached to the pedal’s switch. Pressing the switch makes or breaks the power connection, turning the hand-held drill on and off. [Griorgos] solve his ergonomic problem and cleaned out his junk drawer without spending a dime. We’d say that’s a triple win!

wood bowl cutting

Making A Wooden Bowl Without A Lathe

Typically, when creating a wooden bowl a crafts person would do so on a lathe. A chunk of wood would be bolted to the head stock and the bottom of the bowl turned to an appropriate shape. Then the half-bowl-shaped wood is flipped around on the lathe so that the material on the inside of the bowl can be removed. This traditional method of bowl turning requires a lathe, turning tools, and the serious technique and skill required for the task.

The master maker of weird wood working tools, [Izzy], decided to make a wooden bowl without the use of a lathe. He created a unique fixture to cut the shape of the bowl on a table saw, a piece of equipment that is a bit more common for the average DIYer to have. The fixture itself is made of wood and supports a standard hand drill in a vertical position. The soon-to-be bowl is bolted to the drill and hovers just above the table saw blade. The table saw is turned on and the fixture allows the work piece to rock back and forth creating the bowls outside shape. The drill rotates the piece so that the contours are consistent around the bowl.

The bowl is then flipped over and re-attached to the drill. This time to cut the inside of the bowl, the fixture is locked in the vertical position and the wood is dropped straight down on the spinning blade while being rotated. The saw blade cuts a perfectly hemispherical cavity in the wood. The final bowl looks great after a little sanding and an application of oil. Check out the video after the break.

This isn’t the first time [Izzy’s] projects have been here on Hackaday, check out his DIY Band Saw and Wooden Sphere Cutter.

Continue reading “Making A Wooden Bowl Without A Lathe”

On-Demand Paper Clips

3D Printers are great for printing out parts or items you need, but can they really help if you run out of paper clips? Yes, the all important and extremely overlooked bent metal fastener can put a serious damper on your day if not readily available. There is a solution to this problem, it’s called the Paper Clip Maximizer 1.0. The only consequence of using such a machine may be the destruction of mankind.

The machine takes a spool of wire and methodically bends it into a paper clip shape. Just like an extruder on a 3D Printer, there is a knurled drive wheel with a spring-loaded bearing pinching the wire. This drive wheel is powered by an RC servo that has been modified for continuous rotation. After the drive mechanism, the wire passes through a sturdy guide block. Upon exit, the wire finds the bending head, also powered by a servo. There is a bearing on the end of the bending head that is used to bend the wire around the guide block. After making several bends to form the paper clip, the bending head swings around to cut off the newly manufactured clip with an abrasive wheel. Unfortunately, this part of the process doesn’t work well. The cutoff wheel motor is powered directly by the Arduino that controls the entire machine, the power output of which is not enough to easily cut the wire. It can also leave a sharp burr on the cut wire which is not a great feature for paper clips to have. But we just see these as future fodder for hacking sessions!

Continue reading “On-Demand Paper Clips”

glue rep strap

Wood & Glue RepStrap Works Surprisingly Well

Even with the cost of 3D Printers continually falling, entering the hobby still requires a significant investment. [Skeat] had some typical 3D Printer components available but didn’t have access to a printer for making the ever-so-common frame parts of typical RepRap designs.

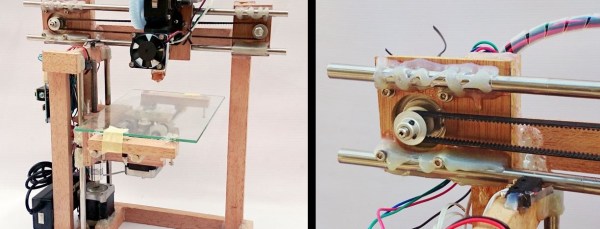
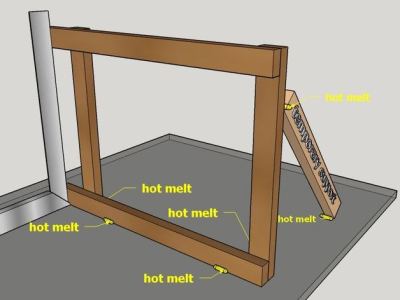
glue rep strap [Skeat’s] plan was to cobble together a printer just good enough to print out parts for another, more robust one. The frame is made from wood, a very inexpensive and available material. The frame is not screwed together and doesn’t have any alignment tabs, it’s just hand cut pieces glued together. Each portion of the frame is laid out, aligned with a carpenter’s square and then glued together. This design and assembly method was intentional as [Skeat] didn’t have access to any precision tools. He stated that the only parts of the frame that had to be somewhat precise were the motor mount holes. The assembly process is well documented to aid anyone else looking to make something similar.

In addition to the wooden frame, all of the components are glued in place. That includes the bearings, rods, limit switches and even the Z axis motor! After seeing the photos of this printer, it would be easy to dismiss it as a poor performer. The below video shows that this printer’s print quality can keep up with any hobby level machine available. We wonder if [Skeat] is rethinking making another since this one works so well.

Continue reading “Wood & Glue RepStrap Works Surprisingly Well”

DIY Spot Welder

Joining Sheet Metal Together With A DIY Spot Welder

Once in a while there comes a time that you need a tool for one specific job. In these cases, it doesn’t make much sense to buy an expensive tool to use just once or twice. For most of us, Spot Welders would fall into this category. [mrjohngoh] had the need to join two pieces of sheet metal. Instead of purchasing a commercial unit, he set out to make his own spot welder.

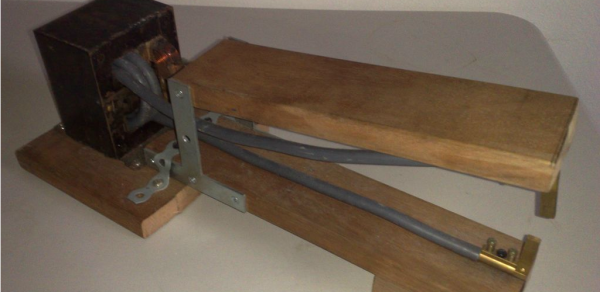
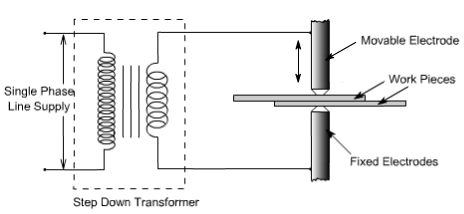
spotwelder A spot welder works by passing an electric current through two thin pieces of metal. The resistance of the metal work pieces and the current passed though them creates enough heat to melt and join the two together at a single spot. To be able to get the high current needed for this project, [mrjohngoh] started with an old microwave transformer. He removed the standard secondary coil and re-wrapped it with 1cm thick wiring to get maximum current out of the transformer. The ends of the coil wire attach to electrodes, which are made from a high-current electrical plug. The electrodes are mounted at the ends of a pair of hinged arms. The weld is made when the two pieces of metal are sandwiched between the electrodes and power is applied.
Spot welding isn’t just for joining two pieces of sheet metal. It’s also used for things like welding tabs onto battery terminals. The versatility and easy of building these welders make them one of the most featured tool hack we’ve ever seen.

diydockplug

Computer Docking Plug Alleviates Docking Station Woes

If you’ve ever owned a laptop with a docking station you can certainly attest to how something so simple can make your life easier. Just pop in the laptop and your external monitor(s), mouse, keyboard, and whatever are all ready to go. When it’s time to leave, just pop the laptop out and be on your way. [Chris] uses a Macbook for work and has to plug and unplug 4 connectors several times a day. This is just plain annoying and even more annoying when he accidentally plugs his two external monitors into the wrong ports. Commercially available docking stations are very expensive so [Chris] scratched his head and came up with a neat DIY docking station alternative.

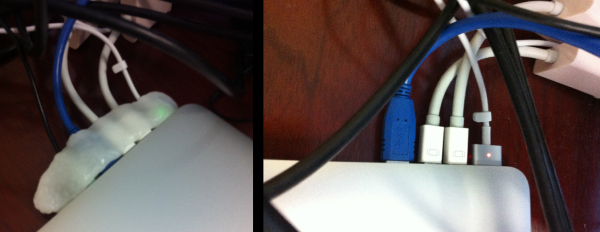
All of the cords that regularly need connecting and disconnecting are conveniently located next to each other. He took some moldable plastic and surrounded all of his cord connectors while they were plugged into his laptop. Once the plastic hardened, all 4 cables can be plugged/unplugged at once. The plastic holds the connectors at the right orientation and spacing so [Chris’s] monitors will never again be plugged into the wrong ports. This is a great idea and we’d love to see a 3D printed version made for the docking-station-less computer users.

via [LifeHacker]