diy air compressor

DIY Air Compressor Made From Refrigerator And Fire Extinguisher

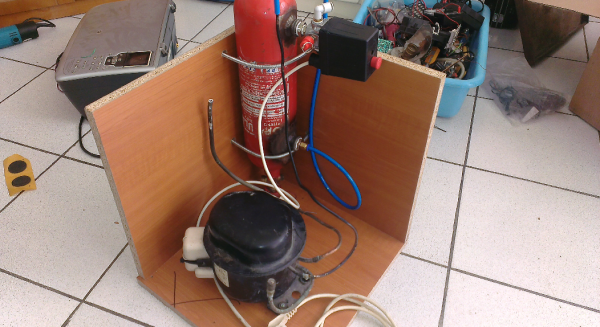
[Giorgos] wanted to build a pneumatic solder paste application tool but needed an air compressor to power it. Instead of going out and buying a compressor, he decided to build one himself. It sure is an ugly duckling but we’re impressed with it’s performance.

The air tank is an old spent fire extinguisher. The stock valve was removed and the insides were cleaned out. Out of curiosity, [Giorgos] figured out the volume by filling the tank with water, then measuring how much water came out. It turned out to be 2.8 liters. Two holes were drilled and threaded bungs were welded on to attach inlet and outlet lines.

The compressor portion is straight out of a refrigerator. Besides the compressor being free, the other benefit is that it is super quiet! Check the video after the break, you’ll be astonished. [Giorgos] did some calculations and figured out that his solder paste applicator needed about 8 bar (116 psi) of pressure. The refrigerator compressor easily handles that, filling the tank in 1 minute, 25 seconds.

On the output side of the tank resides a pressure switch for automatically filling the tank and a regulator for ensuring the solder paste applicator gets the required pressure. This isn’t the first time we’ve seen a refrigerator compressor used as an air compressor. Check out this dual setup capable of 400 psi.

Continue reading “DIY Air Compressor Made From Refrigerator And Fire Extinguisher”

semi auto bed leveling

Semi-Automatic Bed Leveling Your 3D Printer

Two of the most important prerequisites for successful 3D printing is making sure the bed is level and correctly setting the Z=0 height. Getting both of these right almost guarantees great adhesion since the first print layer is not only at the right distance from the build platform but also at a consistent distance for the entire bottom surface of the part.

Manual bed leveling is tedious, requiring the user to move the print nozzle to different points around the build platform, adjust some screws and make sure the nozzle is a piece-of-paper’s thickness higher than the platform. If you want to get complicated, there is an automatic option that probes the build platform and makes height corrections in the software. The probes come in several flavors, two common methods being a deployed mechanical switch (usually mounted to a servo) or force sensors under the build platform that sense when the nozzle touches the build platform. This method also requires some fancy firmware finesse to get working correctly.

[Jonas] posted a video showing the semi-automatic bed leveling capability of his printer. The build platform is held a bit high by springs that surround each of the 3 screws that support the bed assembly. The nozzle is moved directly over one of the 3 screws and then moved down until it noticeably presses on the build platform, compressing the support spring. A thumb wheel is then tightened at that location, locking the bed in place. The same process is performed for the other 2 support points. The result is a perfectly level build surface. Check the video out after the break to see just how quick this procedure is!

We’ve seen a somewhat similar concept that uses a clever gimbal and lock system under the bed.

Continue reading “Semi-Automatic Bed Leveling Your 3D Printer”

maplemaker mini v2 3d printer

MapleMaker 3D Printer Is As Printable As They Get

The term RepRap is fairly common and gets thrown around too often when generally talking about DIY 3D Printers. We must remember that the intent of the RepRap project “…is about making self-replicating machines…” and of course “…making them freely available for the benefit of everyone…“.

[MiniMadRyan] has recently designed a printer that could be considered the embodiment of the RepRap philosophy. He’s calling it the MapleMaker Mini V2. An extremely high percentage of the parts required to build this printer are, in fact, printable themselves. The frame pieces are printed, all of which can be printed on the printer thanks to the 6x8x6 inches print volume. The overall design is aesthetically pleasing, resembling that of a Lulzbot Mini.

The MapleMaker Mini V2 is self-replicating. The other part of the RepRap goal is to be free to the community. The design files are available on YouMagine and the assembly manual is better than those provided by most commercial companies. So if you’re looking to build a printer, be sure to add this one to your short list!


RC Lawn Mower

Electric Lawn Mower Converted To RC Control

Not too many people like pushing a lawn mower around the yard, but unfortunately, it is a necessary chore. Anti-push-mower advocate [imadethis2014] decided to (as his moniker suggests) make a solution to his pushing-problem. He was a fan of radio controlled devices so it made sense to convert his mower to RC!

The mower itself is powered by an off the shelf battery and has a 21-inch deck. The stock wheels and handle were removed and replaced with a new extruded aluminum frame. Out back are a pair of used electric wheelchair motors sourced from eBay. These drive motors are mounted to the new frame via a pair of aluminum brackets that [imadethis2014] designed and cut out on his Shakepoko CNC machine. Since both rear drive wheels work independent of each other, a pair of swiveling casters up front allow the mower to turn.

A large car-sized battery box houses the two smaller wheel chair batteries as well as the motor control and RC electronics. Check out the video after the break, the mower seems to do fairly well. [imadethis2014] admits he needs some new wheels as the current ones don’t get a lot of traction on the grass. He’s also thinking of adding GPS for automated mowing but isn’t quite there yet.

Continue reading “Electric Lawn Mower Converted To RC Control”

Digital Counter From Stuff You Have In Your Junk Drawer

In vehicle racing, a properly tuned suspension is essential for making good time around the track. Weekend Race Warrior [Julian], thought that his right rear suspension might be bottoming out when making hard left turns. After thinking about it for a while, he came up with a super simple way to measure how many times his suspension bottoms out during a lap: a digital counter made from a calculator.

There are two types of calculators out there, one is good for this project and the other won’t work. To figure out which one you have, type in 1+1=. All calculators should display 2. Then, press the = button again. Some calculators will continue to show 2, but some will change to 3, then 4 and so on as many times as the = button is pressed. This is the type of calculator this project requires.

[Julian] opened up his calculator and soldered a pair of wires across the = button terminals. After a hole was drilled in the case for the wires to exit, the calculator was put back together. To count how often his suspension bottomed out, a normally open limit switch was installed on the car at a point where it would be triggered when the suspension bottomed out. The 2 added wires coming out of the modified calculator connect to that switch. Switch presses now emulate a = button press. Before starting a lap, 1+1= is pressed to display 2. At the end of the lap, if the suspension bottomed out, the switch would be triggered and the displayed value would increase. Remember to subtract 2 from that value to get the total number of events that occurred.

A mechanical switch makes this a great application for counting when things move a certain way but there are some more options. Connecting the switch-side of a relay to the calculator allows [Julian] to count brake presses (via the break light signals) or count how often his boost pressure goes over a certain amount (using a pressure switch).

Shirt Design Stencil

Shirt Printing With Freezer Paper

There’s a pretty good chance that you’ve wanted to add a graphic or design to a t-shirt some time in your life. There are certainly ways to do it but most of us don’t have silk screening equipment or a steady enough hand to have the end product look cool. Lucky for us, [UrbanThreads] has put together a stenciling tutorial for personalizing garments. The process is easy and inexpensive. The results are good, although it can be time-consuming if the pattern is intricate.

To get started, a black and white graphic is printed on a sheet of paper. The design is then taped to a sheet of the secret ingredient: freezer paper. The two sheets are then placed on a table with the freezer paper up. Since the freezer paper is semi transparent, the printed out design shows through. It’s now time to use an exacto knife and trace the design while cutting through the freezer paper. The two sheets are then removed from each other and the freezer paper is put wax-side-down on the garment and ironed into place. The wax melts and acts as a temporary adhesive to hold the stencil down. At this point, fabric paint can be sprayed or dabbed on with a brush (avoid brushing back and forth as it may lift the stencil). Once the paint is applied, the stencil is removed and the paint is allowed to dry. According to [UrbanThreads] the freezer paper doesn’t leave any wax or residue on the garment.

For more garment modding, check out t-shirt bleaching or get ambitious with this DIY screen printing setup.

Down Draft table

Down-Draft Table Keeps The Shop Dust Free

Wood working is great but it can certainly get the shop dusty. [BigD] is a wood worker and needed a way to keep his shop from getting super dusty while sanding or routing. He ended up making a pretty slick dual-use downdraft table with a hidden filtration system.

The table’s frame is made from standard 2-by dimensional lumber you’d likely see most shop tables made from. It was built so that the top of the table would be flush with the table of the table saw. This allows the down-draft table to also act as an out feed support for the table saw, making it easier to cut longer pieces of wood.

To allow airflow to pull any generated dust down, a plethora of holes were drilled in the table top. Down below are a couple sealed chambers, one for the incoming dust and one for the air blower that creates the down-draft air flow. The two chambers are separated by a pair of filters which keep the dust from being blown back into the shop. A little door on the side of the table allows access to clean out the accumulated dust and debris. Now [BigD] can sand up a storm on his down-draft table without breathing in a sapling worth of dust.