Massive Wood Joints With Chainsaw Mortiser

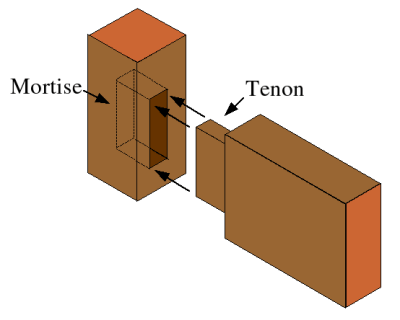
mortise-tenonOne common joinery method used in wood working is the mortise and tenon. A mortise is basically a hole in a piece of wood and the tenon is another piece of wood cut to tightly fit in that hole. The tenon is usually secured in place with either glue or a wooden pin or wedge.

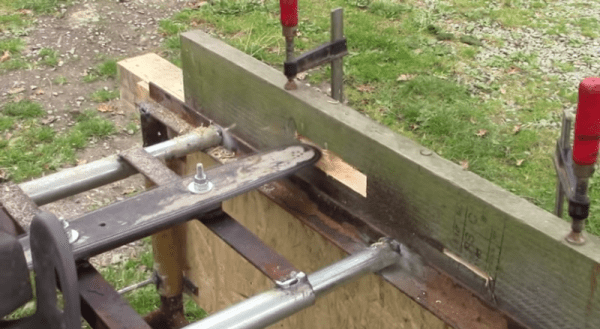
The folks over at [WayOutWest] were building a fence and needed a way to cut a bunch of mortises in 4×4 inch posts to accept 2×6 inch rails. Although they had a chainsaw, trying to cut a mortise with it by hand turned out to be super dangerous because the chainsaw would kick up every time the tip of the blade touched the wood. The team had some parts kicking around so they made a fixture to hold the chainsaw as it is plunged into the 4×4’s.

The contraption’s frame is made from an old scaffolding stand and the slides are just pipes inside of pipes. The chainsaw is bolted to the slide and a lever moves it forward and back. A second lever moves the piece of wood getting mortised up and down so that the mortise can be cut to any width. This is a pretty ingenious build that only cost a little effort and will end up saving a bunch of time mortising countless fence posts.

Continue reading “Massive Wood Joints With Chainsaw Mortiser”

wooden wood lathe

Mini Wood Lathe Made Of….. Wood?

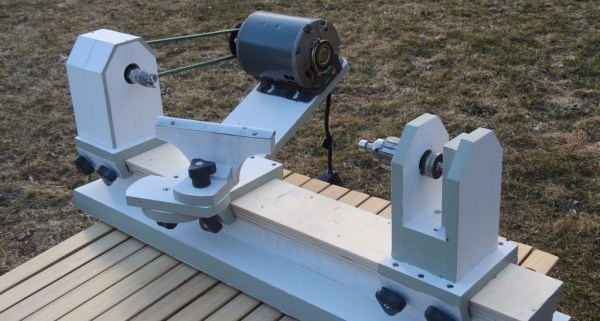
When someone says ‘wood lathe’ the average person would think of a lathe used for turning pieces of wood into ornate shapes. But what if that lathe was also made of wood. Would that be a wood wood lathe? Instead of wondering the answer to that very unimportant question, young 15 year-old [laffinm] decided to actually build a wood wood lathe from plans he found in a magazine.

As you would expect, a 15 year-old’s budget is certainly not going to be very large. [laffinm] started by gathering plywood scraps left over at construction sites. The lathe bed, head stock, tail stock, tool rest and motor mount are all made from 3/4″ plywood. The tool rest and tail stock have knobs that allow loosening of each part so that they can be moved to any location on the bed.

Out back, [laffinm] made his own live center for the tail stock out of a chuck and bearing assembly that he pulled from an old drill. The tail stock supports were drilled out to fit the bearings which were epoxied in place. The live center and tail stock combination supports the right side of the work piece that is being turned on the lathe.

In the end the lathe came out pretty darn well. We here at Hackaday love projects that make use of recycled parts and this project sure does that as most of the parts were scavenged or obtained for free with the only exceptions a v-belt and some nuts and bolts. If you’d like to see the build process in detail, [laffinm] has a very complete Instructable with 3 build videos, the first of which you can find after the break.

Continue reading “Mini Wood Lathe Made Of….. Wood?”

RetroPie SNES Portable

RetroPie Portable Looks Like SNES Gameboy

[Mat] wanted a portable RetroPie project he could take while travelling. He made one with a laser cut plastic housing and, according to him, it turned out to be a ‘hideous deformed beast’. In version 2 he took a different approach and we must say it came out looking pretty nice.

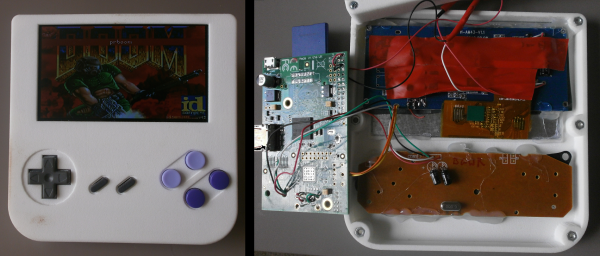
This time [Mat] went with a 3D printed case. He designed it himself in SketchUp. Unfortunately, [Mat] doesn’t have access to a 3D printer so he had to send it out to a professional printing company to the tune of £60 ($90). Although that was a large chunk of change, he was happy with the quality of the print. The final exterior dimensions of the case is 13 x 13 x 2.5 cm.

A quick look at the controls will remind anyone of an SNES controller. [Mat] took the innards of an SNES-like USB gamepad and modeled the new case around it. Not having to cut up or otherwise modify the controller PCB makes for an easy addition to the project. Conveniently, the width of the controller was just about the same as the 4.3 inch LCD used for the gamepad’s display. Both fit nicely together.

Under the hood is a Rasberry Pi running RetroPie. An internal 2600mAh Lithium Ion battery provides up to 3.5 hours of game play. Battery charging management is provided by an Adafruit Powerboost 500 which also has a micro USB port that makes connecting an external charger easy.

Slow Stick Auto Gyro

RC Plane Converted To Autogyro

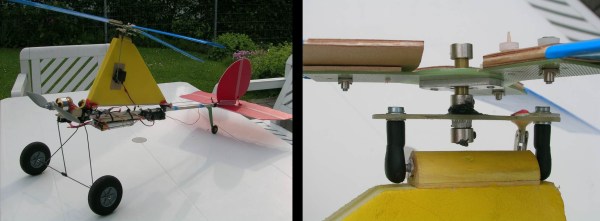
Out in the RC Airplane world, there is a great airframe called the Slow Stick. There is not much going on with this plane as it only has the bare necessities, a motor, wing, tail and a fiberglass tube (hence the ‘stick’ part of Slow Stick) as the fuselage. Yes, and as the name suggests it is slow. Although it’s intent is to be a starter plane for beginners, even experienced pilots like it because it is cheap, easy to repair and fun to modify. [StephanB] is the type of guy who likes to modify things so he set out to convert his Slow Stick to an Autogyro.

An Autogyro can be described as a cross between a plane and a helicopter. Like a plane it has a propeller that provides forward thrust. Unlike a plane, it does not have a wing. To provide lift, there is a large helicopter-like rotor on top of the craft but this rotor is not powered. It only spins when the craft is moving forward. Lift is created when the rotor is spinning, allowing the Autogyro to take off.

[StephanB] started by removing his Slow Stick’s wing. This takes all of 2 seconds and consists of only removing 2 rubber bands. Next he built a frame for the rotor. It was made to fit the wing mounts of the Slow Stick so that it could be quickly converted back to a plane. With a spinning Autogyro rotor, the side that the rotor is traveling in the forward direction creates more lift than the side of the rotor traveling rearward. To compensate for this unequal lift, [StephanB] added a sideways tilting rotor mount. An RC servo is connected to the mount and allows remote control of the rotor to balance out the lift.

Slow Stick Auto Gyro

diy power wagon

Snow Blower Turned Power Wagon

Winter is now gone and it’s time to put away that snowblower. Well, it seems that [SWNH] either didn’t hear the news or thought not using his snowblower for most of the year was a waste of a great resource. No, he’s not using it to blow dirt around, he converted it into a Power Wagon.

A Power Wagon is just what it sounds like, a wagon that is motorized and it is used for moving stuff around your yard. [SWNH] started by disassembling the 2 stages of the snowblower. They came off as a unit with only 6 bolts. Next up, the wagon bed was made, starting with an angle iron frame with a plywood bottom and sides. Two large casters with rubber wheels supports the front of the wagon.

Using the power wagon is easy, fill up the bin and use the snowblower controls to drive the cargo around. [SWNH] says that it steers like a shopping cart. And since the wagon bed is bolt-on, it can be removed and the blower assembly re-installed next winter to take care of that pesky snow.

bass drum speaker mic

DIY Bass Drum Microphone Uses Woofer Cone As Diaphragm

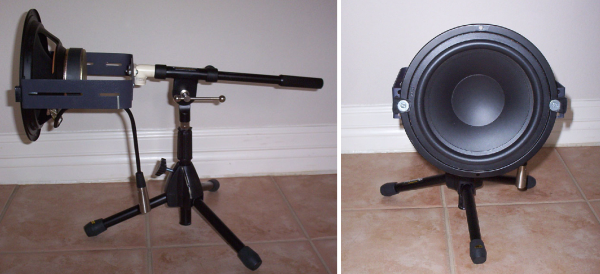
Anyone into audio recording knows that recording drums is a serious pain. Mic setup and positioning can make or break a recording session. One particular hurdle is getting a great sound out of the bass drum. To overcome this, [Mike] has built a microphone using an 8″ woofer in an attempt to capture the low-end frequencies of his bass drum. Using a speaker as a microphone isn’t a new idea and these large diaphragm bass drum mics have taken commercial form as the DW Moon Mic and the now-discontinued Yamaha SubKick.

The project is actually quite simple. The speaker’s positive terminal is connected to Pin 2 of a 3-pin XLR microphone connector. The speaker’s negative terminal is connected to the connector’s Pin 1. [Mike] made a bracket to connect the woofer to a mic stand, which in turn was cut down to position the woofer at bass drum height. The setup is then plugged into a mixer or pre-amp just like any other regular microphone.

[Mike] has since made some changes to his mic configuration. It was putting out way too hot of a signal to the preamp so he added an attenuation circuit between the speaker and XLR connector. Next, he came across an old 10″ tom shell and decided to transplant his speaker-microphone from the open-air metal rack to the aesthetically pleasing drum shell. Check out [Mike’s] project page for some before and after audio samples.

RetroPie Game Gear

RetroPie Meets Game Gear, Again

If you’re a fan of video game systems of yesteryear then you are probably familiar with RetroPie. For those who aren’t, RetorPie is a collection of software and video game emulators that can run on a Raspberry Pi. The package makes it easy to get your fix of old games without having to own a bunch of consoles or loose your breath blowing on cartridges.

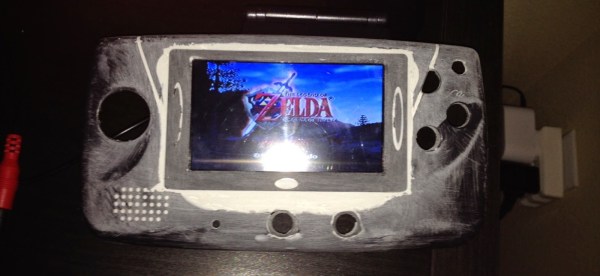
[brooksyx] already had a broken Game Gear, Raspberry Pi and a 4.3 inch LCD screen kicking around so he thought it would be a good idea to put them together into a handheld RetroPie. Clearly, the new screen was not going to fit in the old screen’s place. The Game Gear’s case was cut and the bezel from the new LCD screen was epoxied in place, gaps filled and finally sanded.

RetroPie Game Gear


The screen is not the only modifications done to the case. Down on the bottom right of the case front [brooksyx] added 4 buttons for the N64 C-buttons. Out back the battery compartments and cartridge slot were filled in.

This project isn’t done yet and we are excited to see how it comes out. If you’re digging this RetroPie portable, you may like this Game Gear with an unmodified case or this large-screened Game Boy.