Mini-lathe carriage wheel

Improving A Mini-Lathe With A Few Clever Hacks

Like many budget machinists, the delightfully optimistically named [We Can Do That Better] had trouble with some of the finer controls on his import mini-lathe. But rather than suffer through it, he chose to rectify the machine’s shortcomings and in the process, teach everyone a bunch of great tips.

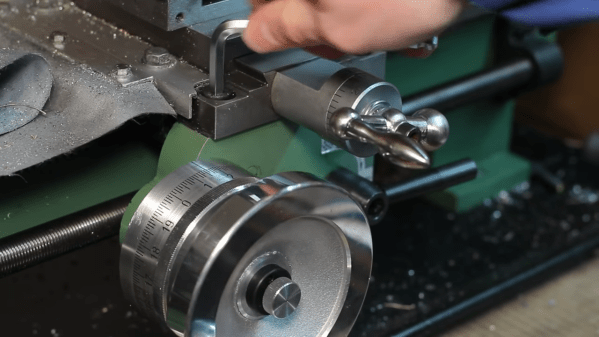
[We Can Do That Better]’s lathe retrofit focused on the carriage handwheel, which appears to lack proper bearings and wobbles around in a most imprecise manner. On top of that, the gearing of the drive made for an unsatisfying 19 mm of carriage travel per revolution of the handwheel. A single gear change made that an even 20 mm per rev, which when coupled with a calibrated and indexed handwheel ring greatly simplifies carriage travel measurements.

While the end result of the build is pretty great in its own right, for our money the best part of the video is its rich collection of machinist’s tips. The use of a wooden dowel and a printed paper template to stand in for a proper dividing head was brilliant, as was using the tailstock of the lathe to drive an engraving tool to cut the index lines. We’ve seen the use of a Dremel tool mounted to the toolpost to stand in for a milling machine before, but it’s always nice to see that trick used. And the mechanism for locking the dial to the handwheel was really clever, too.

Considering a mini-lathe? As encouraging as [We Can Do That Better]’s experience may be, it might be wise to take a deep dive into the pros and cons of such a machine.

Continue reading “Improving A Mini-Lathe With A Few Clever Hacks”

Lathe’s Tool Holder Holds A Rotary Tool

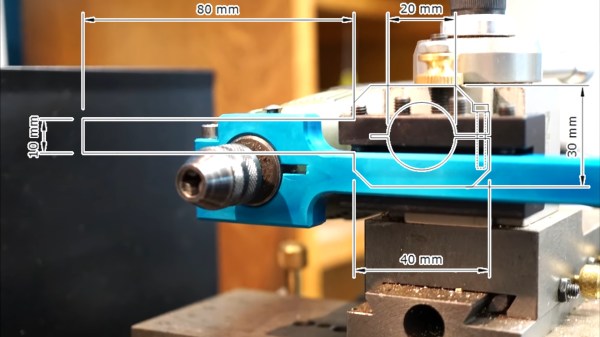
What is better than a tool? Two. What is better than two? Two tools tooling together. [tintek33] wanted a rotary tool to become an attachment on his mini lathe, the video is also below the break. Fortunately, Dremels and Proxxons are built to receive accessories, or in this case, become one. Even if the exact measurements do not apply to your specific hardware, we get to see the meat of the procedure from concept to use.

We start with where the rotary tool should be and get an idea of what type of bracket will be necessary. The design phase examines the important dimensions with a sketch and then a CAD mock-up. Suitably thick material is selected, and the steps for pulling the tool from the raw stock are shown with enough detail to replicate everything yet there is no wasted time in this video. That is important if you are making a quick decision as to whether or not this is worth your hard work. Once the brace is fully functional and tested, it is anodized for the “summer ocean” blue color to make it easy to spot in the tool heap. Some complex cuts are made and shown close-up.

Thank you [jafinch78] for your comment on Take a Mini Lathe for a Spin and check out [tintek33] using his mini lathe to make a hydraulic cylinder for an RC snow plow.

Continue reading “Lathe’s Tool Holder Holds A Rotary Tool”

Take A Mini Lathe For A Spin

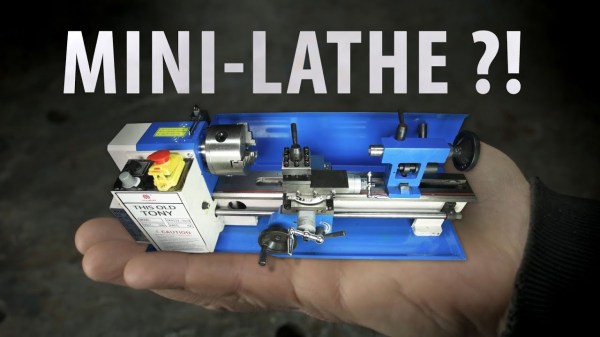
[This Old Tony] is no stranger to quality tools, but he started on a mini lathe. Nostalgia does not stop him from broadcasting his usual brand of snark (actually, it is doubtful that anything short of YouTube going offline will stop that). He rates the lathe’s ability to machine different materials and lets you decide if this is an investment, or a money pit.

Lathe parts range from a chintzy start/stop button assembly that looks like it would be at home on a Power Wheels restoration project to a convenient cam locking mechanism on the tail stock which is an improvement on the lathe with which our narrator learned. We see the speed tested and promptly disproved as marketing hoopla unless you allow for a 40% margin of error. It uses a 500 watt DC motor, so don’t try correcting for mains power frequency differences. The verdict on the lead screw and thread dial is that you get what you pay for and this is demonstrated by painstakingly cutting threads into aluminum. Finally, we see torture tests on cold rolled steel.

Maybe someone from the mini lathe community will stop by with their two-cents. If you appreciate this introduction to lathes, consider [This Old Tony]’s guide to CNC machines or injection molding. But for us, [Quinn Dunki’s] series of machine tools has been a real treat this year.

Continue reading “Take A Mini Lathe For A Spin”

Over-Engineered Mailbox Flag Machined Using Under-Engineered Mini-Lathe

[Tim Nummy] used his cheap, Chinese, bench mini-lathe to make a non-terrible mailbox flag holder (YouTube video, embedded below). Tim posts videos on his channel about garage hobby projects, many of which are built using his mini-lathe, often based on suggestions from his followers. One such suggestion was to do something about his terrible mailbox flag – we’re guessing he receives a lot of old-school fan mail.

He starts off by planning the build around 1 ¼ inch aluminum bar stock, a 688 bearing, three neodymium magnets and some screws. The rest of it is a “think and plan as you go along” project, but essentially, the new holder is in three pieces. An inner piece goes inside the mail box and holds the assembly to the mail box. The middle piece holds the two magnets which act as end-stops or limits for the flags raised and lowered positions. The final, outer piece holds the flag itself, and the bearing which allows it to rotate freely.

This part also has the third magnet embedded in it to work with the other two magnets for the limits. The use of magnets is cool, but a ball catch with two detents would have worked just as well. It’s a great simple project to follow for those who want to wet their feet on lathe work. [Tim] has also posted links to all of the tools and equipment seen in the video, so check that out if anything catches your fancy.

But workshop veterans will almost certainly cringe at several places along the video. The main one that caught our eye is obviously the shaky lathe itself. It could do with a heavier workbench, proper leveling, foundation bolts or anti-vibration mounts. And from the looks of it, the tail stock isn’t any rock steady too. Although the lathe is variable speed, the chuck rpm is set too high for aluminum, and the lack of cutting fluid makes it even more troublesome. Using oil, or even some cutting fluid, while tapping would have been wise too.

We’re not sure if it’s the shaky foundation or poor feed control, but the step cut for mounting the bearing is over-sized by a whole lot more and requires a big goop of retaining compound to glue the bearing in place. But the end result works quite well, including the magnetic catches – a complex solution for a simple problem.

We’re sure our keen-eyed readers will likely spot some more issues in [Tim]’s methods, so go at it in the comments below, but please make sure to rein in the snark and keep your feedback positive.

Continue reading “Over-Engineered Mailbox Flag Machined Using Under-Engineered Mini-Lathe”

Hackaday Prize Entry: 3D Printed Mini-Lathe

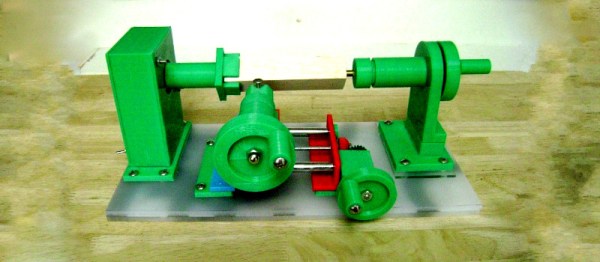
Lathes can be big, powerful, dangerous machines. But sometimes there’s a call for making very small parts out of soft materials, like plastic and wood. For jobs like this, you could use something like this 3D printed mini-lathe.

The benefits of 3D printing a tool like this are plentiful. The design can be customized and refined by the end user; [castvee8] notes that the machine can be made longer simply by increasing the length of the lead screw and guide rails. The machine does rely on some metal parts and a motor; but the real power here is that if you can’t source the exact components, you can always customize the files to suit what you have on hand.

[castvee8] aimed to make the entire build as easy as possible for the novice – even the motor and speed controller are off-the-shelf modules. It’s a testament to the golden age we live in that an entire lathe can be built out of modules and 3D printed parts. The project makes up another member of the family of 3D printed tools [castvee8] is showing off on Hackaday.io.

wooden wood lathe

Mini Wood Lathe Made Of….. Wood?

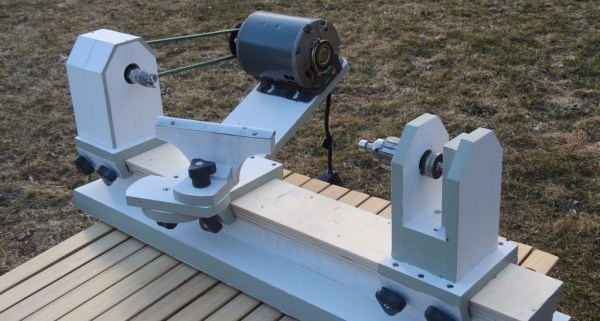
When someone says ‘wood lathe’ the average person would think of a lathe used for turning pieces of wood into ornate shapes. But what if that lathe was also made of wood. Would that be a wood wood lathe? Instead of wondering the answer to that very unimportant question, young 15 year-old [laffinm] decided to actually build a wood wood lathe from plans he found in a magazine.

As you would expect, a 15 year-old’s budget is certainly not going to be very large. [laffinm] started by gathering plywood scraps left over at construction sites. The lathe bed, head stock, tail stock, tool rest and motor mount are all made from 3/4″ plywood. The tool rest and tail stock have knobs that allow loosening of each part so that they can be moved to any location on the bed.

Out back, [laffinm] made his own live center for the tail stock out of a chuck and bearing assembly that he pulled from an old drill. The tail stock supports were drilled out to fit the bearings which were epoxied in place. The live center and tail stock combination supports the right side of the work piece that is being turned on the lathe.

In the end the lathe came out pretty darn well. We here at Hackaday love projects that make use of recycled parts and this project sure does that as most of the parts were scavenged or obtained for free with the only exceptions a v-belt and some nuts and bolts. If you’d like to see the build process in detail, [laffinm] has a very complete Instructable with 3 build videos, the first of which you can find after the break.

Continue reading “Mini Wood Lathe Made Of….. Wood?”

Clever Re-purposing Of A Power Drill Results In A Mini Wood Lathe

Power Drill Wood Lathe

Ever use a lathe? No? Neither had [Jack Hauweling], but that didn’t stop him from building his own and learning how!

Lathes are a lot of fun, especially for small wood working projects. Using mostly wood and a few small pieces of hardware, [Jack] was able to build one in an afternoon that works quite well!

He’s using a cheap corded power drill to drive the work piece, but what we really like is how he made the spur center and spur live center out of a few pieces of threaded rod and a standoff. It’s a simple system that lets him secure the work piece fairly easily simply by tightening the threaded shaft of the live center.

In the video after the break he goes through the entire build process and even shows off his first attempts at using the lathe — he actually was able to make a very nice tool grip on his third try!

Continue reading “Clever Re-purposing Of A Power Drill Results In A Mini Wood Lathe”