This Custom Workbench Will Make You Flip

In a recent video, [SomeSkillStudio] created a tidy tool storage system for their slim garage workbench. We have seen the “five knuckle” 270 degree hinges used here before and knew they’d enable some cool hacks. Here you’ll see how he puts this unique type of hardware to work building a densely packed work surface. For anyone who’s set up shop in a garage that’s somehow also supposed to still regularly host vehicles, you’ll know how important it is to have a place to put everything away and make it easy to do so.

The video has several great tips on making sure everything fits together, something key for anyone reproducing this with their own tool collection. If you have even less space, we have some great past workshop builds from portable, to tiny, to elaborate. Even if you’ve already established a place to work, we have tips on organizing your shop, giving each tool a home in a shadow board or across an infinite grid. Clearly, making a work space is one of our favorite kinds of projects.

Continue reading “This Custom Workbench Will Make You Flip”

Tiny Woodshop Is Packed With Space-Saving Hacks

Fair warning: once you’ve watched [Stephen]’s tiny workshop tour, you will officially be out of excuses for why you need to expand your workshop. And, once you see his storage and organization hacks, you’ll be shamed into replicating some in whatever space you call home.

[Stephen]’s woodshop is a cozy 6′ x 8′ (1.8 m x 2.4 m) garden shed. The front wall is almost entirely occupied by the door and a window, reducing the amount of wall space available but providing ample natural light and keeping the small space from inducing claustrophobia. Absolutely every square inch of the remaining space is optimized and organized. [Stephen] wisely eschews bulky cabinets in favor of hanging tool racks, all mounted flexibly to the wall on French cleats. Everything has a place, and since every hand tool is literally within arm’s reach, it stays stored until it’s needed and goes right back when it’s done. The shop boasts way more than hand tools, though; a lathe, drill press, thickness planer, sander, air compressor, scroll saw, band saw, and even a table saw all fit in there. There’s even dust collection courtesy of “The Beast”, [Stephen]’s DIY dust extractor.

No matter whether you work in wood, metal, or silicon, we could all learn some lessons from [Stephen]’s shop. It’s a model of efficiency and organization, and while he’s not likely to build a full-size [Queen Anne] dresser in there, it’s clear from his blog that he gets a lot done with it. Too bad we missed this one the last time we did a roundup of tiny shops.

Continue reading “Tiny Woodshop Is Packed With Space-Saving Hacks”

Down Draft table

Down-Draft Table Keeps The Shop Dust Free

Wood working is great but it can certainly get the shop dusty. [BigD] is a wood worker and needed a way to keep his shop from getting super dusty while sanding or routing. He ended up making a pretty slick dual-use downdraft table with a hidden filtration system.

The table’s frame is made from standard 2-by dimensional lumber you’d likely see most shop tables made from. It was built so that the top of the table would be flush with the table of the table saw. This allows the down-draft table to also act as an out feed support for the table saw, making it easier to cut longer pieces of wood.

To allow airflow to pull any generated dust down, a plethora of holes were drilled in the table top. Down below are a couple sealed chambers, one for the incoming dust and one for the air blower that creates the down-draft air flow. The two chambers are separated by a pair of filters which keep the dust from being blown back into the shop. A little door on the side of the table allows access to clean out the accumulated dust and debris. Now [BigD] can sand up a storm on his down-draft table without breathing in a sapling worth of dust.

wooden wood lathe

Mini Wood Lathe Made Of….. Wood?

When someone says ‘wood lathe’ the average person would think of a lathe used for turning pieces of wood into ornate shapes. But what if that lathe was also made of wood. Would that be a wood wood lathe? Instead of wondering the answer to that very unimportant question, young 15 year-old [laffinm] decided to actually build a wood wood lathe from plans he found in a magazine.

As you would expect, a 15 year-old’s budget is certainly not going to be very large. [laffinm] started by gathering plywood scraps left over at construction sites. The lathe bed, head stock, tail stock, tool rest and motor mount are all made from 3/4″ plywood. The tool rest and tail stock have knobs that allow loosening of each part so that they can be moved to any location on the bed.

Out back, [laffinm] made his own live center for the tail stock out of a chuck and bearing assembly that he pulled from an old drill. The tail stock supports were drilled out to fit the bearings which were epoxied in place. The live center and tail stock combination supports the right side of the work piece that is being turned on the lathe.

In the end the lathe came out pretty darn well. We here at Hackaday love projects that make use of recycled parts and this project sure does that as most of the parts were scavenged or obtained for free with the only exceptions a v-belt and some nuts and bolts. If you’d like to see the build process in detail, [laffinm] has a very complete Instructable with 3 build videos, the first of which you can find after the break.

Continue reading “Mini Wood Lathe Made Of….. Wood?”

Plastic Mallet

Turning Plastic Milk Jugs Into A Useful Tool

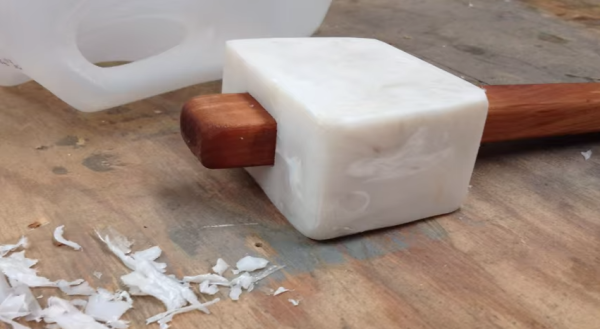
[Peter] obviously enjoys getting to work in his wood shop. He also likes turning things into other things. With his latest project, he combines his two hobbies by turning plastic milk jugs into a plastic joiner’s mallet.

[Peter] started out by collecting and “processing” the milk jugs. Milk jugs are commonly made with HDPE. HDPE is a petroleum-based plastic with a high strength-to-density ratio. It’s easy to recycle, which makes it perfect for this type of project. We’ve even seen this stuff recycled into 3D printer filament in the past. The “processing” routine actually just consists of cutting apart the jugs with a razor blade. [Peter] mentions in the past that he’s used a blender to do this with much success, but he’s unfortunately been banned from using the blender.

Next, all of the plastic pieces are piled up on a metal try to placed into a small toaster oven. They are melted into one relatively flat, solid chunk. This process is performed three times. The final step was to pile all three chunks on top of each other and melt them into one massive chunk of plastic.

While waiting for the plastic to melt together, [Peter] got to work on the handle. He put his woodworking skills to good use by carving out a nice wooden handle from a piece of cherry wood.  The handle was carefully shaped and sanded with a variety of tools. It is finished with some linseed oil for a nice professional look.

When the plastic was mostly melted together, [Peter] had to get to work quickly while the plastic was still soft. He pried the plastic off of the metal tray and stuffed it into a rectangular mold he made from some fiber board. He used a heat gun to soften the plastic as needed while he crammed it all into the mold. With the mold suitably stuffed, he closed it up and clamped it all shut.

Once the plastic cooled, [Peter] had to cut it into the correct shape and size. He took the solid chunk of plastic to his band saw to cut all the appropriate angles. He then used both a drill press and a chisel to cut the rectangular mounting hole for the handle. The plastic piece was then shaped into its final form using a belt sander. All that [Peter] had left to do was slide it up and only the handle. The shape of the handle and mounting hole prevent the plastic piece from flying off of the top of the handle. Check out the video below to see the whole process. Continue reading “Turning Plastic Milk Jugs Into A Useful Tool”