Designing The Atom Smasher Guitar Pedal

[Alex Lynham] has been creating digital guitar pedals for a while and after releasing the Atom Smasher, a glitchy lo-fi digital delay pedal, he had people start asking him how he designed digital effects pedals rather than analog effects. In fact, he had enough interest, that he wrote an article on it.

The article starts with some background on [Alex], the pedals he’s built and why he chose not to work on pedals full-time. Eventually, the article gets to the how [Alex] designed the Atom Smasher. He starts by describing the chip he used, the same one that many hobbyists, as well as commercial builders, use for delay based effects – the SpinSemi FV-1.

The FV-1 is a SMD chip used for digital delays and other effects that require a delay line – reverbs, choruses, flangers, etc. It’s programmed with an assembly-style language called SpinASM. [Alex] goes over some of the tools and references he used when designing for the pedal. He also has a list of tips for would-be effect pedal designers which work whether you’re designing digital or analogue effects.

[Alex] ends his article saying that, in the future, he might make the schematic and code available, but for the moment he’s not. The FV-1 is an interesting chip, and [Alex]’s article gives a nice high-level look at its features and how to develop for it. For some interesting guitar pedal related articles, check out this one using effects pedals to get better audio in your car, and here’s one about playing with DSP and designing a pedal with it.

Continue reading “Designing The Atom Smasher Guitar Pedal”

Monitor Your City’s Air Quality

[Radu Motisan]’s entry in the 2017 Hackaday Prize is a series of IoT Air Quality monitors, the City Air Quality project. According to [Radu], air pollution is the single largest environmental cause of premature death in urban Europe and transport is the main source. [Radu] has created a unit that can be deployed throughout a city and has sensors on it to report on the air quality.

The hardware has a laser light scattering sensor for particulate matter and 4 electromechanical sensors for carbon monoxide, nitrogen dioxide, sulfur dioxide and ozone (these sense the six parameters that are recognized as having significant health impact by multiple countries.) These sensors have2-yearear lifespan, so they are installed in sockets for easy replacement, and if needed, you can swap to different sensors to detect different things. The PCBs for the hardware are separated into a WiFi version and a LoRaWAN version and the software runs on an ATMega328 – the PCB has the standard six-pin ISP connection for programming.

The data collected is sent to a server where it is adjusted based on the unit’s calibration parameters and stored in a database per sensor. This makes servicing the sensors at the end of their life easier as all that’s required is replacing the sensors in the unit and changing the calibration parameters stored for that unit, the software changes are required. The server offers the data via a RESTful API so that building dashboards with the stats and charts become easy.

[Radu] used an off the shelf module as the first prototype and attached it to a car while driving around. He used this to test out the plan and work on the server. He then proceeded to designing the PCB hardware and the enclosure for the final unit. This work is an extension of [Radu]’s previous work, spotlit here in the 2015 Hackaday Prize, but also check out this project to put air quality sensors in the classroom.

Continue reading “Monitor Your City’s Air Quality”

Irising Chicken Coop Door

What’s cooler than a door that irises open and closed? Not much. They add a nice science-fictiony detail to any entryway. [Zposner]’s dad wanted an automatic door for his chicken coop, so [zposner] took some time and came up with a nice door for him with an iris mechanism. You’ll need to watch the video.

[Zposner] used a combination of laser cutting and a CNC router to cut the pieces, then sanded and painted the wood. After assembly, [zposner] started work on the control mechanism. He’s controlling the door with an Arduino and a motor shield; to let the Arduino know to stop the motor, [zposner] used limit switches which get hit as the mechanism rotates. Once the switches were in the right place and the code written, it was time to finish assembly and install the door on the coop. To keep the Arduino that safe, it was installed in a plastic container with a screw lid, and then hot-glued to beside the iris.

Unfortunately, chickens don’t necessarily care how cool something is, and in this case, they didn’t realize that the iris was a door – they refused to exit the coop through it. [Zposner] tried a few things before settling on putting the chicken on the edge of the door – then the chicken would realize that it could go through it.

[Zposner]’s dad now has a snazzy door that opens with a switch. It was a great project for [zposner] and his dad to work on and, even if the chickens seem unimpressed, they did a great job. Check out the iris porthole that a Detroit Hackerspace built into its door, or, if you really want to build an iris mechanism, but don’t have access to a CNC router, a laser cutter, or, you know, wood, you could build this out of bits you have lying around.

Continue reading “Irising Chicken Coop Door”

Building A Better Baby Bottle Boiler

[Sebastian Foerster] hasn’t been at his blog in a while. He and his wife just had twins, so he’s been busy standing waiting for formula or milk to warm up. Being a technical kind of guy, he took a look at the tools currently on the market to do this, analyzed them, and decided instead to do it himself.

[Sebastian] looked to his Nespresso Aeroccino – a milk frother designed to give you hot or cold frothy milk for the top of whatever beverage you decide to put it on top of. It made the milk a bit too hot, 60°C, but once it got to the temperature, it would shut off, so if [Sebastian] could get it to shut off at a lower temperature, he had found the solution!

After taking the Aeroccino apart and going over the circuit, it seemed like a simple design relying on a resistor and NTC (negative temperature coefficient) thermistor connected to an ATTiny44 microcontroller. [Sebastian] didn’t want to have to reprogram the ATTiny, so he looked at the resistor and NTC. The resistor and thermistor create a voltage divider and that voltage is read in by the microcontroller through an analog pin. After looking up some info on the thermistor and replacing the resistor with a potentiometer, [Sebastian] could adjust the shut-off temperature while measuring with a thermometer. When he got the temperature he liked, he reads the value of the potentiometer and then replaces it with a couple of resistors in series.

Now [Sebastian] gets the babies’ bottles ready from fridge to temperature in about 25 seconds. He doesn’t have to worry about keeping an eye on the bottles as they heat up. We’re sure that getting two bottles ready in under a minute is much better on the nerves of new parents than waiting around for ten minutes. For more fun with thermistors, check out our article on resistors controlled by the environment or check out this bluetooth bbq thermometer!

Autonomous Transatlantic Seafaring

[Andy Osusky]’s project submission for the Hackaday Prize is to build an autonomous sailboat to cross the Atlantic Ocean. [Andy]’s boat will conform to the Microtransat Challenge – a transatlantic race for autonomous boats. In order to stick to the rules of the challenge, [Andy]’s boat can only have a maximum length of 2.5 meters, and it has to hit the target point across the ocean within 25 kilometers.

The main framework of the boat is built from aluminum on top of a surfboard, with a heavy keel to keep it balanced. Because of the lightweight construction, the boat can’t sink and the heavy keel will return it upright if it flips over. The sail is made from ripstop nylon reinforced by nylon webbing and thick carbon fiber tubes, in order to resist the high ocean winds.

The electronics are separated into three parts. A securely sealed Pelican case contains the LiFePo4 batteries, the solar charge controller, and the Arduino-based navigation controller. The communications hardware is kept in polycarbonate cases for better reception. One case contains an Iridium satellite tracker, compass, and GPS, the other contains two Globalstar trackers. The Iridium module allows the boat to transmit data via the Iridium Short Burst Data service. This way, data such as GPS position, wind speed, and compass direction can be transmitted.

[Andy]’s boat was launched in September from Newfoundland headed towards Ireland. However, things quickly seemed to go awry. Storms and crashes caused errors and the solar chargers seemed not to be charging the batteries. The test ended up lasting about 24 days, during which the boat went almost 1000km.

[Andy] is redesigning the boat, changing to a rigid sail and enclosing the hardware inside the boat. In the meantime, the project is open source, so the hardware is described and software is available on GitHub. Be sure to check out the OpenTransat website, where you can see the data from the first sailing. Also, check out this article on autonomous kayaks, and this one about a swarm of autonomous boats.

Continue reading “Autonomous Transatlantic Seafaring”

Building A K9 Toy

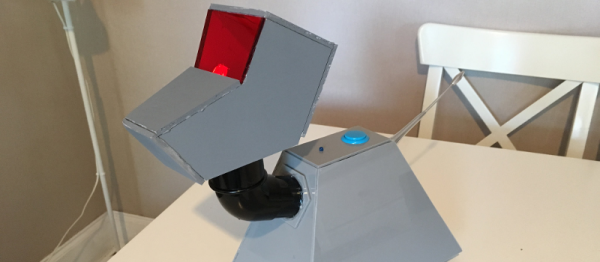
[James West] has a young Doctor Who fan in the house and wanted to build something that could be played with without worrying about it being bumped and scratched. So, instead of creating a replica, [James] built a simple remote controlled K9 toy for his young fan.

K9 was a companion of the fourth Doctor (played by Tom Baker) in the classic Doctor Who series. He also appeared in several spin-offs. A robotic dog with the infinite knowledge of the TARDIS at hand, as well as a laser, K9 became a favorite among Who fans, especially younger children. [James] wanted his version of K9 to be able to be controlled by a remote control and be able to play sounds from the TV show.

Using some hand-cut acrylic, [James] built K9’s body, then started on plans for the motion control and brains. [James] selected the Raspberry Pi Zero for the controller board, a Speaker pHat for the audio, a couple of motors to move K9 around, and a motor controller. K9 is controlled by a WiiMote and has a button on his back to start pairing with the WiiMote (K9 answers with “Affirmative” when the pairing is successful.) When it came to the head, [James] was a little overwhelmed by trying to make the head in acrylic, so he got some foam board and used that instead. A red LED in the head lights up through translucent red acrylic.

It’s a great little project and [James] has put the Python code up on Github for anyone interested. We’ve had a couple of robot dog projects on the site over the years, like this one and this one.

Continue reading “Building A K9 Toy”

Use The Force To Turn On This Lamp

Holocrons are holographic data storage devices used in the Star Wars universe by both Jedi and Sith as teaching devices or for storing valuable information. After the fall of the Jedi, they became rare and closely guarded artifacts. [DaveClarke] built one to light the room.

[DaveClarke] built the lamp around a Particle Photon – a STM32 ARM-M0 based microcontroller with a Cypress wifi chip. All [Dave] needed for the workings were an IR proximity sensor, a servo and a bunch of super-bright white LEDs. When the sensor detects something, it starts up the system. The servo rotates a gear which raises the lamp and fades in the LEDs. The next time the sensor detects something, the servo lowers the lamp and the lights begin to fade out. And since the Photon is connected to the cloud, the system can be accessed with a web interface as well.

Okay, so it’s just an IR sensor detecting reflected infrared light and not the Force that’s used to turn it on, but it’s still pretty cool. There are plenty of pictures and videos at [DaveClarke]’s site, along with a schematic, 3D printer designs, and the source code. The whole thing was designed using Autodesk Fusion 360 and 3D printed in about 30 hours and press-fits together. A very simple yet clever design. There have been some other great lamps on the site, like this blossoming flower lamp or this laser cut lamp with which also has a unique switch.

Continue reading “Use The Force To Turn On This Lamp”