Irising Chicken Coop Door

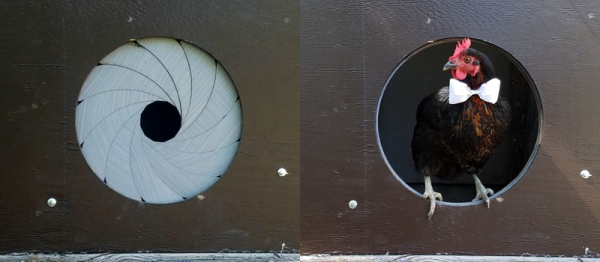
What’s cooler than a door that irises open and closed? Not much. They add a nice science-fictiony detail to any entryway. [Zposner]’s dad wanted an automatic door for his chicken coop, so [zposner] took some time and came up with a nice door for him with an iris mechanism. You’ll need to watch the video.

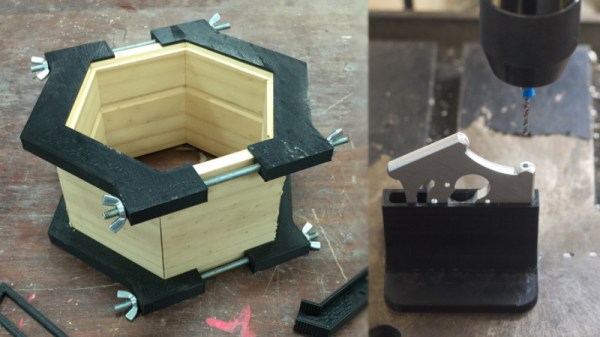
[Zposner] used a combination of laser cutting and a CNC router to cut the pieces, then sanded and painted the wood. After assembly, [zposner] started work on the control mechanism. He’s controlling the door with an Arduino and a motor shield; to let the Arduino know to stop the motor, [zposner] used limit switches which get hit as the mechanism rotates. Once the switches were in the right place and the code written, it was time to finish assembly and install the door on the coop. To keep the Arduino that safe, it was installed in a plastic container with a screw lid, and then hot-glued to beside the iris.

Unfortunately, chickens don’t necessarily care how cool something is, and in this case, they didn’t realize that the iris was a door – they refused to exit the coop through it. [Zposner] tried a few things before settling on putting the chicken on the edge of the door – then the chicken would realize that it could go through it.

[Zposner]’s dad now has a snazzy door that opens with a switch. It was a great project for [zposner] and his dad to work on and, even if the chickens seem unimpressed, they did a great job. Check out the iris porthole that a Detroit Hackerspace built into its door, or, if you really want to build an iris mechanism, but don’t have access to a CNC router, a laser cutter, or, you know, wood, you could build this out of bits you have lying around.

Continue reading “Irising Chicken Coop Door”

The Sound Of (Synthesized) Music

What’s an ADSR envelope generator? If you are a big music hacker, you probably know. If you are like the rest of us, you might need to read [Mich’s] post to find out that it is an attack-decay-sustain-release (ADSR) envelope generator. Still confused? It is a circuit used in music synthesis. You can see a demo of the device in the video below.

Before the Altair–which was sort of the first hobbyist computer you could actually buy–electronics magazines were full of music synthesizer projects that had a lot in common with the analog computers of old. A lot of people took that very seriously and then computers took over the collective consciousness and we found musical hackers started working with (digital) computer-based synthesizers. But the old analog synth designs just won’t die. [Mich’s] ADSR is based on an ancient design, and the amount of information and additions he provides makes it worth a read, even if you don’t fancy building one.

Continue reading “The Sound Of (Synthesized) Music”

Using 3D Printing To Speed Up Conventional Manufacturing

3D printers, is there anything they can’t do? Of course, and to many across the world, they’re little more than glorified keychain factories. Despite this, there’s yet another great application for 3D printers – they can be used to add speed and flexibility to traditional manufacturing operations.

A key feature of many manufacturing processes is the use of fixtures and jigs to hold parts during machining and assembly operations. These must be developed before manufacturing begins and must be custom made to suit the given application. Many manufacturers outsource the development of such fixturing, even in large operations – even major automakers will often outsource development of fixtures and new process lines to outside firms. This can have major ramifications when changes need to be made, introducing costly delays. However, 3D printers can be used to rapidly iterate fixturing designs to suit new parts, greatly reducing development time. As stated in the article, Louis Vuitton uses this to great effect – the reduced time of development is incredibly useful when changing manufacturing lines every few months in the fashion industry.

Obviously there are limitations – in a factory producing large steel castings, it’s unlikely a FDM-printed fixture will be much use when it comes to the wear and tear of machining hundreds of castings a day. However, as a development tool, it can prove very useful. What’s more, jigs for light industrial work – think electronics assembly, woodworking glue-ups, or any form of delicate work by hand – need not be as robust. Lightweight, readily produced 3D printed parts may be just the ticket.

Another great benefit of 3D printing is its ability to be used for mockups. You may be designing a product that requires several aluminium parts to fit together, but alas – the parts won’t be ready for weeks. Rather than wait all that time, only to find out something doesn’t fit right, it may be advantageous to print out a plastic version of the parts. Being able to check geometry with actual parts is often very useful, and makes a great tool if you need to present your work to others. It’s much easier to communicate an idea to people if they can hold and touch what you’re talking about!

It’s something worth considering if you’re setting up any sort of small production line – perhaps you’re looking for a way to make populating a run of PCBs faster, or ease the assembly of a series of distributed sensor modules. These techniques may prove particularly useful if you consider yourself a scrappy hacker.

[Hat tip to George!]

Hackaday Prize Entry: Health-Monitoring Flexible Smartwatch

[Nick Ames]’s Flexible Smartwatch project aims to create an Open Source smartwatch made out of a flexible, capacitive e-ink touchscreen that uses the whole surface of the band. This wraparound smartwatch displays information from the on-board pulse and blood oximetry sensor as well as the accelerometer and magnetometer, giving you a clear idea of how stressed you are about your upcoming meeting.

The display [Nick] went with is called an electrophoretic display (EPD). It’s 400×200-pixels at 115ppi with a 4″ diagonal, and can bend around a wrist. It can draw shapes in 16 shades of gray with a refresh time of under a second or B&W with a faster refresh.

The smartwatch described in [Nick]’s project would be 2.5mm thick — certainly thin enough to fit under a sleeve. We suspect that success of the form factor may hinge on [Nick]’s success in making it not look like a hospital wristband. Although this gives us the thought that a biofeedback-sensing smart wristband is probably the future of hospital stays.

Hydrodipping 101

Style counts, and sometimes all it takes to jazz up the product of a 3D-printer is a 2D printer and a how-to guide on hydrographic printing.

Hydrographic printing, sometimes called hydrodipping, is a process for transferring graphics onto complex-shaped objects in one simple step. A design is printed on a special film which is then floated on the surface of a tank of water. The object to be decorated is carefully dipped into the water right through the film and the design wraps around all the nooks and crannies in one step.

The video tutorial below details the steps to hydrographic printing and outlines how easy the method has become with the availability of water transfer films for inkjet printers. The film is polyvinyl acetate, which is essentially white glue and hence quite soluble in water. The film dissolves and leaves the ink floating on the surface, ready for dipping.

The video lists quite a few tips for optimizing the process for 3D-printed parts and should let you decorate your parts quickly and easily. And once you master the basics, you might want to look at mathematically warping your design to hydrodip complex surfaces.

Continue reading “Hydrodipping 101”

Let’s Play Spot The Fake MOSFET

Recently, the voice push to talk circuit in [Ryan]’s BITX40 radio was keyed down for a very long time. Blue smoke was released, a MOSFET was burnt out, and [Ryan] needed a new IRF510 N-channel MOSFET. Not a problem; this is a $1 in quantity one, but shipping from Mouser or Digikey will always kill you if you only buy one part at a time. Instead, [Ryan] found a supplier for five of these MOSFETs for $6 shipped. This was a good deal and a bad move because those new parts were fakes. Now we have an opportunity to play spot the fake MOSFET and learn that it’s all about the supply chain.

Spot the fake

To be fair to the counterfeit MOSFET [Ryan] acquired, it probably would have worked just fine if he were using his radio for SSB voice. [Ryan] is using this radio for digital, and that means the duty cycle for this MOSFET was 100% for two minutes straight. The fake got hot, and the magic blue smoke was released.

Through an industry contact, [Ryan] got a new, genuine IRF510 direct from Vishay Semiconductors. This is a fantastic opportunity to do a side-by-side comparison of real and counterfeit semiconductors, shown at right. Take a look: the MOSFET on the left has clear lettering, the one on the right has tinned leads and a notched heatsink. [Ryan] posed the question to a few Facebook groups, and there was a clear consensus: out of 37 votes, 21 people chose the MOSFET on the left to be genuine.

The majority of people were wrong. The real chip looked ugly, had tinned leads, and a thinner heatsink. The real chip looked like a poor imitation of the counterfeit chip.

What’s the takeaway here?  Even ‘experts’ — i.e. people who think they know what they’re talking about on the Internet — sometimes don’t have a clue when it comes to counterfeit components. How can you keep yourself from being burned by counterfeit components? Stick to reputable resellers (Mouser, Digikey, etc) and assume that too good to be true is too good to be true.

STM32CubeMX Makes Makefiles

When hardware manufacturers make GUI code-generation tools, the resulting files often look like a canned-spaghetti truck overturned on the highway — there’s metaphorical overcooked noodles and red sauce all over the place. Sometimes we think they’re doing this willfully to tie you into their IDE. Not so the newest version of ST’s graphical STM32CubeMX, which guides you through a pleasant pin-allocation procedure and then dumps out, as of the latest version, a clean Makefile.

Yes, that’s right. This is a manufacturer software suite that outputs something you can actually use with whatever editor, GUI, compiler, or environment that you wish — even the command line. Before this release, you had to go through a hacky but functional script to get a Makefile out of the CubeMX. Now there’s official support for real hackers. Thanks, ST!

If you’re compiling on your own, you’ll need to update the BINPATH variable to point to your compiler. (We use the excellent GNU ARM Embedded Toolchain ourselves, which is super-easy to install on almost any Linux.) If you want to use STM32CubeMX with the Eclipse IDE, [kali prasad yadav] sent us PDF instructions — it’s not hard.

If you doubt that the availability of a free, open, and non-constraining toolchain can matter for a silicon vendor, we’d point to AVR and the Arduino platform that spun off of their support of GCC. Sure, Atmel still pushes their all-in-one wonder, Atmel Studio, which is better than the Arduino IDE by most any metric. But Studio is closed, and Arduino is open. We’d love to see the number of Studio users compared with Arduino users.

Congratulations to ST for taking a big step in the right, open-toolchain, direction.