A man playing a pipe organ through a MIDI keyboard

How To Move A Full-Sized Church Organ From A House To A Museum

As electronics hobbyists we are grateful to our spouses and flatmates who gracefully tolerate all of our weird equipment and chaotic projects in their homes. But it takes a different level of dedication to share one’s home with a pipe organ enthusiast: back in the 1970s, one organist in Bristol went to the effort of installing a full-sized church organ into their house, effectively turning the modest dwelling into one giant musical instrument. Recently however, the house passed on to new owners who, understandably anxious to reclaim some space, listed the whole system on eBay.

A pipe organ installed into an attic
No cash in this attic; just lots of zinc pipes and pneumatic tubing.

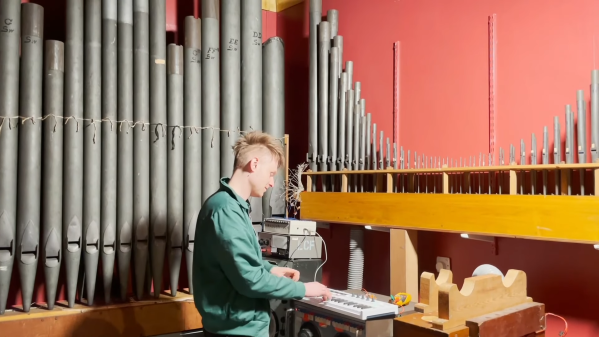
Thankfully, the auction was won not by some scrap metal dealer but by [Look Mum No Computer], our favourite expert on odd musical instruments. He drove out all the way from Kent to help disassemble the organ and stuff the dozens of pipes, miles of cable and numerous valves, tubes, latches and switches into his van. Once back home, he faced the daunting task of reassembling the whole lot into something capable of playing music, which he’s currently documenting in a video series.

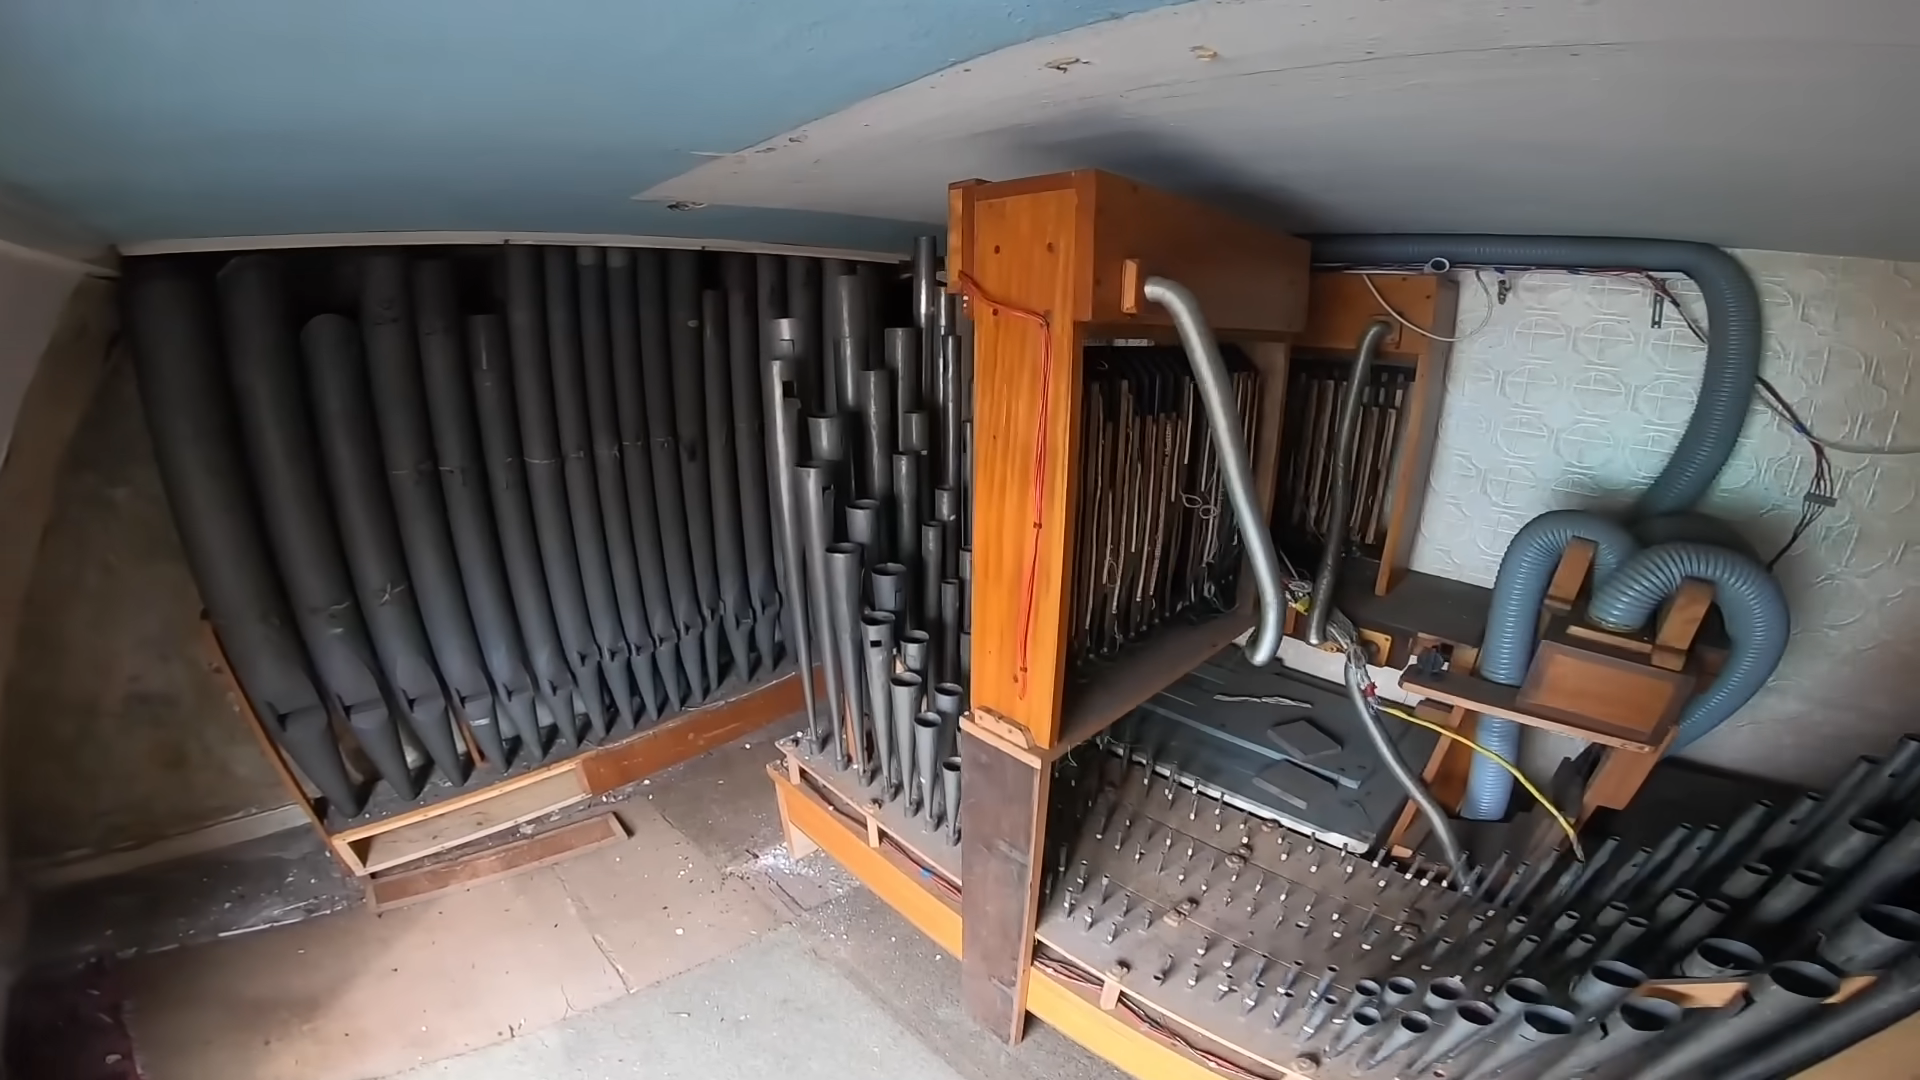
The organ’s new home is This Museum Is (Not) Obsolete, where it has its own room decorated in a style similar to the house it spent much of its life in. The first step to getting it working was to fire up the blower, which is effectively a powerful electric air pump together with a pressure-regulating mechanism. Once this was working, one row of pipes was added to test the actuation system. This consists of a set of solenoids that simply open or close the air supply to each pipe. [LMNC] still had an Arduino-based organ driver system from an earlier project, which allowed him to connect a MIDI keyboard to the partially-complete instrument and play a few notes on it.

There’s still a lot to be done, but we’re definitely impressed by what [LMNC] has achieved so far and can’t wait to see the organ restored to its former glory. We already knew that you could control pipe organs through MIDI, and we’ve seen much smaller organs built from scratch. Thanks for the tip, [hackbyte]! Continue reading “How To Move A Full-Sized Church Organ From A House To A Museum”

A frosted glass disk with geometrical markers

Using A Laser Cutter To Replicate An Optical Comparator Screen

Precision instruments often contain specialized components that are essential to their function, but nearly impossible to replace if they fail. [Andre] had just such a problem with an optical comparator, which is an instrument typically used in machine shops to help check the tolerances of a finished part. It does this by projecting a magnified picture of an object onto a glass screen with markings showing angles and distances.

In the old comparator [Andre] bought on eBay, the markings on the glass had faded to such a degree that the instrument was almost unusable. So he contacted [James] over at Clough42, who was able to create a near-perfect replacement screen by using a laser cutter, as shown in the video embedded below.

The first step was to replicate the screen’s markings in a CAD program. [James] explains the process in Fusion 360, demonstrating how you can generate all the different scales nearly automatically through the proper use of constraints, variables and patterns. He then transferred the drawing to Lightburn, which drives the laser cutter and etches the markings into a sheet of glass covered with CerMark, a marking solution that turns a deep black when heated by a laser.

After etching, the final step was to apply frosting to the glass to turn it into a projection screen. While there are several ways to achieve this, [James] went for a simple spray-based method that gave surprisingly good results. It took a few experiments to find out that etching the markings on the back of the glass and applying the frosting on that side as well gave the best combination of sharpness and durability.

[James]’s project shows that even delicate instruments with custom glass components can be repaired, if you just have the right tools. A similar strategy might also work for creating custom scales for analog meters, or even old radio dials. If you’re not familiar with laser cutters, have a look at our experiments with an Ortur model. Thanks for the tip, [poiuyt]!

Continue reading “Using A Laser Cutter To Replicate An Optical Comparator Screen”

A purple PCB with many DIP chips including a 6502

Hackaday Prize 2022: Reuse Those DIP Chips To Make A 1980s-Style Single-Board Computer

With the Great Chip Shortage still delaying deliveries of new components, now might be a good time to look around your lab and inspect those piles of chips that you thought “might come in handy one day”. Chances are you’ll find a good stack of 74xx series logic, once ubiquitous but today mostly obsolete thanks to powerful microcontrollers and FPGAs. It would be a shame to let them go to waste, so why not use them to make a neat 1980s-style computer?

With this idea in mind, [Anders Nielsen] designed the ABN6502: a single-board computer based on the venerable 6502 processor, but with relatively modern interfaces like a VGA monitor output, a PS/2 keyboard connector and even a wireless module to simplify firmware uploads from a PC. One design requirement was to minimize the number of new components needed; the average hacker interested in building the ABN6502 will probably have many of the chips lying around somewhere in their workshop.

The component list reads like a typical bill of materials for a 6502-based computer, but comes with a lot of flexibility to allow for part subsititution. For the CPU, both the classic NMOS 6502 as well as the modern CMOS-based 65C02 are supported, along with their 6522 companion chip that provides I/O ports and timers. A ROM socket can hold either modern, fast flash chips or traditional but slow UV-erasable EPROMs.

Instead of using DRAM chips with their complicated refresh requirements, [Anders] went for 32 KB of SRAM to implement the main memory; unaffordable in the ’80s but easily available today. Standard 74xx series logic chips glue all the components together, again with several options to add or remove features as the user prefers. Pin headers bring out the I/O ports for easy connection to external peripherals.

The ABN6502’s software library is currently limited to a bootloader, but a complete development toolchain based on the CC65 compiler should make it easy to develop all kinds of programs on this platform. We’ve already featured the clever wireless ROM flashing system, as well as a demonstration of the 6502 driving RGB LEDs.

Continue reading “Hackaday Prize 2022: Reuse Those DIP Chips To Make A 1980s-Style Single-Board Computer”

A modified Ghostbusters Proton Pack

Track Down Ghosts In Your WiFi With The Pwnton Pack

If there’s something weird in your Network Neighborhood, who you gonna call? If you want your WiFi troubles diagnosed in style, try calling [Travis Kaun] — he might just show up wearing the amazing Pwnton Pack. Built from a replica Proton Pack similar to those used in the 1984 classic Ghostbusters, it’s a portable wireless security diagnostics kit that should be able to pinpoint any weaknesses in your wireless network.

Inside, it’s got a Mark VII WiFi Pineapple, which is a portable device designed for security testing purposes, as well as a Raspberry Pi running Pwnagotchi: a deep learning-based WiFi sniffer that aims to capture those network packets that help maximize your chances of brute-forcing the WPA key. These two devices are connected to an array of antennas, including a cool rotating 5 GHz panel antenna to scan the surrounding area.

Naturally, the Pwnton Pack also includes a Neutrona Wand, which in this case contains a 2.4 GHz Yagi antenna hooked up to an ESP32 programmed to perform deauthentication attacks. An Arduino Nano drives an LED matrix that shows scrolling Pac-Man ghosts, while a dedicated sound board provides movie sound effects. The whole system is powered by three LiPo battery packs, and can even be remotely operated if desired.

Sadly, it doesn’t come with one of those ghost traps to suck up wayward WiFi networks, but the range of tools available should help to catch any kind of weird phantoms hiding in your system. We’ve spotted a few Proton Packs before, but never one with such advanced functionality. Security testing systems tend to be a bit less conspicuous, after all. Continue reading “Track Down Ghosts In Your WiFi With The Pwnton Pack”

A multi-PCB setup to drive a CRT vector monitor

Color Vector Display Controller Brings Arcade Classics Back To Life

If you’ve been reading Hackaday long enough, you’ve probably come across a few hacks where someone made simple animations or even video games on an analog oscilloscope screen. Those hacks generally use vector graphics, where the cathode ray tube’s electron beam directly draws geometric shapes onto the screen. This gives the image a unique look that’s quite distinct from the pixel-based raster displays used on TVs and most computer monitors.

Vector displays were also used in several arcade machines of the early 1980s, including classics like Tempest, Gravitar and Star Wars. In order to emulate these games more faithfully than would be possible on a raster monitor, [Robin Champion] designed the vstcm: a color vector monitor controller to easily drive RGB vector monitors.

Star Wars (1983) displayed on CRT monitorThe design is based on [Trammell Hudson] and [Adelle Lin]’s v.st system, and therefore features a Teensy microcontroller as well as a couple of digital-to-analog converters. While the v.st can only connect to monochrome X/Y systems like oscilloscopes, the vstcm can work with RGB monitors to allow near-perfect emulation of color vector-based games. A custom software interface connects the vstcm to AdvanceMAME, a special version of the well-known arcade emulator that facilitates the connection of unusual display systems.

The end result definitely looks the part, although [Robin] notes that performance is not at the level it could be and requests those familiar with the Teensy platform to help optimize the code. If you’d like to build the vstcm but can’t find a vector monitor, you can always modify the yoke of a conventional CRT. Want to learn more about vector displays? Check out this thorough introduction.

A fusion splicer being used to repair an optical fiber

Using A Fusion Splicer To Repair A Samsung TV’s Cable

Some Samsung TVs come with a system called One Connect, where all external cabling is connected to a separate box so that only one small signal cable goes to the TV. In some versions, the cable linking the TV with its Connect Box is a pure fiber optic cable that’s nearly transparent and therefore easy to hide.

Thin fiber optic cables are fragile however; when [Elecami Wolf] got one of these TVs for a very low price it turned out that this was because its One Connect cable had snapped. Replacement cables are quite expensive, so [Elecami Wolf] went on to investigate the inner workings of the fiber optic cable and figured out how to repair a broken one.

The cable consists of four pairs of plastic-coated glass fibers, which are attached to receivers and transmitters inside the thick connectors on either end. Repairing the cable required two things: figuring out which fibers should connect to each other, and a reliable way of connecting them together.

The first was difficult enough: a simple 1:1 connection didn’t work, so it took a bit of work to figure out the correct connection setup. One clever trick was pointing a camera at a working cable and comparing the flashing lights at each end; this helped to identify the right order for two of the four pairs. For the other two, a combination of reverse-engineering the electronic circuits and some systematic trial-and-error yielded a complete wiring diagram.

For the second part, [Elecami Wolf] called on a fiber optic expert who lent him a fusion splicer. This is a rather neat piece of equipment that semi-automatically brings two pieces of fiber together and welds them with an electric arc. Once this was complete, it was a matter of covering the splices to protect them from sharp bends, and the fancy TV was working again.

Although not everyone will have access to a multi-mode fusion splicer machine, [Elecami Wolf]’s videos provide fascinating insights into the workings of modern fiber-optic based consumer electronics. This might be the first fiber-optic splicing attempt we’ve seen; but if you’re trying to hook up an optical fiber to your circuit, this ball lens setup is a neat trick.

Continue reading “Using A Fusion Splicer To Repair A Samsung TV’s Cable”

A wooden picture frame with an e-ink display

Receive Virtual Postcards On This Beautiful E-Ink Photo Frame

Sending postcards to loved ones used to be standard procedure for travelers back when travel was glamorous and communications were slow. While some travelers still keep this tradition alive, many have replaced stamps and post offices with instant messaging and social media — faster and more convenient, but a lot less special than receiving a postcard with a handwritten message from a faraway land.

[Cameron] designed a postcard picture frame that aims to bring back a bit of that magic. It’s a wooden frame that holds an e-ink display, which shows pictures sent to it by your friends. All they need to do is open the unique link that you sent them beforehand and upload an interesting photo; the picture frame will cycle through the submissions based on an adjustable schedule. A web interface allows you to change settings and delete any inappropriate images.

A black PCB with an ESP32 mounted on itThe wooden frame is beautifully made, but the sleek black PCB inside is an true work of art. It holds a battery and a USB-C charging circuit, as well as an ESP32 that connects to WiFi, stores images and downscales them to the 800×480 monochrome format used by the display. [Cameron] has not accurately measured the current consumption, but estimates that it should work for about one year on a single charge thanks to the extremely low power requirements of e-ink displays.

Having your friends decide on the images shown in your house is an interesting idea, if you can trust them to keep it decent. If you like to have more control over your e-ink display, have a look at this solar-powered model or this wall-mounted newspaper display.

Continue reading “Receive Virtual Postcards On This Beautiful E-Ink Photo Frame”