Tiny Two-Legged PCB Robot

YouTuber and electronics engineer [Carl Bugeja] has a knack for finding creative uses for flexible PCBs. For the past year, he has been experimenting with PCB motors, using them on drones, robot fish, and most recently swarm robots. This is his final video in the vibro-bot series, and he’s got his best results to date. (Embedded below.)

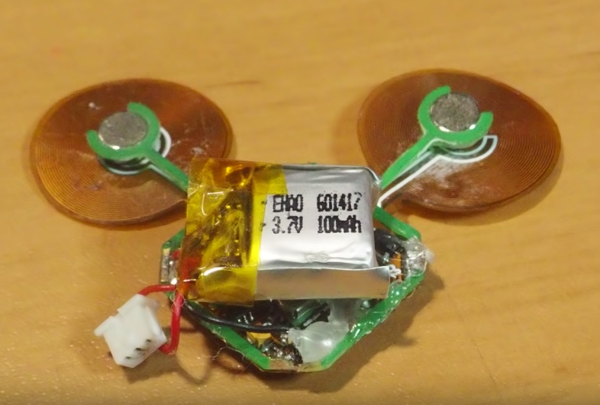
He started off with flexible PCB actuators as robotic legs and magnets fitted into 3D-printed shells. The flexible PCB actuators work as inefficient electromagnets, efficient enough to react to a magnet when a current runs through, but not so efficient that they don’t release immediately.

The most recent design uses a rigid 0.6 mm FR4 PCB that acts as the frame to prevent the middle of the robot from bending. The “brain” of the robot is located at its center, which is connected to the flexible PCB actuators. Since the biggest constraint on his past robots was weight, he removed two of the legs to reduce the weight by 20%, resulting in straighter walks. He also added a Bluetooth module to wirelessly control the robot and replaced his old LiPo with a new, lighter battery (28 mAh, 15 C, 420 mA).

His latest video now shows that the robot is able to move forwards, backwards, and side to side. That’s a huge improvement over his previous attempts, which mostly resulted in the robot vibrating in place or flopping around his workbench. It’s not going to fetch you a beer, but it’s really cool.

Continue reading “Tiny Two-Legged PCB Robot”

Electric Vehicles On Ice

This winter, a group of electric vehicle enthusiasts, including [Dane Kouttron], raced their homemade electric go-karts on the semi-frozen tundra nearby as part of their annual winter tradition. These vehicles are appropriately named Atomic Thing and Doom Sled, and need perfect weather conditions to really put them to the test. You want a glass-like race track but snowfall on ice freezes into an ice-mush intermediate that ends up being too viscous for high-speed ice vehicles. The trick is to watch for temperatures that remain well below zero without snow-like precipitation.

The group is from the community makerspace out of MIT known as MITERS and already have EV hacking experience. They retrofitted their VW Things vehicle (originally built for a high speed electric vehicle competition) to squeeze even more speed out of the design. Starting out with an 8-speed Shimano gearbox and a 7kW motor, they assembled a massive 24S 10P battery out of cylindrical A123 cells salvaged from a Prius A123 Hymotion program. This monster operates at 84V with a 22AH capacity, plenty for power for the team to fully utilize the motor’s potential.

The battery is ratchet strapped to the back of the Atomic Thing to provide more traction on the ice. It must feel just like riding on top of a different kind of rocket.

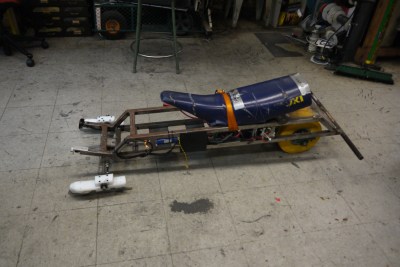
They tried using ice skates in the front of the Atomic Thing, but the steering was difficult to control over rough ice. Studded solid tires perform quite well, resulting in less jarring movement for the driver. Doom Sled is a contraption built from a frame of welded steel tube and a mountainboard truck with ice skate blades for steering. The motor — a Motenegy DC brush [ME909] — was salvaged from a lab cleanout, transferring power to the wheels through a chain and keyed shaft. The shaft-to-wheel torque was duly translated over two keyed hub adapters.

Doom Sled with seat strapped on

The crew fitted a seat from a longscooter and made a chain guard from aluminum u-channel to keep the flying chain away from the driver’s fingers. The final user interface includes a right-hand throttle and a left-hand “electric brake” (using resistors to remove the stored energy quickly to combat the enormous inertia produced by the vehicle).

Overall, ice racing was a success! You can see the racing conditions were just about perfect, with minimal ice mush on the lake. Any rough patches were definitely buffered smooth by the end of the day.

Continue reading “Electric Vehicles On Ice”

Spain’s First Open Source Satellite

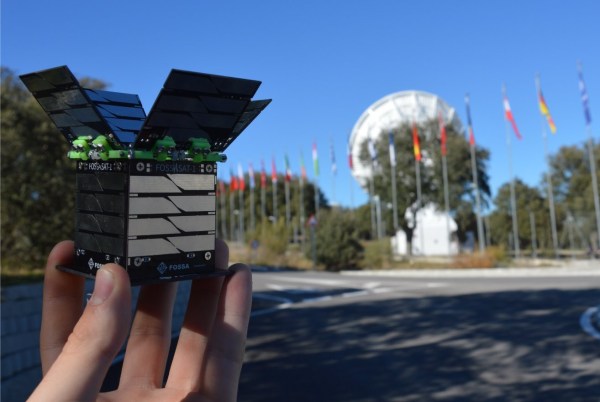
[Fossa Systems], a non-profit youth association based out of Madrid, is developing an open-source satellite set to launch in October 2019. The FossaSat-1 is sized at 5x5x5 cm, weighs 250g, and will provide free IoT connectivity by communicating LoRa RTTY signals through low-power RF-based LoRa modules. The satellite is powered by 28% efficient gallium arsenide TrisolX triple junction solar cells.

The satellite’s development and launch cost under EUR 30000, which is pretty remarkable for a cubesat — or a picosatellite, as the project is being dubbed. It has been working in the UHF Amateur Satellite band (435-438 MHz) and recently received an IARU frequency spectrum allocation for LoRa of 125kHz.

The satellite’s specs are almost as remarkable as the acronyms used to describe them. The design includes an onboard computer (OBC) based on an ATmega328P-AU microcontroller, an SX1278 transceiver for telecommunications, and an electric power system (EPS) based on three SPV1040 MPPT chips and the TC1262 LDO. The satellite also uses a TMP100 temperature sensor, an INA226 current and voltage sensor, a MAX6369 watchdog for single-event upset (SEU) protection, a TPS2553 for single-event latch-up (SEL) protection and various MOSFETs for the deployment of solar panels and antennas.

Up until this point the group has been tracking adoption of LoRa through the use of weather balloons. The cubesat project plans to test the new LoRa spread spectrum modulation using less than $5 worth of receivers. Ultimately with the goal of democratizing telecommunications worldwide.

The satellite is being built in a cleanroom at Rey Juan Carlos University and has undergone thermovacuum and vibration testing at the facility. The group has since developed an educational satellite development kit, which offers three main 40×40 mm boards that allow the addition of modifications. As their mission states, the group is looking to develop an open source project, so the code for the satellite is freely available on their GitHub.

Continue reading “Spain’s First Open Source Satellite”

Reflecting On Margaret Hamilton: 50 Years After Apollo 11

In celebration of the 50th anniversary of the first Apollo moon landing, Google created a 1.4-square-mile portrait of NASA software developer Margaret Hamilton using more than 107,000 mirrors from the Ivanpah Solar Facility in the Mojave Desert, a solar thermal power plant with a gross capacity of 392 megawatts.

The fields of heliostat mirrors (173,500 in total) ordinarily focus sunlight on receivers located on the solar power towers, which subsequently generate steam to drive steam turbines. The facility was first connected to the electrical grid in September 2013 before formally opening in February 2014, during which it was the world’s largest solar thermal power station. Ivanpah was developed by BrightSource Energy and Bechtel, with Google contributing $168 million towards its $2.2 billion in costs. Google no longer invests in the facility, however, due to the decline of the price of photovoltaic systems.

The facility has historically taken steps to avoid disrupting the natural wildlife, which includes desert tortoises. The effect of mirror glare on airplane pilots, water concerns, and collisions with birds has also been addressed by the operators of the installation.

According to Google, the image was larger than Central Park and could be seen a mile above sea level. The mirrors are all attached to a rotating mount that maneuvers the mirrors in order to create lighter and darker shades to make up the image.

The Apollo 11 mission, manned by Buzz Aldrin, Neil Armstrong, and Michael Collins, was the first to bring humans to the moon in 1969. Hamilton‘s role in the team included programming the in-flight software for all of NASA’s Apollo missions. She had also worked on satellite tracking software for the Air Force through Lincoln Lab (started by the Massachusetts Institute of Technology) and later joined the Charles Stark Draper Laboratory. It was, however, her work on creating computer systems to predict and track weather systems for use in anti-aircraft air defenses that made her a candidate for a lead developer role at NASA.

Continue reading “Reflecting On Margaret Hamilton: 50 Years After Apollo 11”

The March Toward A DIY Metal 3D Printer

[Hyna] has spent seven years working with electron microscopes and five years with 3D printers. Now the goal is to combine expertise from both realms into a metal 3D printer based on electron-beam melting (EBM). The concept is something of an all-in-one device that combines traits of an electron beam welder, an FDM 3D printer, and an electron microscope. While under high vacuum, an electron beam will be used to fuse metal (either a wire or a powder) to build up objects layer by layer. That end goal is still in the future, but [Hyna] has made significant progress on the vacuum chamber and the high voltage system.

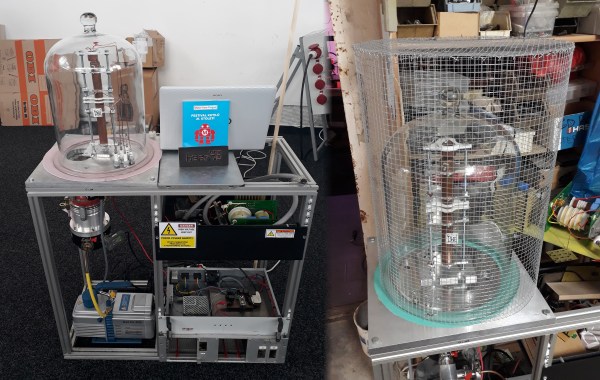
The device is built around a structure made of 80/20 extruded aluminum framing. The main platform showcases an electron gun, encased within a glass jar that is further encased within a metal mesh to prevent the glass from spreading too far in the event of an implosion.

The design of the home-brewed high-voltage power supply involves an isolation transformer (designed to 60kV), using a half-bridge topology to prevent high leakage inductance. The transformer is connected to a buck converter for filament heating and a step up. The mains of the system are also connected to a voltage converter, which can be current-fed or voltage-fed to operate as either an electron beam welder or scanning electron microscope (SEM). During operation, the power supply connects to a 24V input and delivers the beam through a Wehnelt cylinder, an electrode opposite an anode that focuses and controls the electron beam. The entire system is currently being driven by an FPGA and STM32.

The vacuum enclosure itself is quite far along. [Hyna] milled a board with two outputs for a solid state relay (SSR) to a 230V pre-vacuum pump and a 230V pre-vacuum pump valve, two outputs for vent valves, and inputs from a Piranni gauge and a Cold Cathode Gauge, as well as a port for a TMP controller. After demoing the project at Maker Faire Prague, [Hyna] went back and milled a mold for a silicone gasket, a better vacuum seal for the electron beam.

While we’ve heard a lot about different metal 3D printing methods, this is the first time we’ve seen an EBM project outside of industry. And this may be the first to attempt to combine three separate uses for an HV electron beam into the same build.