Raspberry Pi Brings New Life To Some Old Dinosaurs

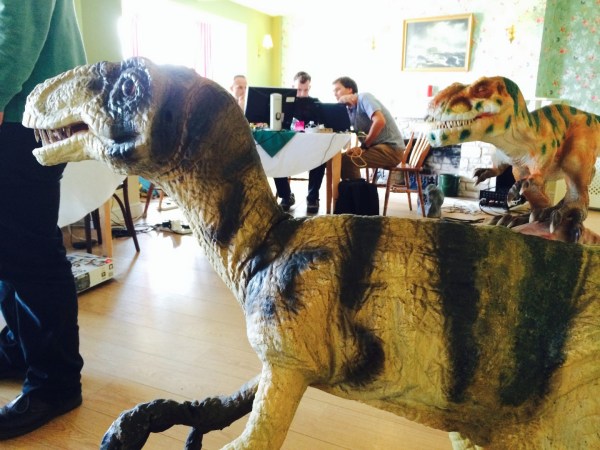
Reprogramming the behaviors of a person-sized animatronic dinosaur would have to be among the coolest opportunities to be presented with… This is exactly what [Dr. Lucy Rogers] and a group of fellow techies were tasked to accomplish for the Blackgang Chine park located on the Isle of Wight in the UK.

dino1
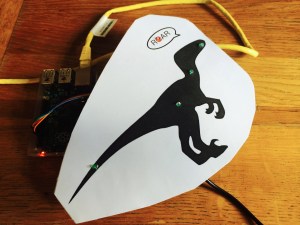
Before the group arrived, the native dinos didn’t do much else than run a preprogrammed routine when triggered by someone’s presence… which needless to say, lacks the appropriate prehistoric dynamism. Seeing that their dated wag, wiggle, and roar response could use a fresh breath of flair, the park’s technical projects coordinator [Mark Butler] began adapting one of the dinosaur’s control boxes to work with a Raspberry Pi. This is when [Lucy] and her group were called upon for a two-day long excursion of play and development. With help and guidance from Raspberry Pi expert, [Neil Ford], the group learned how to use a ‘drag and build’ programing environment called node-RED in order to choreograph new movement sequences for two of the smaller dinosaurs provided for use. The visual nature of node-RED helped those of the Blackgang staff with little programming experience understand the code at work, which aided in their training. Now they can reprogram the dinosaurs with new actions on the fly if needed.

The Pi in the end turned out to be a cost-effective solution which will give the robot dinosaurs a longer, more fulfilling lifespan to roar and frolic on their island home. Check out this video by [Debbie Davies] to see more…

Thanks Ed, for spotting this one!

Continue reading “Raspberry Pi Brings New Life To Some Old Dinosaurs”

This Home-Made 6-Axis Robotic Arm Is Quite The Looker

With a background in software engineering, [Kris Temmerman] decided to make a physical demonstration of his knowledge in the form of a six axis robotic arm… the final product is a delicious display of mechanical eye candy.

Built from mostly aluminum stock, [Kris] machined the bulk of his parts with a CNC mill which he picked up for cheap from China. These custom pieces coupled with some hefty stepper motors ensure the arm’s accuracy as it twists freely and slides along the gantry it’s mounted to. Though the majority of the arm is metal, the hand at the end of his robot was built with 3D printed parts and can be switched out with the future attachments [Kris] plans to design. This classic gripper piece is driven separately with its own Arduino brain controlling the individual servos in the fingers. loadcels

Each finger includes some load bearing sensors which [Kris] harvested from an old scale so that the gripper can tell whether or not it has a hold of an object without crushing it. To orchestrate the robot’s movement, he wrote some nice looking software in C++ which visualizes the inverse kinematics at work in each point of articulation. For the sake of demonstrating his creation in action, he whipped up a basic demo that can locate and move colored blocks laid at random on a surface. A small camera mounted on the hand determines the orientation of the blocks relative to the machine so that the wrist can rotate itself in the proper alignment in order to pick them up.

[Kris] documented the build of his robot in a fascinating speed video which includes footage of the finished arm in action at the end:

Continue reading “This Home-Made 6-Axis Robotic Arm Is Quite The Looker”

Giving Life To An Undead Baby Doll

If carving a pumpkin this month is too passé for you, take a shot at [Jason Suter’s] instructable and build an animatronic legless zombie child that will surely creep out anyone who has a fear of dolls or other vacant-faced toy babies.

Beginning with a sacrificial doll, [Jason] dismembers all of the limbs and head from the torso in order to make room for the robotic upgrades. The servo motors which animate the new wooden dowel bones are mounted to a chassis cut with a CNC machine. [Jason’s] instructions include some nice diagrams demonstrating how the points of articulation at the shoulders and elbows work in conjunction to produce different flavors of crawling and dragging.

FWFSZPYI0LDVY63.LARGEFFU405MI0LDVY54.LARGE

To top it off, the head is attached to its own mounting plate with tendons that rock back and forth in a miserable undead sort-of fashion. As an added nicety, he explains how to install a bluetooth module into the circuitry so he can tweak and upload his example code to the Arduino brain remotely without needing to get his hands near it. There is of course some additional melting, painting, and doll torture required to achieve that rough-up undead look… but that’s all just icing on top of a well executed piece of animatronics.

In his video [Jason] gives us an overview of his zombie’s build and also shows it in action:

Continue reading “Giving Life To An Undead Baby Doll”

Cassette Tape Hack Turns Scratching Into Sliding

It’s common to see a DJ use a turntable as a musical instrument. Physically manipulating a record while its playing produces its own unique sound, but it takes some finesse and puts strain on the delicate workings of the player when you do it. With this in mind, [Jeremy Bell] has refreshed the notion of appropriating old technology to create new sound with his home-brewed scrubboard.

Making use of a cassette tape, [Jeremy] dissected samples from the reel and laid them out in horizontal strips over rails to hold their form. The pickup from the tape player has been hacked into a separate piece that glides smoothly over these rails, giving the user the ease of control. To produce the immediate cutting effect that is less easy to perform with his device than a record player, [Jeremy] created an on and off switch which is simply a close pin covered in foil that teeters over a metal contact (in this case a coin). The end product sounds exactly like scratching a record, but better because he’s doing it with hacker showmanship. One can only image the awesome potential for more elaborate setups having multiple tape samples and the like!

There are a few different videos of the scrubboard in use on [Jeremy’s] website. He is also running a Kickstarter right now in order to turn the project into a stand alone instrument with improved features.

Thanks Omar, for telling us about this cool re-envisionment!

Continue reading “Cassette Tape Hack Turns Scratching Into Sliding”

Your New Winter Hat Should Express Your Brain Waves Like A Neon Sign… Just Saying

We’ve seen a few cool hacks for mainstream commercial EEG headsets, but these are all a tad spendy for leisurely play or experimentation. The illumino project by [io] however, has a relatively short and affordable list of materials for creating your own EEG sensor. It’s even built into a beanie that maps your mental status to a colorful LED pompom! Now that winter is around the corner, this project is perfect for those of us who want to try on the mad scientist’s hat and look awesome while we’re wearing it.

How does all the neuro-magic happen? At the heart of [io’s] EEG project is a retired Thinkgear ASIC PC board by Neurosky. It comes loaded with fancy algorithms which amplify and process the different types of noise coming from the surface of our brain. A few small electrodes made from sheets of copper and placed in contact with the forehead are responsible for picking up this noise. The bridge between the electrodes and the Thinkgear is an arduino running the illumino project code. For [io’s] tutorial, a Tinylilly Arduino is used to mesh with the wearable medium, since all of these parts are concealed in the folded brim of the beanie.

eegBeanie3

In addition, a neat processing sketch is included which illustrates the alpha, beta, gamma, and other wave types associated with brain activity as a morphing ball of changing size and color. This offers a nice visual sense of what the Neurosky is actually reading.

If all of your hats lack pompoms and you can’t find one out in the ether that comes equipped, fear not… there is even a side tutorial on how to make a proper puff-ball from yarn. Sporting glowing headwear might be a little ostentatious for some of us, but the circuit in this project by itself is a neat point of departure for those who want to poke around at the EEG technology. Details and code can be found on the illumino Instructable.

Thanks Zack, for showing us this neat tutorial!

Continue reading “Your New Winter Hat Should Express Your Brain Waves Like A Neon Sign… Just Saying”

This Analog Cambot Plays Outside The Lines

There are quite a few flavors of line following robot. No matter how they’re made, most are built for speed and accuracy. The Cambot by [Jorge Fernandez] however makes use of a traditional video camera to read visual input instead of the reflective sensors we’re used to seeing in these types of robots. Because of this it lacks those swift and agile qualities, but scores points with its unique analog design, over-sized tricycle wheels, and stylish RCA jacks poking out on the side.

Coupled with a PIC 16F84A microcontroller, [Fernandez] divides the video input from the camera into 625 lines. The PIC is responsible for scanning horizontally across these lines and translating the proportions of black and white into PWM pulses. The duration these proportions are seen by the camera determines the PWM frequency fed to the left and right servo motors driving the robot.

As far as line-followers go, this is a refreshing retro approach to the concept. [Hernandez] outlines the finesse about driving his cambot on his blog (an English translation can be read here) and provides a complete schematic for those who are interested in whipping up their own quirky little machine.

Continue reading “This Analog Cambot Plays Outside The Lines”

Creating A 2D Film With 3D Printed Frames

In the early days of film, there was a time when French 3D Cinema was called “Relief Cinema”. The word, Relief, however brings the idea of something physical to mind when we hear it, which is why the name was later tweaked to include the more intangible term, 3D. Playing on this fact, French Artist [Julien Maire] has designed and built an over-sized projector for his installation titled “Relief“, that creates an animation by passing light through a series of individual 3D vignettes.

[Julien’s] intricately built projection reel in itself is an impressive mechanical feat, arguably out-staging the image it exists to produce on the wall of the gallery space. The eighty-five individual frames that create the short clip of a man digging a hole in the ground, consist of small figurines made with a stereo lithography printer. The semi-transparent nature of the resin used by the SLA printer gives the shadow cast by the projector a series of foggy-values that create a three dimensional appearance instead of merely casting a silhouette of the shape. This installation blends new and old technologies together to produce something we’re familiar with, but leaves us admiring an object that we’ve never seen before.

film-without-film-3d-printing-12

[Julien’s] “Relief” is currently being exhibited at iMAL (interactive Media Art Laboratory in Brussels) which will run throughout the month of October. If you happen to find yourself on a long stay in Europe before the Hardware Workshop in Munich, you could make a pitstop and check it out!