Chiptunes Via USB MIDI With The AY-3-8910

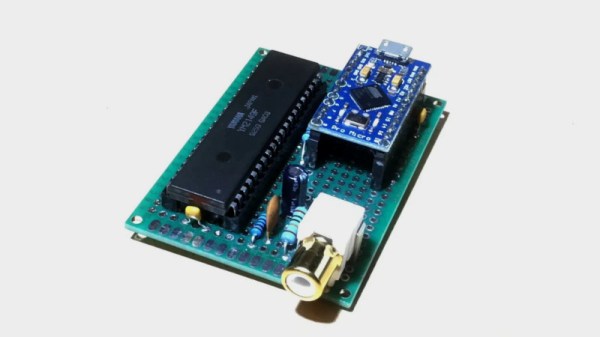
There are many venerable soundchips in the chiptune pantheon, of which the AY-3-8910 is perhaps one of the lesser known. Having not served on active duty for Nintendo or Commodore it’s somewhat unloved in the USA, but it made its name in a variety of arcade and pinball machines and has quite a European following due to its appearance in machines bearing the Amstrad and Sinclair names. [TheSpodShed] decided to whip up a USB MIDI interface for the chip, with the help of the Arduino Pro Micro.

The Arduino Pro Micro is a Sparkfun creation, using the ATmega32U4 microcontroller. Its USB MIDI functionality makes it a perfect candidate for such a build, and it also packs enough digital IO to run the AY-3-8910, with 13 lines required to get things going. [TheSpodShed] whipped up the project on protoboard, with only a few passives needed along with the sound chip and Arduino.

The Arduino code was written with an eye to making the most of the chip’s limited polyphony. The synth prioritises the most recent received notes, while also aiming to keep the highest and lowest of the currently requested notes still playing where possible. This gives the synth the best chance of keeping the expected bass and melody intact when playing a wide variety of MIDI content.

It’s a tidy build, and one that shows some love for a soundchip some have forgotten. Of course, it’s not the only option – we’ve also seen the SAM2695 and YM2612 given the same treatment. Video after the break.

Continue reading “Chiptunes Via USB MIDI With The AY-3-8910” →
Driving A Big RC Car On The Ceiling

RC cars are a great way to have fun hooning around. There’s plenty of laughs to be had racing your friends in the local grocery store carpark, ideally after hours. [Ivan Miranda] wanted to go in a different direction, however – and that direction was up. (Video embedded after the break.)

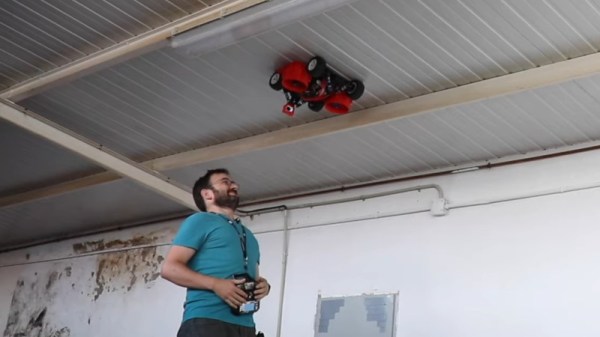
There are existing toys that can pull off a wall-riding feat, but they’re normally on a fairly small scale. [Ivan] wanted to go big, and so outfitted some seriously powerful brushless fans on to his 1/8th Rattler buggy from Hobbyking. After initial failure, a smaller scale model was successfully built and tested, before it was realised the full-sized build had the propellers on backwards.

With this oversight fixed, the car was able to drive on the ceiling, albeit in the limited space between the roof beams. It was somewhat less viable on the wall, struggling to stay stuck and having issues with suspension flex.

Overall, it’s a great application of mass brushless power to fight gravity – the same principle behind the multirotors we all love so much. [Ivan]’s put the same trick to use for getting around on a skateboard, too. Video after the break.

Continue reading “Driving A Big RC Car On The Ceiling” →

Dreamcast Gets A Plug-n-Play Hard Drive Mod

The Dreamcast was a proud moment for Sega, at least initially, being the first console to launch of a new generation. Unfortunately this didn’t translate into massive sales, and the plug was pulled far earlier than expected. The console retains a dedicated fanbase to this day however, who continue to tinker with the hardware. [DreamcastChannel] is one of them, and put together a nifty plug-and-play hard drive mod.

The mod is based on earlier work, which consisted of manually soldering the 44 lines of an IDE cable on to the main Dreamcast motherboard. This allowed an IDE hard drive to be neatly mounted inside the shell, but [DreamcastChannel] knew it was possible to do better.

Starting from scratch, the GDROM optical drive assembly is gutted, leaving just its metal case and PCB. The IDE cable for the hard disk is then soldered to the pads on the PCB. A 3D printed mount is used to fix the hard drive to the metal case. This allows the entire assembly to slot neatly into the Dreamcast, using the GDROM’s original connector.

It’s a hack that makes putting a hard drive into the Dreamcast neat and tidy. Combined with a hacked BIOS and Dreamshell, it makes playing backup games a breeze. We’ve seen plenty of Dreamcast hacks before, too – the VMU is often a key candidate for attention. Video after the break.

Continue reading “Dreamcast Gets A Plug-n-Play Hard Drive Mod” →

Lego-Powered Sub Built In A Water Jug

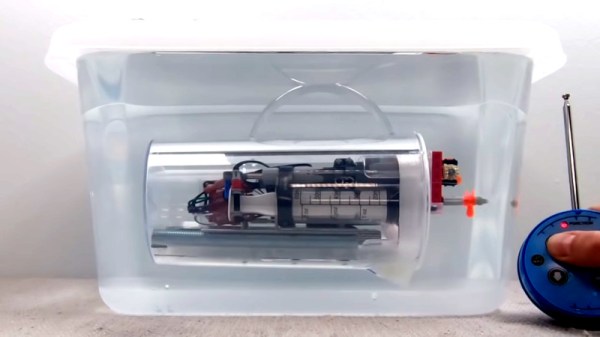
Submarines are universally considered cool, but bring several challenges to the RC modeller that aren’t there with land and air builds. Water ingress can ruin your project, and there’s always the possibility of it sinking to the bottom, never to return. That didn’t phase [Brick Experiment Channel], however, and thus a Lego sub was born. (Video embedded below the break.)

The sub uses a water jug as a hull. The video steps through the process of sealing the hull itself, before dealing with sealing the rotating propeller shafts. A large syringe is used as a ballast tank, with Lego motors used to actuate the tank and provide propulsion and steering. An existing RC submarine is cannabilized for parts, providing the necessary radio control hardware.

In testing, the sub performs admirably, with a few final tweaks necessary to improve the performance of the propellers. It’s not winning any races anytime soon, but it’s a functional underwater explorer that we’d love to take down the lake ourselves sometime.

We’ve seen Lego subs built before, even including missiles.

Continue reading “Lego-Powered Sub Built In A Water Jug” →

3D Printing A NAS Server Case

It’s good to back up, and despite that, few of us do. [Brian] we suspect is of the more diligent persuasion, given his strong enthusiasm for network attached storage. Recently, he found himself looking for a new case for his DIY build, and decided to go the 3D printed route.

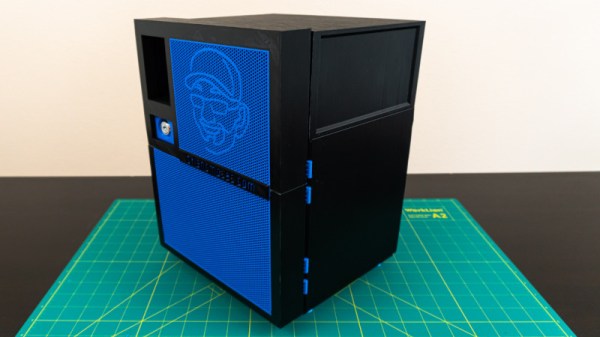
The case is the design of one [Toby K], who sells the design online. [Brian] set out to produce the case himself using a Prusa i3, investing much time into the process. Total print time for theĀ successful parts alone was over 227 hours, not including the failed parts and reprints.

Assembly caused some headaches, with various hinges and dovetails not fitting together perfectly first time. Not one to shy away from some proper down and dirty making, [Brian] was able to corral the various parts into fitting with a combination of delicate hammering, filing, and reprinting several broken pieces.

Overall, accounting for the filament used and hardware required, [Brian] spent over $200 producing the case. For those who just need a housing for their NAS, it doesn’t make a whole lot of financial sense. But for those who enjoy the build, and like the opportunity to customize their case as they see fit, the time and money can certainly be worth it. As [Brian] states, there aren’t too many cases on the market that ship with his logo on the grill.

We’ve seen other 3D printed case builds before, too. Video after the break.

Continue reading “3D Printing A NAS Server Case” →

Build Your Own LED Glow Poi

Spinning poi is an entertaining pastime, and LEDs can make a great addition to the experience. [MilanDer] built some LED poi of their very own, using a few maker staples along the way.

A 3D printed enclosure is first created, using “clear” PLA that in practice produces translucent white parts. This acts as a great diffuser for the APA102 LEDs inside. The LEDs are driven by an Arduino Pro Mini, which is fitted inside the enclosure along with a buck-boost converter, lithium battery and charge board. Finally, a strap is added to allow the poi to be spun easily by the user.

The visual effect is great, and through the use of an infrared receiver, the poi can be remotely controlled to deliver different RGB animations at the touch of a button. We’d love to see a group of spinners with synchronized colored poi thanks to a master controller, and this hardware would be more than capable of the task.

We’ve seen some advanced networked Poi before, too. If you’ve got a great LED build, be sure to let us know.

Familiar Parts Make Interfacing Weather Station Easy

Hackers love to measure things, and enjoy monitoring the world around them. Weather stations are a big part of this, and many tinkerers have tried to interface such hardware with varying levels of success. [Ray] is one such individual, and was pleasantly surprised when working on a recent project.

Unlike more old-school models, the model [Ray] found himself working on was a modern unit with a significant number of sensors, a WiFi interface, and even a color screen. Reading the manual, [Ray] noted the device used the IP 192.168.4.1, which is commonly used by the ESP8266 when running in AP mode. The hunch proved to be correct, and opening the device revealed an ESP-WROOM-2 running the show.

Now working with familiar parts, it was simple to hook up to the onboard serial port to scope for data. To [Ray]’s delight, the device was outputting all the weather data out over the connection, and in plaintext to boot. The station also featured the ability to connect to Weather Underground, and watching the debug messages during this process helped [Ray] to understand the format of the information.

It’s rare that manufacturers make it so easy, but debug ports can often be a treasure trove of information to the budding hacker. We’ve seen others cracked before, too.