The Danish Internet Of Hot Tubs

Every hacker camp has its own flavor, and BornHack 2019 in the Danish countryside gave us the opportunity to sample some hacker relaxation, Scandinavian style. Among the attractions was a wood-fired hot tub of gargantuan proportions, in which the tired attendee could rejuvenate themselves at 40 Celcius in the middle of the forest. A wood-fired hot tub is not the easiest of appliances to control, so to tame it [richard42graham] and a group of Danish hackerspace friends took it upon themselves to give it an internet-connected temperature sensor.

The starting point was a TMP112 temperature sensor and an ESP8266 module, which initially exposed the temperature reading via a web interface, but then collapsed under too much load. The solution was to make the raw data available via MQTT, and from that create a web interface for the event bar, Twitter and IRC bots. There was even an interface to display hot tub temperature on the ubiquitous OHMlights dotted around the camp.

It’s more normal to control a hot tub via an electric heater, but since the wood fire on this one has to be tended by a camp volunteer it made sense to use the IRC system as an alert. It will be back at BornHack 2020, so we’ll have to do our job here at Hackaday and spend a long time lounging in the hot tub in the name of journalistic research to see how well it works.

Hacked Hoverboards Become Potent RC Tank

Hoverboards were the darling, or perhaps the scourge, of the last few years, Banned by vigilant airlines, they’re a great way to break an ankle or set your house on fire. However, they’re also a treasure trove of valuable parts for hacking, as [Aaron] ably demonstrates with his RC tank build.

[Aaron’s] build utilizes not only the hoverboard’s torquey hub motors but also the original control hardware, too. This is a cinch to repurpose, thanks to the custom firmware for the original controller developed by [Lucy Fauth], whose work we have featured before.

The hacked parts are crammed into a chassis built with aluminum extrusion, and the final result is a nimble and robust tank with one motor per wheel. This enables some exciting driving dynamics. Additionally, with all the torque available, [Aaron] is even able to ride the tank like an electric skateboard.

It’s a fun build that shows off the raw power available from the hoverboard hardware. We fully expect to see these parts remain popular in the hacking scene in the coming years. Video after the break.

Continue reading “Hacked Hoverboards Become Potent RC Tank”

Conductive Origami Lights Up Your Life

It’s taken mobile phone developers years to develop electric circuits and displays that can fold. Finally he first few have come to market — with mixed reviews and questionable utility at best. For all that R&D, there are a lot of other cases where folding circuitry might have been more useful than it seems these handsets have been. One of those is conductive origami, which in this case allows for light fixtures that turn themselves on as they are unfolded.

This conductive origami is produced by [Yael Akirav] using a 3D printer to deposit the conductive material onto fabric. From there, the light fixture can be unfolded into its final position and turned on. This isn’t just a decorative curiosity though, the design of the folding material actually incorporates the ability to turn itself on as it is unfolded. One device brightens itself as it is slowly unfolded.

This is an interesting take on foldable circuits in general, especially with some of the functionality incorporated into the physical shape of the material. We’ve seen conductive elements embroidered into fabric before, but this takes it to a new level. Surely there are more applications for a device like this that we will see in the future as well.

Thanks to [t42] for the tip!

A Colorful Way To Play Chess On An ATmega328

We’ve all seen those chess computers that consist out of a physical playing field, and a built-in computer that would indicate where you should put its pieces while inputting the position of your pieces in some way. These systems are usually found in a dusty cardboard box in a back room’s closet, as playing like this is fairly cumbersome, and a lot depends on the built-in chess computer.

This take by [andrei.erdei] on this decades-old concept involves an ATmega328p-based Arduino Pro Mini board, a nice wooden frame, and 4 WS2812-based 65×65 mm RGB 8×8 LED matrices, as well as some TTP223 touch sensors that allow one to control the on-board cursor. This is the sole form of input: using the UP and RIGHT buttons to select the piece to move, confirm with OK, then move to the new position. The chess program will then calculate its next position and indicate it on the LED matrix.

Using physical chess pieces isn’t required either: each 4×4 grid uses a special pattern that indicates the piece that occupies it.  This makes it highly portable, but perhaps not as fun as using physical pieces. It also kills the sheer joy of building up that collection of enemy pieces when you’ve hit that winning streak. You can look at the embedded gameplay video after the break and judge for yourself.

Continue reading “A Colorful Way To Play Chess On An ATmega328”

This Rubik’s Cube Lamp Has Some Serious Retro Style

The reassembly is handled with super glue and acrylic to diffuse the light.

There’s an easy way to signal to your friends and family that you’re a successful, urbane member of society – by decorating your home with tasteful references to popular culture. A classy oil painting of Yoda or a framed Tarantino movie poster is a great way to go. Alternatively, consider building yourself a swanky Rubik’s Cube lamp.

The build starts by disassembling the cube, as if you were going to cheat and reassemble it in the correct order. Instead, the cube is then gutted to make room for electronics. Inside, a ping pong ball covered in LEDs is installed, along with lithium batteries and a power board cribbed from a USB power bank. The whole assembly is laced back together with glue and frosted acrylic which acts as an retro-styled grid-like diffuser. The power button is even sneakily hidden in one of the squares!

It’s a sweet retro build that would make an excellent addition to any hip lounge room. We’re a big fan of self-contained glowing cubes here at Hackaday – we’ve covered nuclear powered and infinity designs before. Video after the break.

Continue reading “This Rubik’s Cube Lamp Has Some Serious Retro Style”

An Entire PDP-11 On Your Bench

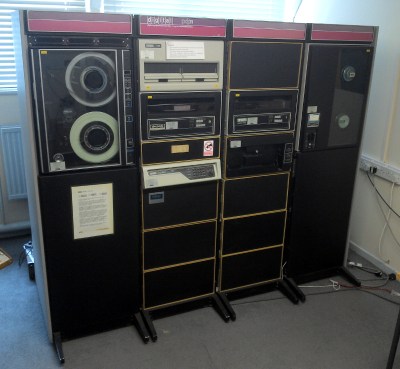
A PDP-11 at The National Museum Of Computing, Bletchley, UK.

The DEC PDP series of minicomputers occupy a special place in computing history for us, because as the workhorses of commercial computing from the 1960s through to some time in the 1990s they provided the bedrock upon which so many of the computing technologies we take for granted today were built. If we think of any PDP, the chances are we’ll be imagining fridge-sized units with panels of blinkenlights that have become iconic in their own right. But that wasn’t the sum of PDP hardware, for at the end of the series of machines there were produced PDP-11s containing what had previously needed those fridge-sized units on a single chip-sized module. [Peter Schranz] had one of these modules, a DCJ11 that he’d salvaged in the 1990s, and he set to with it in making a modern desktop version of a PDP-11.

The PDP-11/hack is a PDP-11 as a set of daughter cards on a lightly modified Q-bus backplane. The DCJ11 and its memory sit on one, an emulated disc controller on another, and finally a multifunction board brings together clock and serial functions. Where the original would have had acres of 74 logic the PDP-11/hack uses more modern CPLDs and microcontrollers to provide glue logic and to emulate now-obsolete components. Given a serial terminal it will boot and run PDP operating systems and software, though it lacks a set of blinkenlights to display its status.

This isn’t the first PDP-11 using this chip we’ve shown you.

LED Triangle Looks Cool; Someone Tell Alt-J

For the average person, decorating at home is as simple as a few choice picks from the IKEA catalogue. Makers are a different breed, though – preferring something customized and glowing. This LED triangle is a particularly great example of the form, and the latest benchmark for excellence to come out of [scanlime’s] workshop.

Hailing from the recent past of 2014, it’s a design that is well-suited to the average makerspace. Built out of layers of lasercut chipboard and acrylic, it creates 16 seperate pockets for LEDs with very little bleed in between. A black bezel is fitted to complete the effect, along with frosted white acrylic diffusers for each triangle element.

The build uses WS2812B LEDs, controlled by [scanlime’s] Fadecandy controller. Fadecandy is a combination of hardware and software designed specifically for LED art projects, providing high-quality control of dithering and other effects to help make glowables prettier. It tends to turn up wherever head-turning visualizations are needed. In this application, it does a great job, with the pseudo-random flickering of the pixels being almost hypnotizing in nature.

It’s a great cyberpunk art piece, and we’d love to have one on our coffee table at home. If you’re sick of LED cubes, triangle-based builds may reignite your passion. Video after the break.

Continue reading “LED Triangle Looks Cool; Someone Tell Alt-J”